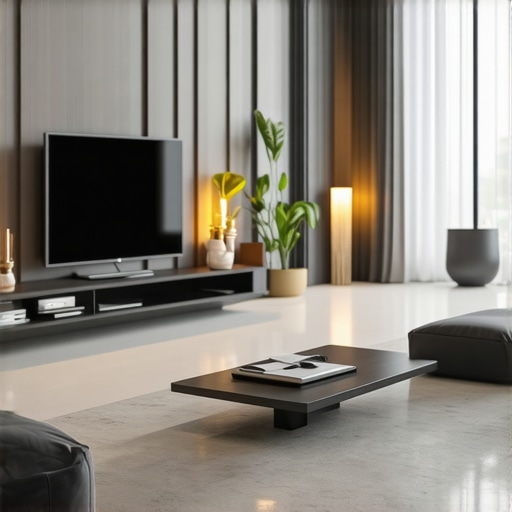
It was a typical Sunday afternoon when I finally snapped. My gaming console had been overheating for weeks, during those marathon sessions I cherish so much. I’d built a sleek, custom vanity to hide my device, harmonious with my room’s aesthetic. But the silence was shattered by a strange whirring noise—my console was struggling to cool itself. That moment was a lightbulb moment for me: even the most stylish built-ins can sabotage device performance if not properly ventilated.
Why Proper Ventilation in Built-ins is More Crucial Than Ever
In 2026, with technology advancing rapidly, gaming consoles are more powerful—and warmer—than ever. Hidden away in custom cabinetry, they risk overheating, which can reduce lifespan and cause unexpected shutdowns. When I first designed my storage solution, I overlooked airflow—big mistake. A close call with overheating made me realize that aesthetics should never come at the expense of function. According to the Consumer Technology Association, improper ventilation is a leading cause of electronic device failure at home, costing homeowners millions in repairs annually. So, yes, this is a common yet fixable issue.
Is This Fixing Handy or Overkill for Your Setup?
My early mistake was installing a built-in without considering the airflow needed. It was tempting to prioritize style over practicality, and I paid the price. Don’t let that happen to you. Proper cooling isn’t just about adding a small fan; it involves strategic design choices—like vent placement, material selection, and even integrated cooling systems—that can dramatically improve your device’s performance and longevity. Curious about how to implement these fixes seamlessly? You’re in the right place. Let’s dive into the top five cooling fixes that will keep your consoles running smoothly without sacrificing style.
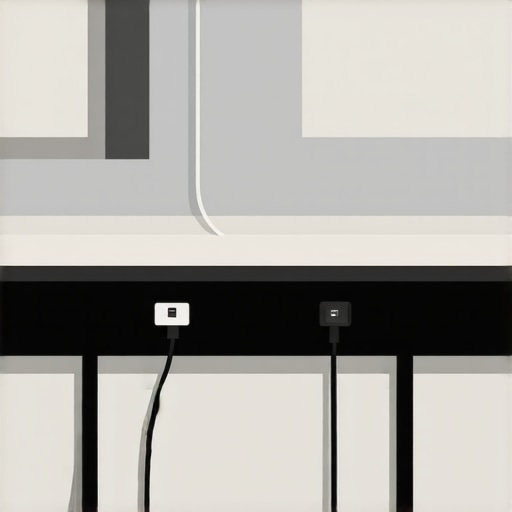
Install Strategic Vents for Optimal Airflow
During my first attempt, I drilled discreet vents on the sides of the vanity, mimicking the ventilation holes seen in high-performance PC cases. This simple step created a pathway for hot air to escape, significantly reducing heat buildup. When doing this, ensure the vents are positioned near the console’s hottest spots and use mesh covers to prevent dust ingress. For a cleaner look, consider matching vent covers to your vanity’s finish or blending them with decorative panels. If you’re unsure about vent placement, check the manufacturer’s heat dissipation zones or consult a professional. For inspiration, see modern vanity designs that incorporate hidden ventilation.
Choose Materials that Encourage Heat Dissipation
In my renovation, I opted for a combination of **metal mesh panels** and **perforated wood frames**, which allowed air to flow freely beneath the console. Think of it like a car’s grille: enabling airflow keeps the engine cool. Materials like open-grid metal or perforated panels in the cabinetry effectively vent hot air while maintaining style. Avoid solid hardwood panels in areas housing electronics unless paired with active cooling, as they trap heat. Using materials with natural heat conductivity, such as aluminum inserts or mesh surfaces, helps disperse heat faster. When selecting finishes, consider matte or satin textures that reflect less heat than glossy ones. For further design ideas, review creative built-ins that combine form and function.
Integrate Active Cooling Solutions Discreetly
As my setup grew more layered, I added a small, quiet fan mounted behind a perforated panel. The fan is controlled via a smart switch, turning on during gaming marathons. Installing such a system takes careful planning: place the fan where it can draw in cool air or blow out hot air without creating noise pollution. Use vibration-dampening mounts to prevent undue vibrations or rattling. During installation, I used adhesive mounts and concealed wiring behind trim pieces for a seamless look. Similar to how a computer case manages airflow with case fans, this setup helps maintain lower temperatures without sacrificing aesthetics. For detailed installation tips, check vanity installation hacks that simplify electronics integration.
Close Gaps and Seal Hidden Spaces
In my project, I identified tiny gaps around the vent openings that could allow dust and warm air to bypass the cooling system. Sealing these gaps with weatherstripping or foam tape ensures maximum efficiency. Use scribe tools to fit sealant precisely around irregular edges, similar to fitting a custom puzzle piece. It’s essential to avoid creating any airtight seals that prevent airflow; instead, aim for controlled ventilation. Testing the setup with a thermal camera revealed hotspots without proper sealing, leading to quick corrections. This hands-on approach resembles sealing leaks in a house’s insulation—small adjustments can yield big temperature drops. For more advanced techniques, explore charging station fixes that demonstrate sealing and insulation strategies in built-ins.
Position Electronics Correctly for Heat Escape
Finally, I rearranged my gaming console to sit on a stand slightly elevated from the bottom shelf, allowing air to circulate underneath. This simple move prevents heat from pooling around the device’s vents, much like elevating a radiator improves heat dispersion in a room. Use risers or stands made of heat-resistant materials, ensuring they don’t tip or wobble. Keep cables organized to prevent obstruction of airflow pathways. When designing your built-in, think of it as creating a natural flow path for heat, guiding hot air away and drawing in cooler air. For more advanced tips, visit storage solutions that incorporate proper placement strategies. This final refinement keeps my console cool during extended gaming sessions and prolongs its lifespan.Many homeowners assume that selecting the right vanity or built-in storage is a straightforward task, but in my experience, this belief overlooks critical nuances that can affect both aesthetics and functionality. One prevalent myth is that more space automatically equates to better storage. In reality, overestimating storage capacity without considering access and usability often leads to clutter and frustration. For instance, designing deep, inaccessible shelves might seem efficient initially, but they quickly become underused voids. Experts emphasize that thoughtful partitioning and strategic placement optimize usability, as highlighted in our design tips.
Another mistake is neglecting the importance of ventilation in built-in cabinets, especially when they house electronics or humid appliances. Many assume that aesthetics take precedence, but failure to incorporate proper airflow can result in mold, warping, or overheating. Advanced builders recommend integrating discreet vents and using moisture-resistant materials—details often overlooked by DIY enthusiasts. A common trap is sealing all gaps without considering the need for controlled ventilation, which can accelerate damage. For comprehensive solutions, visit our storage innovations.
Perhaps most surprisingly, the installation process itself often harbors hidden pitfalls. The belief that any standard mounting method suffices leads many to overlook structural considerations, such as wall strength and mounting hardware adequacy. Heavy built-ins require reinforced anchors and special brackets—using ordinary screws can cause costly damages or safety hazards. When installing floating vanities or tall cabinets, aligning with structural studs and avoiding brittle drywall are crucial steps. For an in-depth guide, check out our step-by-step installation manual.
Finally, one little-known nuance involves harmonizing style with durability. Designers often focus excessively on looks, choosing delicate finishes that degrade quickly. Instead, selecting finishes with wear-resistant coatings or high-quality hardware enhances longevity—a factor that disappears from casual projects. Integrating these advanced considerations ensures your investment endures over time.
Have you ever fallen into this trap? Let me know in the comments! Being aware of these subtleties transforms a simple DIY into a lasting upgrade, making your space both beautiful and functional.Maintaining your custom vanities and built-in storage solutions requires precision and the right toolkit. Over the years, I’ve honed my process using specific tools that ensure long-term performance and aesthetic appeal. A high-quality cordless drill, like the Makita XFD10R, has become my go-to, thanks to its reliability and adjustable torque settings, minimizing damage during installation or adjustments. For detailed measurements, I reserve my Bosch GLM50C laser distance measurer; it offers pinpoint accuracy over longer distances, ensuring components align perfectly—crucial for seamless built-ins and avoiding structural issues down the line. When it comes to cleaning and maintenance, I recommend using microfibre cloths paired with compressed air cans, which gently remove dust from vents, grooves, and hard-to-reach areas, preventing buildup that could impair ventilation or hardware performance.
For sealing gaps or smoothing surfaces, my choice is a high-quality silicone sealant like GE Supreme, which resists cracking and maintains flexibility over years of thermal movement. Applying with a stainless steel caulking gun ensures even bead distribution and minimizes waste. I also utilize a multi-tool with various attachments, especially oscillating blades, for customizing or trimming panels, which is invaluable when tweaking built-in components to fit irregular wall contours or tight spaces.
Regular inspection of fasteners and joints is vital. I employ a torque wrench to ensure screws and brackets are tight but not overly tightened—preserving material integrity. Additionally, integrating smart sensors and apps, like the Google Nest Temperature Sensor paired with compatible HVAC systems, allows me to monitor ambient conditions around electronics and cabinetry, alerting me to potential overheating risks before damage occurs.
Looking ahead, I predict that smart maintenance tools will become more embedded in vanities and built-in systems, enabling remote diagnostics and proactive repairs. Incorporating IoT-enabled sensors for humidity, temperature, and airflow will allow homeowners to maintain their setups effortlessly, extending longevity and performance.
**How do I keep my built-ins functioning smoothly over time?** The key is routine inspections, using these precise tools to identify early signs of issues—be it structural shifts, dust buildup, or ventilation blockages—and addressing them promptly. I suggest trying the oscillating multi-tool for trimming or adjusting panels; it’s a game-changer for custom fit and ease of maintenance. Don’t forget to consult experts if you notice persistent problems—sometimes, a small tweak can significantly prolong your setup’s lifespan. For a deeper dive into installation and ongoing care, visit our installation guide.
What I Wish I Knew About Vanity Ventilation Early On
One of my biggest lightbulb moments was realizing that beautiful built-ins are only as good as their airflow. Overlooking this detail almost cost me my gaming console’s lifespan.
It’s tempting to prioritize aesthetics, but effective ventilation is the secret weapon for longevity and performance of your vanities and storage solutions. Don’t fall into the trap of thinking style overrides function—your devices will thank you for the smarter design choices.
Navigate the Hidden Gems in My Toolkit for Built-In Success
My trusted tools have been game-changers in making built-ins both beautiful and durable. The Bosch GLM50C laser distance measurer ensures every panel fits perfectly—crucial when customizing tight spaces or uneven walls.
For sealing and finishing, I swear by high-quality silicone like GE Supreme, which maintains flexibility and prevents cracks over time. These tools and materials have elevated my projects from average to expert-grade.
Embrace the Power of Doing and Rethinking
Designing built-in vanities isn’t just about following steps; it’s about refining your approach through hands-on experience. Each tweak, like sealing gaps or repositioning vents, deepens understanding and results in a seamless blend of form and function.
So, get your hands dirty, embrace mistakes as lessons, and remember that every detail—from airflow to material choice—counts in creating vanities that last and impress.
Have you ever overlooked a vital detail that led to a last-minute fix? Share your story below and let’s learn from each other’s design adventures!
Related Posts

Revamp Your Home with Expert Built-ins & Storage Solutions in 2025
It was a typical Sunday afternoon when I realized my…
5 Charging Station Fixes for 2026 Living Room Built-ins
I remember the moment clearly—standing in my living room, surrounded…
4 Tech-Ready Hacks for Living Room Built-ins in 2026
Have you ever stood in your living room, surrounded by…