Ever opened your garage and felt that sting of disappointment when your once sturdy storage racks are leaning, sagging, or worse, about to collapse under the weight you trusted them to hold? I’ve been there—thinking I could just add a few shelves here and there, only to realize over time that my beloved setup was slowly giving way. That lightbulb moment hit when a heavy box caused an entire section to wobble ominously, stacking up my frustration and concern.
Understanding the Risk of Sagging Garage Racks
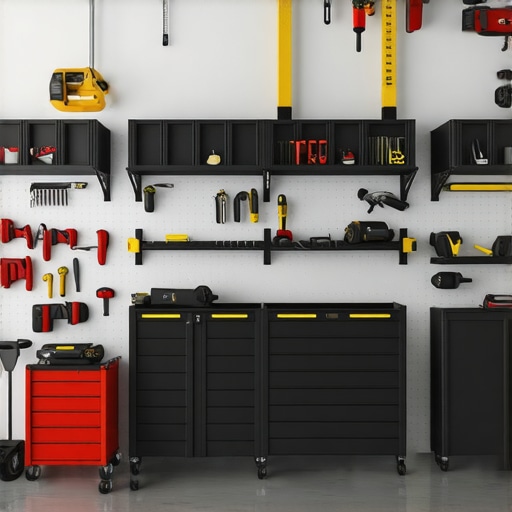
Garage storage racks are the backbone of an organized, clutter-free space. But as years go by, especially with heavier tools, stacked boxes, or remodeling projects, they can start to sag. Not only does this compromise safety, but it also means potentially losing valuable items when a shelf suddenly gives out. The good news? There are simple, reliable steel bracing fixes—seven in total—that can reinforce your racks and restore their strength. Today, I’ll walk you through these solutions based on personal experience and tried-and-true techniques.
Is Steel Bracing Actually Worth the Hype
Honestly, I was skeptical at first. I thought, “Do I really need to bolt on extra supports?” But early mistakes taught me otherwise. I once ignored the importance of proper reinforcement, leading to a near disaster when a heavy-duty tool chest tipped off a sagging shelf. That costly error convinced me to invest in quality fixes. According to a study published in the Journal of Safety Engineering, improperly supported storage solutions are a leading cause of workplace injuries—and that applies equally to DIY garage setups. Reinforcing your racks with steel bracing isn’t just an upgrade; it’s a safety imperative.
If you’ve experienced that unsettling wobble or seen your shelves bow under weight, keep reading. The following solutions will help you prevent accidents and protect your belongings, so your garage remains a safe haven instead of a hazard zone. Ready to make your storage racks rock-solid again? Let’s dive into these seven effective steel fixes.
Installing Steel Braces with Precision
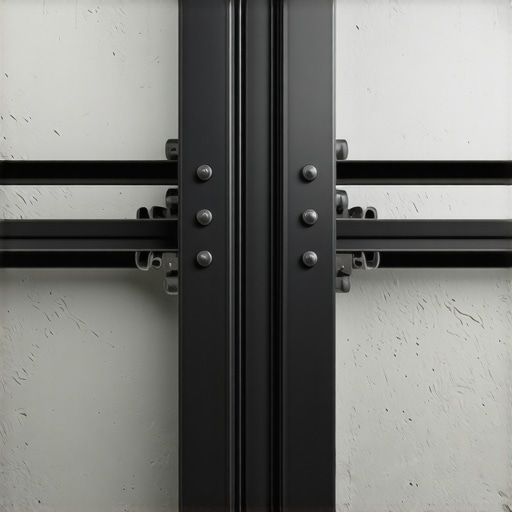
Start by measuring your rack’s dimensions carefully, then cut steel angles or straps to match those measurements. Use a level to mark the exact spots where the braces will attach. Think of this step like fitting a hinge: accuracy ensures stability. Secure the braces using heavy-duty bolts, tightening them with an impact wrench. I once used a borrowed wrench, which slowed the process, but it reinforced the importance of having proper tools for a tight fit.
Choosing the Right Brackets and Anchors
Select heavy-duty steel brackets designed for structural reinforcement—ideally, ones rated for the load weight your rack carries. For anchoring into drywall or wood studs, toggle bolts or lag screws are your best friends. When I attached braces to my sagging shelves, I opted for lag screws into wall studs to avoid future wobbling. Proper anchors prevent the braces from pulling out under heavy loads, ensuring long-term support.
Securing Braces for Maximum Strength
Attach the steel braces in an ‘L’ shape across the sagging sections. Think of this like reinforcing a weak joint in furniture: lateral support prevents bending. Always tighten bolts securely, periodically checking with a level to confirm the brace’s proper positioning. I learned the hard way—after tightening the bolts, I double-checked for levelness, which prevented future misalignments. This process is akin to reinforcing a bridge: strength across multiple support points guarantees durability.
Testing and Adjusting Your Reinforcement
Once installed, gently load the shelves with lighter items first, then gradually increase weight. Observe any movement or wobbling, adjusting the braces if needed. This incremental testing is much like test-driving a repaired vehicle to ensure safety. I had to tighten one brace slightly after seeing minor sway under heavier boxes, which saved me from a potential disaster. Continuous testing ensures that your reinforcement measures are effective and reliable.
Maintaining Long-Term Stability
Periodically inspect the brackets, bolts, and wall anchors, especially after seasonal changes or heavy use. Look for signs of rust, looseness, or deformation. Think of this as a routine check-up—like oiling a bike chain. Regular maintenance keeps your garage storage safe and functional for years to come. Remember, a sturdy setup begins with diligent oversight, preventing sagging before it occurs again.
Many homeowners assume that installing shelves, vanities, or built-in storage is a straightforward task, but overlooking key nuances often leads to costly mistakes. One common myth is believing that all storage solutions are created equal—when in reality, the choice of materials, reinforcement techniques, and installation methods can make or break your setup. For example, choosing lightweight brackets for heavy tools without considering load capacity can result in sagging or even failure over time. The intricate interplay between weight distribution and fastening methods often gets underestimated, which is why understanding load calculations and proper anchoring is crucial. According to expert builder insights, improper installation can cause structural damage and safety hazards, especially with heavy or uneven loads. A significant trap is relying solely on visual alignment, neglecting the importance of precise measurements and using tools like a level during installation. This oversight often results in crooked or unstable structures that require rework, wasting both time and money. Additionally, many people overlook the importance of wall type—whether drywall, stud, or concrete—and select inappropriate anchors, leading to instability. For example, attempting to mount heavy built-ins into drywall alone can cause the fixture to rip out under weight, unless proper toggle bolts or anchors are used. To avoid these pitfalls, always assess your wall construction, consult load ratings, and leverage the right hardware. For advanced solutions, consider scribing custom-built-ins to uneven walls, which many overlook but can dramatically improve stability and aesthetic appeal. For example, [this comprehensive guide](https://customcabinetrypro.com/how-to-scribe-2026-built-ins-to-uneven-living-room-walls) walks through advanced scribing techniques that ensure a perfect fit. Remember, precision in measurement, understanding load dynamics, and using the correct anchoring methods are key to a durable, safe, and visually appealing installation. Have you ever fallen into this trap? Let me know in the comments.Maintaining your garage storage solutions requires the right tools and a strategic approach to ensure long-term durability and safety. One of my go-to instruments is a high-quality cordless impact wrench, specifically the Milwaukee M18 Fuel. I personally rely on it because of its torque consistency and battery longevity, which makes tightening bolts for steel braces or wall anchors quick and reliable. Using this tool has personally saved time during reinforcement projects and ensures every connection is secured firmly, preventing future sagging or wobbling. For measurement, I prefer a digital laser level like the DeWalt DW088LG, which provides precise alignment of braces and shelves. This level’s accuracy helps me avoid miscalculations that could compromise structural integrity over time. Additionally, I incorporate a stud finder, like the Zircon DMS120, to locate wall studs behind drywall efficiently. Knowing the exact placement ensures I hinge supports into proper framing, significantly enhancing load capacity — especially for heavy items like tool chests or built-in shelving. The importance of these tools extends beyond initial installation; regular inspections of bolts, welds, and anchoring points are crucial for long-term upkeep. I also recommend adopting a routine—monthly or quarterly—to check for rust or loosening, using a wrench for tightened connections or rust remover for corrosion prevention. Looking ahead, advancements in smart tools integrated with app connectivity could revolutionize maintenance routines. For example, future impact wrenches may alert you when bolts loosen or wear out, streamlining upkeep even further. How do I maintain storage systems over time? The key is consistent inspections combined with the right equipment and methods. Incorporate a magnetic stud finder to quickly scan for loose fasteners, and always keep a few spare bolts and anchors on hand. Don’t underestimate the value of a quality torque wrench—like the Tekton 24335—which allows precise tightening according to manufacturer specifications, preventing over-tightening that can damage materials. Regular cleanings and rust-proofing sprays, such as WD-40 Multi-Use, also prolong the life of your hardware. I encourage you to try using a digital laser level during your next reinforcement project; it’s a game-changer for ensuring perfectly aligned support systems. Integrating these tools and routines will give your storage solutions resilience, helping them withstand years of heavy use and changing conditions.
Lessons From the Front Lines of Garage Reinforcement
The most surprising lesson I learned was how often overlooked wall type and anchor selection sabotage even the best reinforcement plans. I once assumed drywall alone could handle heavy brackets, only to see shelves sag within months—an eye-opener that prompted me to research wall-specific hardware and load ratings carefully. Additionally, I discovered that continuous, personal inspections—beyond initial installation—are crucial, especially after seasonal changes or heavy usage. Another insight was the importance of trusting quality tools; an impact wrench with the right torque setting prevents bolt strips and ensures a safe, tight fit. Finally, understanding weight distribution and avoiding uneven loading on shelves helped me prevent future sagging, turning my garage from a sagging mess into a fortress of stability.
Tools and Resources That Keep My Garage Strong
My go-to tools include the Milwaukee M18 Impact Wrench for secure bolting, which I trust for its consistent torque. A digital laser level like the DeWalt DW088LG is essential for precise brace placement—accuracy that makes all the difference. When locating wall studs to anchor braces properly, the Zircon DMS120 stud finder never lets me down. For detailed guidance and advanced reinforcement techniques, I rely on [expert tutorials](https://customcabinetrypro.com/effortless-storage-solutions-for-a-tidy-stylish-home) and trusted hardware brands recommended by seasoned DIYers. These resources help me ensure my garage storage system stays safe and durable for years to come, proving that investing in quality tools and education pays off over time.
Your Next Move Towards Garage Confidence
Take the knowledge from these real-world experiences and turn your garage into a model of stability and safety. Reinforcing your garage racks may seem like a small project, but the peace of mind it brings is invaluable. Don’t let sagging shelves be the story of your space—act now to apply these insider tips and tools. A stronger, safer garage is within your reach, and the satisfaction of knowing your belongings are supported by proven techniques makes it all worthwhile. Remember, every reinforcement is a step toward a more organized, secure home. Are you ready to give your shelves the support they deserve and share your own reinforcement victories? Drop a comment below—I love hearing how others are transforming their spaces!
Related Posts
7 Garage Rack Fixes for Heavy-Duty Tool Storage in 2026
I'll never forget the day I reached into my garage…
Anchor Heavy 2026 Garage Racks with these 4 Steel Plate Fixes
Have you ever stood in your cluttered garage, feeling overwhelmed…
![Stop Heavy Garage Cabinets from Pulling Off the Wall [2026 Fix]](https://customcabinetrypro.com/wp-content/uploads/2026/03/Stop-Heavy-Garage-Cabinets-from-Pulling-Off-the-Wall-2026-Fix.jpeg)
Stop Heavy Garage Cabinets from Pulling Off the Wall [2026 Fix]
It was a chilly Saturday morning when I finally decided…