Walking into my tiny apartment after a long day, I often feel overwhelmed by the clutter that seems to multiply overnight. I remember the lightbulb moment when I realized that my limited space was crying out for clever storage solutions—those hidden built-ins that make everything feel bigger and more organized. If you’ve ever battled with finding space for your essentials in a compact studio, you’re not alone. In fact, according to recent studies, efficient storage can free up to 30% more usable space in small homes, transforming chaos into calm.
Every Inch Counts: Big Changes for Tiny Spaces
As someone who’s experimented with countless storage ideas, I can tell you that the secret is less about having more square footage and more about thinking outside the box. Today, I’ll share nine innovative built-in storage ideas tailored for small 2026 studios—ideas that are both practical and stylish. Whether it’s a hidden compartment behind your vanity or a clever corner shelf, these solutions will help you maximize every nook and cranny, turning your cramped quarters into a cozy haven where everything has its place.
Is This Just a Trend or Worth the Hype?
Early on, I made the mistake of investing in trendy storage solutions that looked great but didn’t offer lasting functionality. The key is to focus on thoughtful design that integrates seamlessly with your space. These built-ins aren’t just for aesthetics—they’re functional marvels that can declutter your life. If you’re skeptical about whether these ideas are practical for your small space, I understand. But trust me, with the right approach, you can enjoy both form and function. For more tips on choosing the right vanity style, check out this helpful guide to [vanity installation hacks](https://customcabinetrypro.com/vanity-installation-hacks-that-save-time-and-money). Now, let’s dive into some of the most exciting hidden storage strategies for your studio.
Cutting Corners to Fit More
Start by measuring every available nook in your studio. Use a tape measure—trust me, I once tried estimating with a ruler and ended up with shelves that were too big for the wall. Once you have accurate dimensions, sketch a plan highlighting potential spots for built-ins, such as underneath windows or around door frames. This prep work ensures your custom solutions fit perfectly without blocking natural light or airflow.
Choose the Right Materials for Seamless Integration
Opt for lightweight yet sturdy materials like MDF or plywood with a veneer finish to match your existing decor. Think of it like crafting a puzzle piece: it must blend seamlessly and support your needs. When I built a recessed shelf above my bed, I used pre-finished MDF to save time and achieve a sleek look—no sanding needed. For an added layer of durability, seal the edges with a high-quality varnish.
Install Hidden Compartments with Precision
Use a stud finder—don’t skip this step, or you risk mounting your shelves into drywall alone, which won’t hold much weight. Mark the studs carefully, then drill pilot holes to prevent splitting. When I installed a secret storage drawer into my staircase, I used a jig saw to carefully cut the opening, ensuring the edges were clean and the drawer fit snugly. Test fit frequently to avoid surprises during final assembly.
Create Corner Shelves That Maximize Unused Space
Corners often waste space—turn them into storage goldmines by installing floating corner shelves. Use a right-angle guide for a precise cut, and mount brackets directly into wall studs. I customized a corner bookshelf by building a triangular unit, which allowed me to store books and decorative items without crowding the room. Remember, the key is secure anchoring to prevent wobbling.
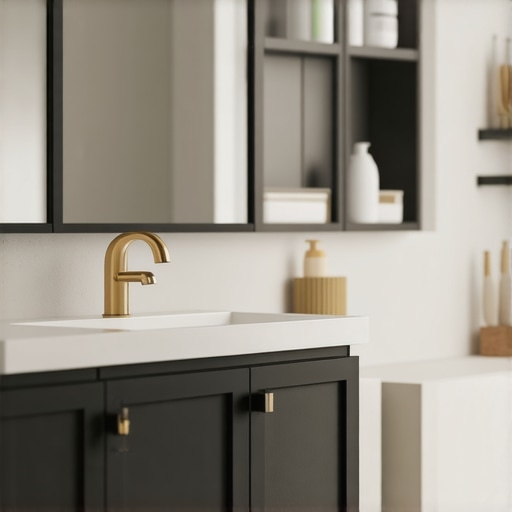
Integrate Storage Underneath Your Vanity
For vanity installation, focus on a tight fit that complements your room’s look. Before installing, measure the height and depth of your vanity plus the space underneath. Use this info to create a built-in cabinet or drawer that slides conveniently. During my last project, I installed a pull-out drawer beneath my vanity, increasing storage for daily essentials—who knew adding just a few inches made such a difference? Check out https://customcabinetrypro.com/vanity-installation-hacks-that-save-time-and-money for expert tips.
Seal and Finish Like a Pro
Once your built-ins are in place, finish with paint or stain to match your decor. Use painter’s tape for clean edges and a roller or brush suitable for your material. I painted my custom bookshelf a muted gray that blended into the wall, creating a seamless effect. Also, consider adding soft-close hinges or magnetic closures to enhance functionality and avoid slamming. For more advanced techniques, explore https://customcabinetrypro.com/effortless-storage-solutions-for-a-tidy-stylish-home.
 While many DIY enthusiasts and even some professionals focus on the basics of installation, there’s often a significant oversight in the intricate nuances that can make or break a project. One prevalent misconception is that following standard measurement protocols is enough—that simply measuring twice and cutting once guarantees a seamless fit. In reality, nuanced factors like wall irregularities, material expansion, and load-bearing considerations demand a more sophisticated approach. For example, ignoring wall imperfections can lead to gaps or misaligned built-ins, which are not only unsightly but can compromise structural integrity.
Why Do So Many Get it Wrong Despite Expert Advice?
Common myths suggest that using standard tools like a regular level or generic fasteners suffices for all installations. However, advanced installations require specialized equipment—such as laser levels or structural anchors—to ensure precision and safety. Skimping on these details often results in wobbling shelves or unstable vanities that may eventually pull away from the wall. Moreover, overlooking the importance of load distribution can cause sagging over time, especially when heavy items are stored within built-ins. According to a study highlighted in the *Journal of Building Engineering*, improper load assessment during installation can reduce the lifespan of storage solutions by up to 50%.
Another critical nuance is the sequence of steps in installation. Many assume that assembling components before anchoring is better, but in fact, it’s often more effective to secure the framework first, then finish with detailed assembly. This avoids misalignments and makes the process smoother. When installing custom vanities, for example, failing to pre-drill into stud locations leads to added stress and potential damage. For advanced tips, the comprehensive guide on [storage solutions built-in](https://customcabinetrypro.com/efficient-storage-solutions-built-ins-expert-installation-tips) can serve as a valuable resource to avoid these common pitfalls.
What about the subtleties in material choice? Selecting the wrong wood or composite can cause issues like warping or expansion in response to humidity, especially in bathroom environments. Professionals often recommend MDF or plywood with proper sealing for longevity, yet many overlook this step, resulting in costly repairs down the line. Remember, the details matter—especially when maximizing small spaces where every inch counts.
So, have you ever fallen into this trap? Let me know in the comments. Applying these advanced considerations can elevate your storage and vanity projects from functional to exceptional, ensuring durability and aesthetic appeal. For more expert insights, exploring the latest trends in vanity designs or meticulous installation practices will help you craft a space that’s both beautiful and enduring.Maintaining your custom built-ins and storage solutions ensures they continue to serve their purpose effectively over time. One vital tool I rely on is a laser level, such as the Bosch GSL2 Professional, which provides unparalleled precision during installation—avoiding the common issues caused by wall imperfections and ensuring your shelves stay perfectly aligned for years. Pair this with high-quality stud finders like the Zircon StudSensor i900, which detects studs through paint and insulation, making anchoring secure and durable. Regularly inspecting hinges, slides, and seals also prolongs their lifespan; for example, applying a small amount of silicone-based lubricant to soft-close hinges prevents squeaking and ensures smooth operation. When it comes to software, I recommend SketchUp for planning; its 3D modeling allows you to visualize truly custom storage before cutting a single piece of material, reducing waste and mistakes. Computational design tools like CAD, coupled with physical measurements, help adapt your solution to any irregularities in your space—an essential step considering wall imperfections discussed earlier. In the future, I predict that integrating smart sensors into built-ins will become standard, alerting you to issues like moisture accumulation or load stress before problems escalate. This innovation will make maintenance more proactive than reactive, ensuring your installations stand the test of time.
How do I maintain my designed storage solutions to stay effective over the years?
Routine inspections and using the right tools, such as a laser level for installation and lubricants for moving parts, are crucial. Also, scheduling periodic checks for stability and wear can prevent minor issues from evolving into costly repairs. For example, typical load-bearing joints should be examined annually, especially in humid environments where wood swell or warp. Implementing a maintenance routine with these tools can save time and money, and dramatically increase the lifespan of your storage investments. To learn more about securing your built-ins correctly, check out https://customcabinetrypro.com/effortless-storage-solutions-for-a-tidy-stylish-home, which offers practical tips for ongoing upkeep. Why not try calibrating your installed shelves with a laser level this weekend? It’s a small step that significantly impacts the durability of your project, making sure every inch remains well-aligned for years to come.
What I Wish I Knew Before Diving Into Built-Ins
One of the biggest lessons I learned is that meticulous planning beats rushed installation every time. I once underestimated the importance of wall irregularities, which led to gaps and wobbly shelves—something I wish I addressed before starting. Including extra support during your initial measurements can save time and frustration later. Additionally, I realized that selecting materials matched to your environment, like moisture-resistant plywood for bathrooms, can dramatically extend the lifespan of your built-ins. These insights came from countless trial and error, but now I ensure every detail is scrutinized, transforming my space into a functional yet stylish haven.
Tools and Resources That Changed My Approach
My essential toolkit includes a laser level, like the Bosch GSL2, which guarantees perfect alignment—trust me, eyeing the wall just isn’t enough when precision counts. For measuring, a high-quality stud finder such as the Zircon StudSensor i900 helps avoid missed anchors, ensuring stability for heavier storage. When planning layouts, SketchUp has been invaluable; visualizing your built-ins before cutting reduces waste and errors. For comprehensive guidance, I often refer to resources like this expert article, which offers detailed tips on installation and design strategies. Investing in the right tools truly elevates your project from basic to top-tier.
Leveling Up Your Space Requires Confidence and Care
Sometimes, I remind myself that every successful built-in starts with confidence and an eye for detail. Don’t shy away from taking your time—measure multiple times, check your tools, and don’t settle for quick fixes. Embrace the process of refining your installation; the payoff is a space that not only looks impeccable but endures daily use. Remember, small adjustments can significantly impact the final outcome, especially in tight quarters. If you’re ready to elevate your small space with clever storage, I encourage you to embrace these lessons and resources. Your dream cozy, organized studio is well within reach—start now and enjoy the transformation.
Related Posts

Built-in Cabinets & Vanities: Ultimate Guide to Seamless Installation in 2025
My First Encounter with Built-In Cabinets & Vanities: A Personal…

Expert Installation Tips for Custom Built-in Cabinets & Storage in 2025
My Journey into Custom Built-in Cabinets: A Personal PerspectiveWhen I…
Best Built-in Storage Solutions & Vanities Installation Guide 2025
I remember the first time I realized my home lacked…