

I will never forget the morning I walked into my basement and saw my brand-new media center looking like it had been sitting in a puddle. There hadn’t been a flood, and there were no leaks. But the bottom trim was swollen, the paint was peeling, and that unmistakable scent of mildew was starting to drift upward. It was a total heartbreaker. I had spent weeks on that project, only to realize I had made the ultimate rookie mistake: I let my beautiful cabinetry touch the raw concrete. Concrete is essentially a giant, slow-motion sponge that wicks moisture from the ground through a process called capillary action. If your cabinets are sitting directly on that slab, they are basically drinking water every single day. Today, I am showing you exactly how to implement the moisture-proof base tactic to save your furniture and your sanity. We are going to build a foundation that keeps your built-ins bone-dry, regardless of how humid your lower level gets.
My Basement Floor Was Eating My Woodwork
In my early DIY days, I honestly thought a thick coat of paint would protect the wood. I was wrong. I learned the hard way that the moisture barrier trick is a survival requirement for anything touching a basement floor. My specific mistake? I used standard MDF for the base plate. Within six months, the bottom two inches were trash. Even a seemingly dry basement has relative humidity levels that fluctuate wildly, and according to the Natural Resources Canada research, unmanaged basement moisture is a leading cause of indoor air quality issues and structural decay. This is why I switched to a dedicated sub-base system using rot-proof materials like PVC or pressure-treated lumber. Whether you are tackling built-in storage ideas or following an expert guide to vanity installation, the goal is to break the connection between the floor and the finish. Have you ever noticed that weird puffiness at the bottom of your cabinets? If so, you’ve already got a moisture problem.
Does a Plastic Base Really Stop the Rot?
I get the skepticism from my neighbors all the time. People ask if a simple layer of PVC or a rubberized membrane actually works. The answer is a resounding yes. By creating a thermal and moisture break, you ensure the delicate finish of your custom units never sees a drop of floor-wicked water. I often combine this with the leveling leg strategy to handle those wonky, sloped basement floors that usually make installation a nightmare. We are building for the long haul here, not just for the photo on the weekend reveal. Let’s look at why you should never trust a bare slab again.
Build a Ladder That Cannot Rot
The first step is moving away from traditional lumber entirely. For the base plate—the part that actually kisses the floor—I use 3/4-inch PVC trim boards ripped to the height of my intended toe kick. PVC is completely impervious to water and won’t rot, even if it sits in a puddle. I build what I call a “ladder frame” where the rails and rungs are all PVC. I remember a specific job where I ignored this and used pressure-treated 2x4s for a mudroom unit. Within a year, the “wet” chemicals in the wood had reacted with the cabinet screws, and the wood’s natural drying process caused a massive twist that actually cracked the grout on the side panels. It was a mess that required a full teardown. Now, I assemble my PVC ladder with stainless steel pocket screws. This frame becomes the sacrificial layer that protects your high-end built-in storage ideas from the inevitable basement dampness.
Seal the Deal with a Silicone Gasket
Even with a plastic base, you do not want water sitting underneath the frame for weeks. I apply a generous, continuous bead of 100% silicone sealant to the bottom edge of the PVC before I flip it over and set it on the concrete. This creates a waterproof gasket. It is a trick I also use when applying the moisture barrier trick for vanities against cold walls. By sealing the perimeter, you stop humid air from getting trapped under the cabinet, preventing that musty basement smell from ever developing. If you are working in a bathroom, the same logic applies to an expert guide to vanity installation—protect the bottom first, or the top finish will eventually fail from the ground up. 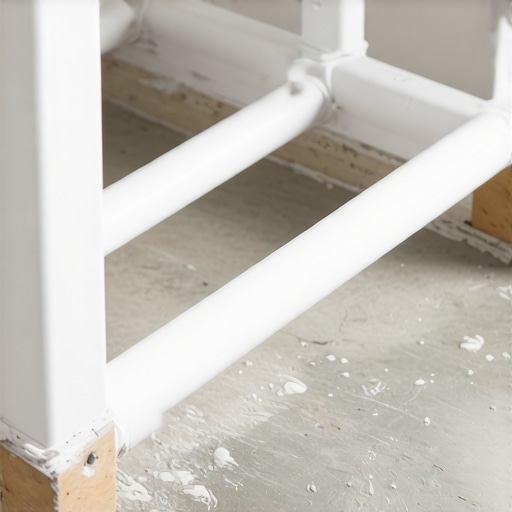
Flatten the World Before You Set the Box
Concrete slabs are notoriously uneven, often sloping toward a floor drain in ways you cannot see with the naked eye. If you just slap a cabinet on the floor, the doors will never hang straight, and the drawers will bind. I prefer using the leveling leg strategy for sloped garage floors, even for interior built-ins. These heavy-duty plastic legs allow you to dial in the height of each corner independently with a simple wrench. If you prefer a hidden look, you can use the hidden sub-base for leveling heavy media walls on carpet but adapt it for concrete by using plastic shims instead of wood. Once the base is level and rock-solid, I anchor it to the wall studs, not the floor, to avoid puncturing any potential vapor barriers or radiant heat lines. This keeps the unit stable and allows for the slight expansion and contraction that happens in every home during seasonal changes.
Master the Art of the Scribe
Sometimes the floor is so wavy that even a perfectly level base leaves huge, ugly gaps at the bottom. This is where you use the scribing trick for installing vanities against out-of-square-walls. You hold your base trim slightly above the floor, trace the contour of the concrete onto your material with a compass, and trim to the line with a jigsaw. This ensures your custom woodwork looks like it grew out of the floor, rather than being forced onto it. It takes an extra twenty minutes, but it is what differentiates a basic DIY project from a professional installation that adds real value to your home. When you combine this with step-by-step guide to vanity installation for beginners techniques, you create a foundation that survives both floods and fashion trends.
Most DIYers think that once the base is level, the hard work is over. I used to be one of them until I realized that a level base is only half the battle. There is a common belief in the woodworking community that a ‘tight fit’ is the gold standard of craftsmanship. I’m going to challenge that right now: if you wedge your cabinetry into an alcove with zero room to breathe, you are inviting disaster. Houses are not static blocks of concrete; they are living, breathing structures that expand and contract. According to the USDA Forest Products Laboratory’s Wood Handbook, wood can change dimensions significantly based on relative humidity, and if your built-in has no ‘relief,’ that pressure will eventually transfer to your joinery. This is why I always leave a 1/8-inch gap between the unit and the wall, which I later cover with a decorative scribe or molding. It prevents the unit from buckling when the summer humidity hits.
Why Does My Perfectly Level Cabinet Door Still Swing Open?
This is the question that keeps most installers up at night. You’ve used the most expensive levels, your base is perfect, yet the doors refuse to stay shut. The nuance here is the difference between ‘level’ (horizontal) and ‘plumb’ (vertical). Your floor might be level, but if your walls are leaning even a fraction of an inch—which they almost always are—your cabinet box will rack when you screw it to the studs. This slight twist in the box is the silent killer of hinges. I’ve seen people try to fix this with the three-hinge solution, but that’s often just a band-aid. The real fix is shimming behind the cabinet at the screw points to ensure the box remains perfectly square, regardless of how much the wall bows. If you skip this, you’ll find your cabinet doors warping in humid bathrooms because they are under constant internal tension.
The Trap of Over-Anchoring
Another mistake I see experts make is over-anchoring. We have a tendency to think ‘more screws equals more strength.’ However, if you are working on a massive project, like using the anti-flex move for long-span kitchen islands, pinning the unit too rigidly to both the floor and the wall can cause it to crack during seasonal shifts. The ‘Oops’ factor here is ignoring the natural settling of the house. I once anchored a floor-to-ceiling library unit so tightly that when the house settled that winter, the ceiling joists actually pressed down on the unit and cracked the crown molding. Now, I always use slotted mounting holes for my top anchors to allow for a few millimeters of vertical movement. This is especially critical when you are dealing with heavy loads, such as the steel reinforced toe kick for heavy appliance storage. You want the unit to be secure, not strangled. Have you ever noticed mystery cracks appearing in your trim work a year after an install? That’s likely the result of this rigid mounting trap. Have you ever fallen into this trap? Let me know in the comments.
High-Tech Solutions for Low-Tech Materials
When you are pushing the limits of storage, such as solving why your wardrobe rod is bowing, don’t just reach for thicker wood. Wood has its limits. For long spans, I’ve started integrating aluminum C-channels hidden inside the shelving. It’s an advanced move that keeps your built-in storage ideas looking sleek without the bulk of traditional supports. Mastering these hidden nuances is what separates a cabinet that lasts five years from one that lasts fifty.
To reach that fifty-year mark, you need more than just good wood; you need a precision toolkit that compensates for your home’s inevitable flaws. I’ve found that my Bosch GLL3-330CG 3-plane laser is the single most important investment I’ve made. Why? Because it projects a 360-degree green beam that shows me exactly where a wall bows before I even carry the cabinet into the room. This isn’t just about being fancy; it’s about the fact that if your expert guide to vanity installation relies on a 2-foot bubble level, you’re essentially guessing over a 6-foot span. When I’m setting up a massive media wall, I set the laser in the center of the room. If that beam hits 40 inches on the left and 40-1/8 inches on the right, I know I’ve got a floor slope I need to address before the first box is even positioned.
How do I keep my custom built-ins working like new for years?
Maintenance is where most homeowners drop the ball. Even the most effortless storage solutions for a tidy stylish home require a ‘tune-up’ every autumn and spring. I personally go through my house and check every hinge when the furnace first kicks on for the winter. This is when the air dries out and the wood shrinks. According to the Blum Technical Manual, their hardware is tested for 200,000 opening and closing cycles, but that rating assumes the cabinet box remains square. If you notice a door rubbing, don’t wait. Use the adjustment screws to realign it immediately. I also recommend a dry PTFE spray for your drawer tracks. Unlike standard oils, it doesn’t attract sawdust or pet hair, which is the primary reason your drawer slides bind and the simple realignment becomes necessary. Taking ten minutes to check for stop drawer dragging with this under-mount slide adjustment can save you from a complete hardware failure down the road. Furthermore, keep an eye on the finish near water sources. If you are implementing innovative storage solutions to transform your bathroom, check the caulking at the backsplash monthly. A tiny crack in the seal can let water seep into the end grain of your plywood, leading to swelling that no amount of sanding can fix.
The Digital Revolution in Custom Cabinetry
Looking ahead, I’m seeing a massive shift toward LiDAR technology in the DIY space. I’ve started using tablet-based apps that create a 3D mesh of a room, allowing for maximizing space innovative built-in solutions for small rooms with zero-clearance accuracy. We are moving toward a world where ‘scribing’ might become a digital process performed by a CNC machine before the wood even arrives at your house. This means even more innovative storage solutions to transform your bathroom will be possible in spaces we previously thought were too ‘crooked’ to build in. My advice? Don’t be afraid of the tech. Grab a digital angle finder and stop trusting that your 90-degree square is actually 90 degrees in a 100-year-old house. The Architectural Woodwork Institute (AWI) notes that even ‘premium’ grade work can fail if the site conditions vary by more than 20% relative humidity; managing your environment is as much a tool as your saw. Try this: tonight, check one drawer in your kitchen. If it isn’t gliding like silk, use the adjustment tabs on the underside of the slide. You’ll be amazed at how a 1mm shift makes it feel brand new again.
The Hardest Lesson I Learned About Basement Built-Ins
Building in a basement isn’t like building on the second floor; the rules of physics change when you’re near a slab. My lightbulb moment came when I realized that even a ‘dry’ basement is constantly exchanging moisture with the wood. If you use standard MDF for your base, you aren’t building a cabinet—you’re building a wick. By switching to a PVC ladder frame, you create a permanent barrier that ensures your built-in storage ideas won’t end up in a landfill in five years. Another hard-earned tip? Never skip the 1/8-inch relief gap. Without it, the summer humidity will cause the wood to expand and literally rip your beautiful joinery apart at the seams. It’s better to have a tiny gap covered by a scribe than a cracked face frame that requires a total rebuild.
My Go-To Kit for Rock-Solid Installations
I don’t leave my workshop without a few specific items that make or break a project. First, I always carry a Bosch GLL3-330CG laser. It’s the only way to truly map out how much a basement floor slopes over a long run. For sealing, I swear by 100% silicone; it’s the secret sauce for step-by-step guide to vanity installation for beginners because it creates that essential waterproof gasket. I also rely on the standards set by the Architectural Woodwork Institute (AWI). Their technical manuals provide the blueprint for how wood reacts to site conditions, which is invaluable when you’re maximizing space with innovative built-in solutions for small rooms. Finally, keep a set of plastic shims on hand—wooden shims will rot just as fast as your cabinets if they touch the concrete.
Stop Overthinking and Start Building Your Legacy
The transition from ‘DIYer’ to ‘Craftsman’ happens the moment you start building for the next generation, not just the next season. By implementing these moisture-proof base tactics, you are protecting your investment and your hard work from the silent threats of dampness and shifting foundations. Whether you are adding innovative storage solutions to transform your bathroom or a massive library in the basement, the foundation is everything. Go grab your level, find your high point, and build something that stays square, dry, and beautiful for decades to come. Your home deserves nothing less than a foundation built to last. Have you ever had a project ruined by basement moisture or a ‘sponge’ base that soaked up a leak? Let me know in the comments below!