

I still remember the smell. It was a cold February morning, and I finally decided to reorganize the pantry I’d built just six months prior against the north-facing wall of our kitchen. I reached for a bag of flour in the back corner and my hand hit something slick and cold. When I pulled the cabinet away from the wall, my heart sank. The entire back panel was covered in a fuzzy, blackish-green quilt of mold. I had spent weeks on those units, and in one winter, the lack of a simple vapor strategy had turned my hard work into a health hazard. I felt like a total amateur. It was a brutal lesson in physics: when warm house air meets a freezing exterior wall behind a solid wooden box, you don’t just get storage; you get a localized rainstorm.
The Cold Hard Truth About Exterior Wall Storage
I made the classic rookie mistake of assuming that because my walls were insulated, they were ‘safe.’ They weren’t. When you install heavy cabinetry or innovative built-in solutions directly against an outer wall, you are essentially creating an insulated pocket where air cannot circulate. That trapped air reaches its dew point, and moisture begins to cling to your beautiful wood. Today, I’m going to show you exactly how to avoid my expensive mistake by using the moisture barrier rule. We aren’t just talking about a piece of plastic; we are talking about protecting your investment and your lungs. If you are planning effortless storage solutions for your home, this step is non-negotiable. According to the EPA, mold can begin to grow on damp surfaces in as little as 24 to 48 hours, which means your ‘small’ condensation problem can become a structural nightmare before the snow even melts.
Is This Extra Step Actually Worth the Hassle?
You might be thinking that a modern home with a high R-value doesn’t need this. I used to be that skeptic. But even the best insulation has thermal bridging. My failure happened because I didn’t realize that cabinets act as their own layer of insulation, keeping the wall behind them even colder than the rest of the room. By using the moisture barrier trick for vanities against cold walls, you create a physical disconnect that keeps the dampness away from your cabinetry. It’s the difference between a kitchen that lasts thirty years and one that needs a gut-job in five. Whether you are looking for expert design tips for custom vanities or building a massive library, you have to respect the temperature gradient. Have you ever noticed a musty scent inside your drawers during the winter, or are you just about to start an installation and want to do it right the first time?
Give Your Cabinets Room to Breathe
Think of your exterior wall as a block of ice and your house air as a warm, humid summer day. When they meet, condensation is inevitable. The first rule of thumb is to never let the back of your cabinet sit flush against the drywall. I usually aim for at least a 1/4-inch to 1/2-inch air gap. You can achieve this by using furring strips—thin strips of wood or plastic—attached to the studs first. This creates a chimney effect, allowing air to move vertically behind the unit. If you’re tackling a step-by-step vanity installation for beginners, don’t skip this. It feels like you’re losing space, but you’re actually gaining longevity.
Stop the Vapor with a Physical Shield
Before the furring strips go up, I like to staple a layer of 6-mil polyethylene plastic or, even better, a thin sheet of rigid foam insulation directly to the wall. This is what I call the moisture barrier trick for vanities against cold walls. The foam acts as a thermal break, moving the dew point from the back of your cabinet to the inside of the wall where the house’s drainage plane can handle it.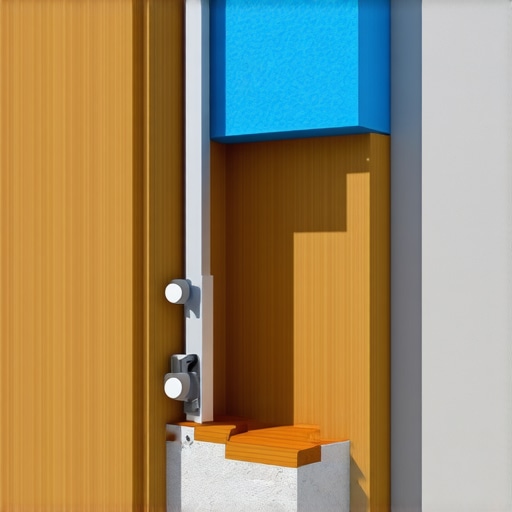
The Step-by-Step Defense Strategy
Last winter, I helped a friend install a massive floor-to-ceiling library unit against a north-facing brick wall. He wanted it tight to the wall for a seamless look, but the wall was sweating so much we could see the sheen under a flashlight. We compromised by using a moisture-proof base tactic. We raised the entire unit on a pressure-treated 2×4 plinth and left a one-inch gap at the top behind the crown molding. We even drilled discreet 1-inch holes in the back panels of the lower shelves to encourage airflow. This hidden ventilation allows the warm air to escape rather than festering. Three years later, we pulled a section out for a wiring update, and the brick was bone dry.
Master the Scribe for a Perfect Fit
When you leave that air gap, the sides of your cabinets (the finished ends) will show a gap. This is where scribing becomes your best friend. You’ll want to use an oversized finished end panel and trim it to match the exact contour of the wall, even if the wall is bowed. Following the scribing trick for installing vanities against out-of-square walls ensures that while the back of the box is safe and dry in its breathable zone, the front looks like it was grown out of the drywall.
Reinforce the Anchors
Because you are backing the unit away from the wall, your standard 3-inch cabinet screws might not reach the studs securely through the furring strips and the gap. Switch to 4-inch or 5-inch heavy-duty RSS screws. If you are working with a heavy stone top, consider the internal support move for heavy stone vanities to make sure the weight isn’t putting leverage on those extended screws. I learned this the hard way when a floating desk started to sag because the lever effect of the gap wasn’t accounted for. Using expert design tips for custom vanities means planning for these mechanical stresses before the first hole is drilled. Every extra inch of screw length adds stability that prevents the unit from pulling away as the house settles.Most DIYers—and even some pros I’ve worked with—believe that the tighter you seal a cabinet to a wall, the better protected it is. This is the ‘airtight myth.’ In reality, by caulking every single seam where wood meets drywall, you aren’t keeping moisture out; you’re locking it in. If a microscopic amount of water vapor migrates through the wall, it needs a way to evaporate. Without that 1/4-inch gap we discussed earlier, you’re essentially building a petri dish. According to the Building Science Corporation, ‘vapor-closed’ assemblies in cold climates are a primary cause of interstitial mold growth because they prevent the wall from drying toward the interior. If you’re looking for creative storage solutions for vanities, remember that air movement is your primary defense, not your enemy.
Does radiant flooring change how you anchor your vanity?
This is a technical hurdle I see homeowners face when they have spent thousands on heated bathroom floors only to realize they can’t drill into the subfloor for stability. You absolutely cannot use standard floor anchors here. Instead, you need to rely on the secret to mounting vanities over radiant floor heat, which involves a heavy-duty wall-cleat system or a specialized adhesive strategy. If you accidentally drill into a heating loop, you aren’t just looking at a cabinet fix; you’re looking at a $10,000 floor replacement. 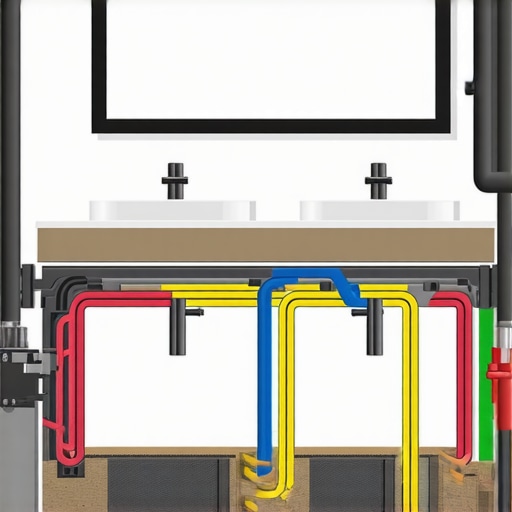
Watch out for the heavy stone sink trap
Another nuance often missed in expert vanity installation is the ‘creep’ of heavy materials. Most standard cabinets are designed to hold the weight of the box and basic contents, but they aren’t always ready for a 200-pound slab of quartz plus a sink full of water. Over time, that weight causes the front rail of the cabinet to bow slightly. This isn’t just an aesthetic annoyance; it can actually pull the cabinet away from your moisture barrier at the back, creating a fresh entry point for damp air. I always recommend the internal support move for heavy stone vanities, which uses hidden steel brackets to transfer that weight directly to the floor framing. Have you ever fallen into this trap where a ‘simple’ install turned into a structural puzzle? Let me know in the comments.To keep your installation from failing six months down the road, I have one tool that is absolutely non-negotiable: a pinless digital moisture meter. I personally use the Klein Tools ET140 because it allows me to check the moisture content of the wood and the drywall behind it without poking unsightly holes in my finish work. If you see the meter spike above 12% in the back corner of your pantry or vanity, you know your air gap or moisture barrier is failing before the mold even has a chance to sprout. This is how you move from being a hobbyist to a pro who understands the science of the home envelope. By monitoring these levels during the first winter, you can catch thermal bridging issues early and adjust your ventilation strategy if needed. 
Use a Pinless Moisture Meter to Spot Trouble Early
Beyond the wall itself, you have to think about the moving parts. Even the most creative storage solutions for vanities will eventually shift as your house settles. I’ve seen thousand-dollar units become unusable because the owner didn’t know how to do a simple realignment. Every six months, I take a screwdriver to my hinge plates. If you’ve ever wondered why cabinet doors sag and the three-hinge solution is often the answer, it’s because the weight of the door eventually overcomes the initial friction of the factory screws. A quick turn to the lateral adjustment screw keeps those gaps even and prevents the finish from rubbing off.
How do I maintain my custom built-ins over time?
Maintenance isn’t just about cleaning; it’s about mechanical integrity. For drawers, I swear by a dry PTFE lubricant spray rather than grease. Grease attracts sawdust and hair, creating a grinding paste that destroys ball bearings. If you notice why your drawer slides bind and the simple realignment is necessary, clean the tracks first with a vacuum and then apply a light coat of PTFE. This keeps the action smooth and prevents the ‘drag’ that leads to handle failure. Also, keep an eye on your bathroom’s humidity levels. According to the USDA Forest Products Laboratory, wood is hygroscopic, meaning it constantly exchanges moisture with the air; maintaining an indoor relative humidity between 30% and 50% is critical to stop cabinet doors from warping in humid bathrooms.
The Future of Smart Built-in Monitoring
Looking ahead, I predict we are going to see a massive shift toward integrated cabinetry sensors. We are already seeing high-end clients request built-in hygrometers that sync to their phones. Imagine getting a notification that the area behind your bedroom vanity has reached a dew point risk. It’s the ultimate way to protect your investment. For now, my advice is simple: don’t just build it and forget it. Give your cabinetry a ‘physical’ once a year. Check the screws, verify the moisture levels, and ensure that air is still moving where it should. Pick up a moisture meter this weekend and scan your existing exterior-wall cabinets—you might be surprised at what you find lurking behind the flour bags.
The Hardest Lesson I Learned About Trapped Air
If I could go back to that cold February morning, I’d tell myself that tightness is not the same as quality. The biggest myth in the DIY world is that a perfect seal protects your home. In reality, houses need to breathe. I’ve learned that ignoring the temperature gradient is a recipe for structural failure. Every time I tackle a step-by-step vanity installation for beginners, I emphasize that the air gap is your best friend. It’s a lightbulb moment when people realize that a half-inch of ‘wasted’ space is actually the secret to a mold-free home. Also, never underestimate the power of a thermal break—using rigid foam is a game-changer that keeps the cold at bay.
The Tool Bag Essentials for a Dry Install
You don’t need a massive workshop to do this right, but you do need the right specific gear. First, a pinless moisture meter is non-negotiable for monitoring the health of your exterior walls. I also swear by GRK RSS screws; when you’re backing a cabinet off the wall, you need that extra structural bite that standard hardware just can’t provide. For those working on effortless storage solutions, keeping a can of PTFE dry lubricant on hand ensures your drawers stay smooth without attracting the dust that leads to grinding. I also recommend checking out the Building Science Corporation’s white papers on vapor barriers—it’s the gold standard for understanding how moisture moves through your home’s envelope.
#IMAGE_PLACEHOLDER_E#
Ready to Build Something That Lasts?
Building custom furniture and cabinets is about more than just aesthetics; it’s about creating a legacy in your home. By applying the moisture barrier trick for vanities against cold walls and ensuring your internal support move for heavy stone vanities is solid, you are ensuring your hard work remains beautiful for decades. Don’t be afraid of the technical side of the installation. Once you master the physics of airflow and moisture, you gain a level of confidence that separates the amateurs from the true craftsmen. Your home is your biggest investment—treat it with the respect it deserves by building for the long haul.
Have you ever found a hidden surprise like mold or rot behind a cabinet you were replacing? Let me know your stories in the comments below!