

It was a quiet Tuesday evening when I heard the slow, agonizing groan of protesting drywall coming from my newly remodeled guest bathroom. I walked in, expecting a minor plumbing leak, only to find my gorgeous, expensive new floating vanity leaning forward like a tired patron at a bar, a visible half-inch gap yawning between the back panel and the pristine paint. My heart sank. I had spent hours picking out the perfect unit, only to watch it slowly peel away from the wall. Early in my DIY journey, I made the classic mistake of trusting standard drywall anchors and a prayer. I did not understand how leverage, wet hand towels, and the simple act of a toddler leaning on the edge could turn a beautiful vanity into a structural hazard.
The Terrifying Physics of the Leaning Vanity
When you hang a heavy piece of furniture on a vertical surface, you are playing a high-stakes game with gravity. A floating vanity is not just holding up its own weight; it carries a heavy stone countertop, a sink filled with water, and whatever items you store inside. Every time someone leans on the front edge, that downward pressure multiplies the pulling force exerted on the upper wall anchors. If you want to avoid structural failure, you have to understand how to manage these physical forces before you even pick up a drill. Many homeowners run into this exact issue when trying to figure out how to fix floating vanities that move when leaned on. If your framing is not prepared to handle that leverage, the drywall will eventually crush, the fasteners will slip, and your beautiful bathroom oasis will become a safety hazard.
Are Floating Vanities Actually Safe for Everyday Family Homes?
It is easy to scroll through social media and think floating vanities are an accident waiting to happen, especially if you have kids who love to climb. But the truth is, a floating vanity is incredibly safe and stable—provided you do not skip the foundational steps. The failure point is almost never the cabinet itself; it is how the cabinet connects to the framing of your house. According to the structural guidelines outlined by the International Code Council (ICC), fasteners must be anchored directly into solid wood framing or engineered blocking to meet safety standards for cantilevered residential fixtures. Simply hoping you hit a stud with a standard drywall screw is a recipe for disaster, which is why proper preparation is your best defense.
The Core Reason Your Vanity is Pulling Away
If you are currently staring at a gap behind your sink, the culprit is almost certainly a lack of structural backing inside the wall. Most interior walls are framed with studs spaced 16 inches apart. If your vanity width does not perfectly align with those studs, or if you only manage to catch a single stud near the edge of the cabinet, the vanity will eventually sag. This is why professional installers rely on 7 reinforcement tactics for wall hung bedroom vanities to spread the load across multiple framing members. Without that solid wood-to-wood connection, the moisture-rich air of a bathroom will soften the drywall over time, making it even easier for the anchors to pull straight through the gypsum board. Have you ever walked into your bathroom and noticed a hairline crack forming in the caulk line above your vanity? Tell me about your experience in the comments below, because catching that warning sign early can save you thousands in drywall repairs.
Step-by-Step Support and Installation Mechanics
Getting a wall-hung cabinet to stay perfectly level and secure requires shifting from basic decorating mindsets to structural engineering principles. You cannot rely on plastic wall plugs or thin trim screws. Think of your floating vanity as a diving board: the further out the front edge extends, the greater the rotational leverage pulling at the top of your wall. To counter this, you must build a mounting system that transfers that downward rotational force directly into the vertical wall studs. This is why professionals rely on specialized expert guide to flawless vanity installation tricks tips to guarantee the structure holds up under real-world, daily family use.
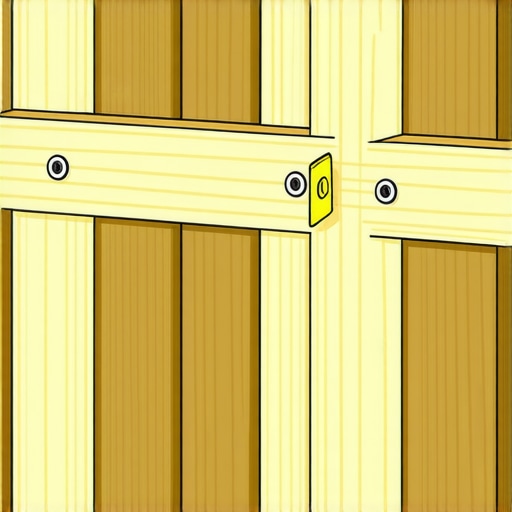
How to Install Hidden Wall Blocking Between Studs
If your drywall is already open, the absolute best way to secure your vanity is by installing solid wood blocking. This means running horizontal 2×6 or 2×8 lumber flat between your vertical studs, flush with the front face of the framing. I remember a particularly messy bathroom remodel in a 1920s bungalow where the plaster walls were crumbling, and the original studs were spaced a chaotic 19 inches apart. I tried to cut corners by skipping the blocking and using heavy-duty toggle bolts. The moment we set the heavy stone top down, the plaster cracked and the unit sagged two degrees. I had to tear out the brand-new tile, open up the wall, and lag-bolt solid 2×8 blocking between those uneven studs. The vanity has not budged a millimeter since. When you install horizontal blocking, use three 3-inch pocket screws or framing nails on each side to tie the block directly to the studs. This provides a continuous solid-wood mounting surface across the entire width of your cabinet.
The Heavy-Duty Bracket Strategy for Finished Drywall
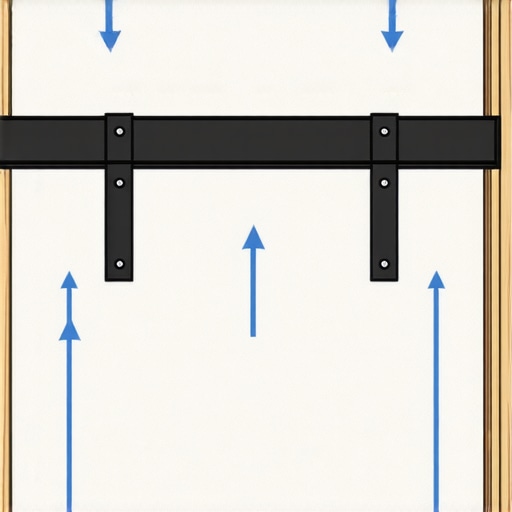
If you are working on finished drywall and do not want to rip open your walls, horizontal wood blocking is out of the question. In this scenario, you must utilize specialized steel brackets that mount directly to the face of your existing studs. Standard L-brackets from the home center will bend under the extreme cantilever forces of a heavy sink. Instead, look for heavy-duty structural steel brackets designed to support floating benches. If you are dealing with particularly narrow or non-standard framing, you may need to learn how to support floating vanities on thin 2×3 interior walls using external steel plates. These brackets act as a rigid skeleton, transferring the weight down the wall studs and preventing the drywall from compressing under the lower edge of the cabinet.
Leveling and Securing the Cabinet to the Framing
Once your support structure is in place, you are ready to hang the cabinet box itself. Do not make the mistake of attempting this solo; use a helper or adjustable cabinet jacks to hold the unit at your desired finished height. Before driving any fasteners, you must verify that the cabinet is perfectly level front-to-back and side-to-side. If the wall is slightly bowed, use cedar shims behind the cabinet mounting rail to fill the gaps. Driving screws into a bowed wall without shims will twist the cabinet box out of square, causing the doors to sag and the drawers to bind. Use heavy-duty structural cabinet screws with integrated washers to secure the cabinet back rail through the drywall and deep into your solid wood blocking or studs.
Smart Internal Storage Integration Before the Sink Goes On
With the structural shell locked down, you should organize your internal cabinet layout before plumbing pipes restrict your access. It is much easier to install internal organizers, pull-out shelves, or customized drawer boxes while you still have wide-open overhead access. Homeowners who want to maximize their usable space often look into creative storage solutions for vanities declutter in style to keep daily essentials organized without interfering with the drain pipes and hot/cold water shutoff valves.
When you browse social media, you are inundated with sleek, wall-hung designs that look like they are floating on air. The conventional wisdom tells you that as long as you have found your wall studs, you are ready to hang. However, in my years of correcting failed installations, I have learned that merely finding a stud is only half the battle. Many DIYers assume that a standard stud is a perfectly rigid, unmoving vertical column. The truth is that standard 2×4 framing lumber is surprisingly flexible when subjected to high leverage. If you only secure your vanity with a couple of screws near the top center, the rotational torque will still cause the lower edge of the cabinet to crush into the drywall, creating an unsightly and dangerous tilt over time.
Why Do Heavy Quartz Tops Crack the Cabinet Frame Below?
A major nuance that most standard installation guides overlook is the sheer compressive weight of modern solid-surface countertops. While we focus on pulling forces at the top, we neglect the crushing pressure at the joint. A heavy engineered stone top can flex a wood cabinet frame just enough to cause structural failure if the cabinet itself lacks proper internal bracing. Research by the Woodwork Institute on architectural casework standards highlights that cantilevered cabinets require structural tension and compression analysis to prevent joint separation. When you pair heavy quartz with weak cabinet joinery, you risk a catastrophic collapse. This is why understanding why your heavy quartz vanity is cracking the cabinet frame is essential before you lay down that expensive slab.
Another common trap is neglecting the wall material itself. If your bathroom has older plaster and lath rather than modern drywall, standard fastening methods will fail. Plaster crumbles under high-pressure compression, meaning the lower rear edge of your vanity will slowly dig into the wall, throwing the entire unit out of level. To combat this, smart installers use a concealed steel plate to distribute the load across a wider surface area. If you are dealing with off-center plumbing that prevents you from aligning the cabinet perfectly with your wall studs, you will need to implement the stud bypassing plate for off-center vanity installation to bridge the gap safely without tearing out your entire wet wall.
Ultimately, a flawless floating vanity setup is not just about mounting; it is also about how you design the internal layout to handle real-world storage without putting extra stress on the joints. If you crowd heavy items into deep, unbraced drawers, you can cause the glides to bind and twist the vanity box. Many homeowners run into this issue and have to seek out creative storage solutions for vanities declutter in style to keep weight balanced and ensure smooth mechanical operation. Have you ever fallen into this trap or noticed your cabinet doors starting to sag after installing a heavy countertop? Let me know in the comments below, and let’s talk about how to get it leveled out for good.
Once you navigate the structural mechanics of securing your cabinet, you must shift your focus toward long-term maintenance and tool selection. I have seen incredibly solid installations degrade over a few years simply because the installer used cheap, corrosion-prone fasteners or neglected simple environmental checks. In my own toolbox, I never head to a bathroom remodel without my heavy-duty GRK structural screws. These fasteners feature a built-in washer head and climate-coated finish that resists rust in high-humidity environments, preventing the steel from weakening over years of hot showers. A standard drywall or wood screw will eventually rust and shear under constant load, but these structural screws hold fast forever.
How do I maintain my floating vanity over time?
To ensure your vanity never shifts, perform a physical inspection twice a year. Empty the cabinet and check the back mounting rail for any hairline gaps between the wood and the wall paint. Use a precise digital level to check that the front-to-back angle remains perfectly flat. If you notice any dipping, it means your framing is compressing or a fastener is beginning to slip. Additionally, inspect the plumbing connections under the sink; slow, hidden leaks will rot out your cabinet’s structural backing. To prevent water damage from ruining your hard work, consider adopting 5 ways to waterproof vanity bases against floor flooding. The future of floating furniture is moving toward integrated smart monitoring, where built-in moisture sensors and micro-tension gauges inside the wall-bracket assembly can alert your phone before a leak or a physical structural failure even occurs. For now, we rely on quality craftsmanship and robust materials to keep our homes safe.
For those aiming to elevate their entire bathroom layout, coordinating these structural storage elements is key. You can achieve a cohesive, high-end look by pairing your secure vanity with modern, flush-mounted shelving. Check out our guide on creative built-ins for seamless storage and home aesthetics to see how to carry this minimalist, sturdy design language throughout your entire home. I highly recommend taking the time this weekend to open your vanity cabinet, locate your mounting screws, and verify they are high-quality structural fasteners rather than standard drywall screws. Upgrading those three or four screws is a quick, low-cost weekend project that can prevent a catastrophic drywall failure down the road.
When you browse social media, you are inundated with sleek, wall-hung designs that look like they are floating on air. The conventional wisdom tells you that as long as you have found your wall studs, you are ready to hang. However, in my years of correcting failed installations, I have learned that merely finding a stud is only half the battle. Many DIYers assume that a standard stud is a perfectly rigid, unmoving vertical column. The truth is that standard 2×4 framing lumber is surprisingly flexible when subjected to high leverage. If you only secure your vanity with a couple of screws near the top center, the rotational torque will still cause the lower edge of the cabinet to crush into the drywall, creating an unsightly and dangerous tilt over time.
Why Do Heavy Quartz Tops Crack the Cabinet Frame Below?
A major nuance that most standard installation guides overlook is the sheer compressive weight of modern solid-surface countertops. While we focus on pulling forces at the top, we neglect the crushing pressure at the joint. A heavy engineered stone top can flex a wood cabinet frame just enough to cause structural failure if the cabinet itself lacks proper internal bracing. Research by the Woodwork Institute on architectural casework standards highlights that cantilevered cabinets require structural tension and compression analysis to prevent joint separation. When you pair heavy quartz with weak cabinet joinery, you risk a catastrophic collapse. This is why understanding why your heavy quartz vanity is cracking the cabinet frame is essential before you lay down that expensive slab.
Another common trap is neglecting the wall material itself. If your bathroom has older plaster and lath rather than modern drywall, standard fastening methods will fail. Plaster crumbles under high-pressure compression, meaning the lower rear edge of your vanity will slowly dig into the wall, throwing the entire unit out of level. To combat this, smart installers use a concealed steel plate to distribute the load across a wider surface area. If you are dealing with off-center plumbing that prevents you from aligning the cabinet perfectly with your wall studs, you will need to implement the stud bypassing plate for off-center vanity installation to bridge the gap safely without tearing out your entire wet wall.
Ultimately, a flawless floating vanity setup is not just about mounting; it is also about how you design the internal layout to handle real-world storage without putting extra stress on the joints. If you crowd heavy items into deep, unbraced drawers, you can cause the glides to bind and twist the vanity box. Many homeowners run into this issue and have to seek out creative storage solutions for vanities declutter in style to keep weight balanced and ensure smooth mechanical operation. Have you ever fallen into this trap or noticed your cabinet doors starting to sag after installing a heavy countertop? Let me know in the comments below, and let’s talk about how to get it leveled out for good.
Once you navigate the structural mechanics of securing your cabinet, you must shift your focus toward long-term maintenance and tool selection. I have seen incredibly solid installations degrade over a few years simply because the installer used cheap, corrosion-prone fasteners or neglected simple environmental checks. In my own toolbox, I never head to a bathroom remodel without my heavy-duty GRK structural screws. These fasteners feature a built-in washer head and climate-coated finish that resists rust in high-humidity environments, preventing the steel from weakening over years of hot showers. A standard drywall or wood screw will eventually rust and shear under constant load, but these structural screws hold fast forever.
How do I maintain my floating vanity over time?
To ensure your vanity never shifts, perform a physical inspection twice a year. Empty the cabinet and check the back mounting rail for any hairline gaps between the wood and the wall paint. Use a precise digital level to check that the front-to-back angle remains perfectly flat. If you notice any dipping, it means your framing is compressing or a fastener is beginning to slip. Additionally, inspect the plumbing connections under the sink; slow, hidden leaks will rot out your cabinet’s structural backing. To prevent water damage from ruining your hard work, consider adopting 5 ways to waterproof vanity bases against floor flooding. The future of floating furniture is moving toward integrated smart monitoring, where built-in moisture sensors and micro-tension gauges inside the wall-bracket assembly can alert your phone before a leak or a physical structural failure even occurs. For now, we rely on quality craftsmanship and robust materials to keep our homes safe.
For those aiming to elevate their entire bathroom layout, coordinating these structural storage elements is key. You can achieve a cohesive, high-end look by pairing your secure vanity with modern, flush-mounted shelving. Check out our guide on creative built-ins for seamless storage and home aesthetics to see how to carry this minimalist, sturdy design language throughout your entire home. I highly recommend taking the time this weekend to open your vanity cabinet, locate your mounting screws, and verify they are high-quality structural fasteners rather than standard drywall screws. Upgrading those three or four screws is a quick, low-cost weekend project that can prevent a catastrophic drywall failure down the road.
The Hardest Lessons I Learned Hanging Heavy Bathroom Cabinets
Over years of working with floating bath fixtures, I have developed a deep respect for structural limits. Here are three lightbulb moments that completely changed how I approach these installations: First, never underestimate the power of a child using the front edge as a step-stool. Dynamic, sudden weight behaves very differently than static weight. Second, cheap cabinet backs made of thin hardboard will disintegrate under tension. If your cabinet back is weak, always reinforce it with an internal plywood cleat. Finally, remember that wood breathes. In a bathroom that cycles constantly between dry heat and high humidity, wall framing can swell and shrink, which makes utilizing high-quality structural fasteners with washer heads absolutely non-negotiable.
My Essential Toolkit for Unshakable Wall Installations
You do not need an entire workshop to hang a floating cabinet, but relying on the wrong tools is a recipe for a sagging vanity. Here is the exact gear I trust on every single job: I never start without a magnetic stud finder paired with a high-end electronic scanner to double-verify stud edges. Next, I rely exclusively on GRK structural cabinet screws or Spax washer-head power screws because they bite immediately and do not snap under immense shear forces. Lastly, a solid 24-inch professional box level is crucial; a tiny, cheap pocket level simply cannot give you the accuracy you need across a 30- or 48-inch cabinet span.
Take the First Step to a Secure and Beautiful Space
Hanging a floating vanity might seem intimidating at first, but once you understand the simple engineering physics behind leverage, you can confidently build a bathroom that is both stunning and structurally sound. Do not let the fear of a sagging cabinet stop you from achieving that ultra-modern, airy aesthetic. By taking your time to locate real wood framing, using heavy-duty hardware, and adding solid backing, you will ensure your new setup lasts as long as your home does. Now, it is your turn to grab your drill and bring your dream design to life.
Have you ever struggled with getting a floating vanity perfectly level on bowed drywall, or did you run into unexpected framing challenges behind your bathroom walls? Let me know in the comments below!