Ever opened a closet or bathroom cabinet and felt overwhelmed by clutter, wishing for a magic wand to make everything neat and accessible? I’ve been there. Just a few years ago, my home was filled with mismatched shelves, awkward corners, and storage solutions that only added to the chaos. The lightbulb moment hit me when I realized that investing in custom, well-designed built-in cabinets could turn my space into a haven of organization. It’s incredible how a thoughtful storage upgrade can change not just your home’s look but also your daily life. If you’re tired of wasting time digging through piles of stuff or feeling frustrated by limited space, then you’re in the right place. Today, I’ll share proven strategies to maximize your home’s potential with effective built-in cabinets and storage ideas that blend seamlessly with your decor. Trust me, it’s more achievable than you might think—and the results will make you wonder why you didn’t do it sooner.
Why Built-in Cabinets Are a Game-Changer for Home Organization
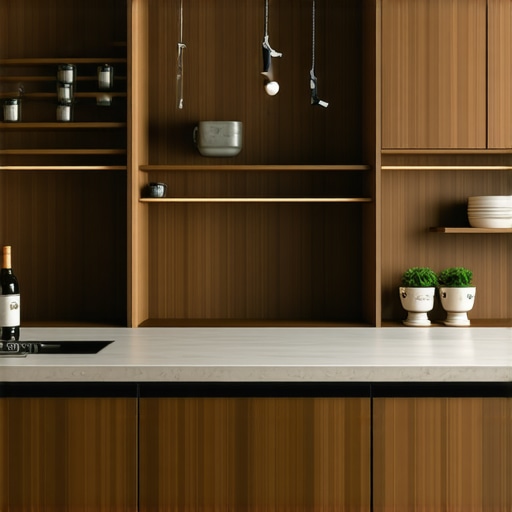
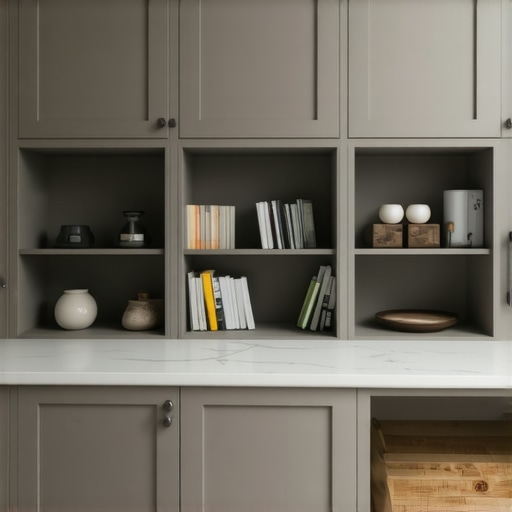
Built-in cabinets are more than just a fancy upgrade; they’re a practical solution that transforms clutter into calm. Unlike free-standing furniture, these fixtures are tailored to fit your specific space, making the most of every inch. For example, a custom vanity can elevate your bathroom’s style while offering ample storage, keeping your counter clear and your essentials organized. Plus, when installed correctly, they create a seamless look that enhances your home’s aesthetic, rather than disrupting it with bulky furniture. I’ve learned from personal experience that the key to success lies in planning and expert installation. A mistake I made early on was choosing a generic design without considering my daily needs, which resulted in wasted space and frustration. Avoiding this pitfall is simple when you consult trusted sources like this guide to storage solutions. Today, I’ll walk you through how to select and install built-ins that work for your lifestyle and space, ensuring your home stays beautiful and functional.
Is the Hype About Built-in Storage Actually Worth It?
Many skeptics question whether investing in built-in cabinets is justified, especially considering costs and installation time. I’ll admit, I was skeptical at first, too. My biggest mistake was rushing into a DIY project without proper planning, which led to uneven finishes and wasted money. But with the right approach—such as consulting professionals and choosing the right style—I’ve seen firsthand how built-ins can dramatically improve organization and home value. If you’re worried about whether this is just a trend or a practical upgrade, know that many of the top home design trends for 2025 emphasize integrated storage solutions that blend form and function seamlessly. For more insights on the latest trends, check out this article. My advice? Don’t let fear of cost or complexity hold you back. With expert guidance, creating custom storage that lasts and looks stunning is entirely within your reach. Ready to discover how to make your space both stylish and organized? Let’s dive into the practical steps that will turn your cluttered areas into sleek, functional spaces.
Measure and Plan Your Space
Start by assessing the area where you want to install built-in cabinets. I once measured a tiny corner in my living room, only to realize I’d forgotten to account for a radiator that protruded slightly. To avoid such surprises, use a tape measure and sketch your space on paper or digital tools. Note the height, width, and depth, and consider the clearance needed for doors or drawers. This step ensures your custom cabinets fit perfectly and maximize every inch of space. For inspiration on stylish and functional designs, check out this resource.
Select the Right Style and Material
Choosing the right style and material is crucial. I chose a sleek matte finish for my bedroom vanity, which gave it a modern look that blended seamlessly with my decor. Think about your home’s overall aesthetic—rustic, contemporary, or traditional—and select materials accordingly, whether wood, MDF, or laminate. Remember that thicker, high-quality materials like solid wood or plywood provide durability and a premium feel. If you’re unsure, consult with a professional or browse this guide for ideas on matching style with function.
Choose a Fitting Hardware and Accessories
Hardware transforms the look and usability of your cabinets. I opted for push-to-open mechanisms to eliminate handles, creating a sleek surface. When selecting hardware, consider the finish—brushed nickel, matte black, or brass—that complements your decor. For smaller spaces, soft-close hinges and pull-out shelves can make access easier and prevent slamming. For more tips on hardware options, visit this article.
Prep Your Space and Gather Tools
Before installation, clear the area and gather all necessary tools: a drill, level, screwdriver, measuring tape, and screws. I recommend setting up a workspace with plenty of light and laying down protective sheets. During my first attempt, I overlooked some minor tools, which caused delays. Double-check your list and ensure all hardware and materials are on hand. Proper prep minimizes mistakes and speeds up the process. For detailed tool lists, see this guide.
Follow Step-by-Step Installation Procedures
Begin by marking the wall or floor where the cabinets will sit, ensuring they are level. Use a level tool—like I did on my first project—to draw a reference line. Attach the cabinets to the wall securely with anchors, especially if they will bear weight. For tall units, reinforce internal framing for stability. I learned the hard way that uneven installation led to a crooked cabinet, which was difficult to fix afterward. Take your time to double-check measurements and use a spirit level frequently. For comprehensive installation instructions, review this resource.
Finish and Seal Your Cabinets
Once installed, apply finishing touches such as paint, stain, or sealant to protect your cabinets. I used a clear polyurethane to prevent scratches and water damage. If your cabinets include shelving or drawers, install hardware and test for smooth operation. For a seamless look, consider adding trim or molding to hide gaps. Proper finishing not only enhances appearance but also prolongs lifespan. For finishing tips, refer to this guide.
While it might seem like choosing a vanity or built-in storage is straightforward, many homeowners fall into subtle traps that can compromise both functionality and aesthetic appeal. Let’s dig deeper into what most people get wrong and how to avoid costly mistakes. Myth one: More storage always means better design. In reality, overstuffed cabinets can create clutter, defeating the purpose of organized space. Consider smart storage solutions that prioritize accessibility and simplicity over sheer capacity.
Myth two: Installation is a DIY task for amateurs. This is where many get tripped up. Improper installation can lead to crooked cabinets, gaps, or even structural damage. A common mistake is underestimating the importance of precise measurements and leveling. For advanced setups, I recommend reviewing top installation tips to ensure your project is not just beautiful but also durable.
The oops factor: Ignoring space constraints during planning can cause major issues—like blocking access or interfering with existing fixtures. Always sketch your layout, double-check measurements, and consider future needs. For example, I once installed a vanity that blocked a window, making the space darker and less functional. Remember, good planning saves time and money in the long run.
What about advanced questions? Here’s a key point for experienced DIYers: How do you ensure your built-ins are structurally sound without sacrificing style? The answer lies in internal reinforcement—adding framing or using high-quality materials like plywood rather than cheap MDF. This enhances longevity and stability, especially for heavy or frequently used units. According to experts, incorporating such reinforcement is essential for seamless, lasting installations.
Have you ever fallen into this trap? Let me know in the comments, and share your tips or questions about vanities and built-in storage. For more expert guidance, consider exploring this resource.
Keeping your custom-built vanities and storage solutions in top shape requires a mix of the right tools, consistent maintenance, and a bit of forward-thinking. Over time, even the most durable materials can benefit from proper care to ensure they continue functioning seamlessly and looking stunning. I personally recommend investing in quality tools like a cordless impact driver, which makes tightening or adjusting hardware far easier than traditional screwdrivers, especially in tight spaces. Additionally, a soft microfiber cloth and mild cleaning solutions are essential for regular upkeep without damaging finishes. For deeper cleans, I use a laminate-safe cleaner to maintain the sleek look of laminate surfaces, while hardwood finishes benefit from specialized wood conditioners. These tools and products help me extend the life of my built-ins, saving money and effort in the long run.
As trends evolve, the future of built-in storage leans heavily toward smart, integrated solutions that include features like automated lighting, soft-close mechanisms, and modular components. Staying ahead involves not only choosing high-quality materials but also adopting maintenance routines that support these advanced features. Regularly lubricating hinges and slides with silicone spray, for example, prevents squeaks and ensures smooth operation for years. Moreover, inspecting seals, weatherstripping, and hardware for wear can catch issues early, avoiding costly repairs or replacements down the line.
How do I maintain my built-in storage to keep everything working smoothly?
Begin with routine cleaning—dust and debris can accumulate behind drawers or in hinges, impairing function. Use a vacuum with a brush attachment to clear out hidden corners, then wipe surfaces with a damp microfiber cloth. For moving parts, applying a small amount of silicone spray or lubricant designed for cabinetry keeps hinges, slides, and locks operating quietly and efficiently. Checking and tightening screws periodically prevents hardware from loosening over time, especially in high-traffic areas or where weight is involved. If you notice any sticking or squeaking, don’t ignore it; addressing these issues early preserves the quality and safety of your installation. For more detailed maintenance advice, visit this guide.
Looking ahead, I predict that smart maintenance systems—like sensors that alert you when hinges need lubrication or when seals are worn—will become standard in high-end built-ins. Incorporating these technologies can make upkeep even easier and more proactive. I highly recommend trying out a small, automated maintenance kit for your cabinets, which can save time and extend their lifespan significantly. Remember, a little regular attention now prevents major repairs later, keeping your home both beautiful and functional for years to come.
What I Wish I Knew Before Installing Custom Vanities
One of the most valuable lessons I learned was that rushing the planning stage can lead to costly mistakes. I once chose a vanity style without considering how it would fit with my existing decor, which resulted in a disjointed look. Taking the time to measure accurately and visualize the final space saved me from many headaches later. My second insight is that quality materials make a huge difference. Opting for plywood over MDF, especially for heavy-use areas, ensures longevity and stability. Lastly, I discovered that hardware choices can elevate the entire design—sleek handles or push-to-open mechanisms add a modern touch and improve usability. These lessons are small but impactful, transforming a DIY project into a durable, beautiful feature in your home.
One Reply to “Effective Built-in Cabinets & Storage Ideas for Seamless Organization”
Leave a Reply
Related Posts
Top Storage Solutions & Built-ins for More Space Efficiency
Discovering the Joy of Organized Living: My Personal Journey with…
Expert Guide to Storage Solutions & Built-in Cabinets for Seamless Home Renovations
I remember the moment clearly: trying to cram my overflowing…
Smart Storage Solutions & Built-ins for Seamless Home Organization
My Journey to a Clutter-Free Home BeginsEver since I moved…
This post really hits home for me, especially the part about the importance of planning and measuring accurately before starting a built-in project. I’ve learned from personal experience that rushing into the installation without thoroughly assessing the space can lead to uneven edges and unbearable frustration, especially when you realize a cabinet blocks a window or door like I did last year. I appreciate the emphasis on internal reinforcement too, because I’ve found that high-quality plywood framing makes a significant difference in the durability of heavy-use built-ins.
One challenge I’ve faced is balancing aesthetics with function—how do you ensure your storage solutions stay stylish without sacrificing practicality? I’d be interested to hear some tips from others on managing this balance, especially in smaller spaces where every inch counts. Also, does anyone have recommendations for low-maintenance hardware that still offers a sleek, modern look? Great insights overall, and I’m inspired to revisit my current project with a fresh perspective.