Ever spent ages rummaging through a cluttered vanity drawer, frustrated because you couldn’t find that one lipstick or skincare product? Or maybe you’ve faced the dreaded chaos every morning, where your bathroom or bedroom storage feels like a black hole? I’ve been there. Those mornings of chaos finally clicked for me when I realized that my space wasn’t just a mess — it was a missed opportunity for better organization and style. That lightbulb moment led me to discover the game-changing potential of smart vanities and built-in storage solutions, especially as design trends shift in 2025.
Why Now Is the Perfect Time to Rethink Your Storage
With the rapid pace of home renovation innovations, 2025 is shaping up to be a pivotal year for transforming personal spaces. The trend leans heavily toward seamless, smart, and space-efficient solutions that don’t sacrifice style. According to industry experts, innovative storage options are becoming more accessible and customizable, making it easier than ever to create a space that’s both functional and beautiful. But here’s the thing — many people still hesitate, thinking these upgrades are complicated or just a luxury. I want to assure you, that’s a misconception. The real challenge is knowing where to start and how to avoid common pitfalls, which is exactly what I’ll walk you through today.
Is Installing Built-in Storage Actually Worth the Hype?
Early on, I made the mistake of rushing into a DIY project without proper planning. I ended up with mismatched cabinets and wasted money on features I didn’t need. Trust me — effective planning and expert advice can save you a lot of headaches. If you’re questioning whether these upgrades are worth it, I’ll tell you — they absolutely are. Not only do they optimize your space, but they also elevate your home’s aesthetic. If you’re curious about how to get started, I recommend exploring options like creative built-ins and storage ideas to inspire your project.
So, if you’re tired of the chaos and ready to upgrade your space, stay tuned. I’ll guide you through the practical steps that will help you choose, plan, and install the perfect smart vanity and built-in storage solutions tailored to your home’s style and your lifestyle.
Define Your Storage Needs Clearly
Before diving into any installation, I recommend assessing your space thoroughly. Think about what items clutter your area—skincare, makeup, toiletries? In my case, I spent a quiet Sunday measuring my bathroom cabinet and listing items to store. This simple step prevents choosing oversized or under-sized units, saving time and money. To get accurate measurements, use a tape measure, noting height, width, and depth. Consider the types of storage you need—drawers, open shelves, or hidden compartments. This foundational step ensures your built-ins will fit perfectly and serve your daily routine efficiently.
Choose the Right Style for Your Space
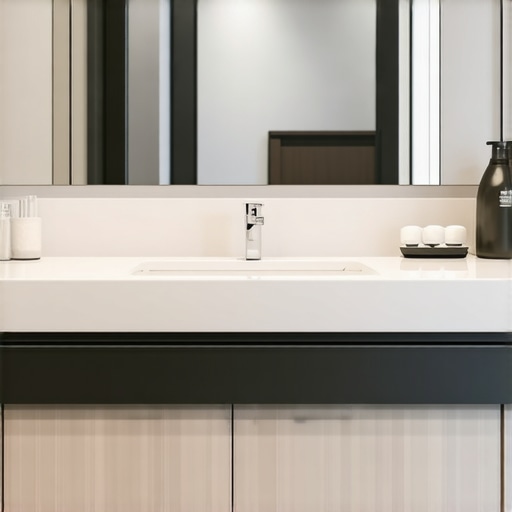
Matching your vanity or built-in with your home’s aesthetic is crucial. Are you going for sleek modern, rustic charm, or timeless elegance? I once jumped straight into purchasing a vanity without matching it to my bedroom decor, which resulted in a disjointed look. To avoid this, browse inspiration from style guides. When selecting, consider materials, colors, and hardware that complement existing furniture. Remember, a cohesive style elevates your entire space, making the storage not just functional but also a design statement.
Plan Your Layout Like a Pro
Visualizing your layout is key. Use graph paper or a digital tool to sketch your space, marking where each piece will go. I once used painter’s tape on my floor to map out the vanity and storage units, which helped me see how the pieces fit without committing. Think about accessibility—keep frequently used items within arm’s reach. Also, consider leaving room for movement and mirrors. This planning stage reduces surprises during installation and ensures everything flows naturally. If you’re unsure, consulting with experts through professional guidance can be invaluable.
Prepare Your Space and Tools
Clear the area and gather your tools—drill, level, screws, screws driver, and measuring tape. I once started installation with a cluttered workspace, which made the process frustrating. A tidy, well-lit environment with all tools at hand speeds up the project and reduces mistakes. Also, check your wall condition; patch and paint if necessary. Safety first: wear goggles and gloves. Proper preparation creates a smooth workflow and guarantees a professional finish.
Follow a Step-by-Step Installation Process
For a built-in vanity, follow these core steps:
- Mark your wall and floor where the unit will go, using a level to ensure straight lines. Use painter’s tape to visualize placement.
- Attach mounting brackets or cleats to the wall, ensuring they are anchored into studs for stability. I used a stud finder to avoid mishaps.
- Secure the vanity frame or base to the brackets, checking alignment continuously.
- Install shelves, drawers, or cabinets as per your design, following manufacturer instructions or expert advice. For example, I installed drawers by sliding them into pre-made tracks, which I found easier with a helper.
- Finish with hardware, mirrors, and decorative touches, ensuring all elements are securely attached.
Ensure Safety and Functionality
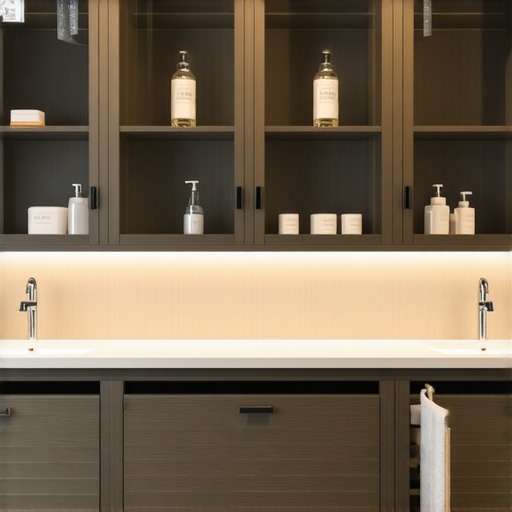
Double-check all fastenings and stability. Test drawers and doors for smooth operation. I once discovered a loose screw after a week, which I promptly tightened to prevent accidents. Consider adding lighting—LED strips or spotlights—to enhance usability. For small spaces, explore smart lighting options that make finding items easier and add ambiance. Remember, a well-installed storage solution lasts longer and performs better, making your effort worthwhile.
Seek Professional Help When Needed
If your project feels overwhelming, don’t hesitate to contact experts through professional installers. They bring precision and experience, especially with complex built-ins or custom vanities. My neighbor once attempted a DIY project that ended with uneven surfaces; hiring a professional saved her time and ensured a flawless finish. Investing in expert help can be a game changer, especially for high-end or intricate installations.
Many homeowners dive into vanity and storage upgrades with enthusiasm, but let’s dig deeper into the nuances that often trip people up. A frequent misconception is that bigger is always better. In reality, oversized cabinets or vanities can overwhelm a space, making it feel cluttered rather than organized. Instead, focus on precise measurements and customized solutions that fit your unique layout. For instance, exploring creative built-ins ensures a harmonious blend of function and style, tailored to your space.
Another common mistake is neglecting the importance of planning the layout thoroughly. Skipping this step often results in designs that look great in theory but fail in practice—like drawers that are hard to open or shelves that block natural light. Use digital tools or simple sketches to visualize your space before committing. Remember, even a simple step like using painter’s tape to map out your layout can save you hours and frustration during installation. When in doubt, consult experts through professional guidance.
For advanced DIYers, an often overlooked detail is wall anchoring. Properly anchoring built-in units into studs is critical for safety and durability. Many underestimate the importance of this and end up with loose or wobbly fixtures. According to industry experts, ensuring all mounting points are secured into wall studs can prevent accidents and extend the lifespan of your installation. If you’re unsure about how to do this, consider seeking professional help to avoid costly mistakes.
Is More Storage Always Better for Your Space
Contrary to popular belief, cramming in extra cabinets or shelves doesn’t necessarily improve organization. Overstuffed storage can make access difficult and visually cluttered. The goal should be smart, efficient storage that suits your daily routines. For example, integrated drawers with dividers can keep small items tidy and accessible, reducing clutter. Additionally, exploring built-in storage ideas can help maximize your space without overwhelming it. This approach promotes a balance between quantity and usability, ensuring your space remains functional and inviting.
Finally, many underestimate the importance of finishing touches like lighting and hardware. Proper lighting not only enhances the aesthetic but also makes daily tasks easier. Upgrading hardware can instantly elevate the look of your vanity and cabinets. Remember, the smallest details often make the biggest difference. If you’re considering a more seamless and stylish upgrade, I recommend reviewing the latest vanity design trends for 2025 to inspire your project.
Have you ever fallen into this trap? Let me know in the comments and share your experiences or questions about vanity renovations. With careful planning and attention to detail, you can transform your space into a beautiful, functional retreat.
Once you’ve successfully installed your custom vanity or built-in storage solutions, the next crucial step is maintaining their functionality and appearance over time. Regular upkeep not only prolongs the lifespan of your investments but also ensures your space remains organized and stylish through the years. In this article, I’ll share specific tools, methods, and expert tips that I personally rely on to keep my built-ins working flawlessly.
How do I maintain my storage solutions over time?
To keep your vanities and built-in cabinets in prime condition, it’s essential to adopt a routine that addresses both cleaning and minor repairs. I recommend using a microfiber cloth and a gentle, non-abrasive cleaner—like a mixture of warm water and mild dish soap—for daily dusting. This prevents the buildup of dirt, dust, and grease that can degrade surfaces. For more stubborn spots, a dedicated wood or laminate cleaner, such as Method Wood For Good, works great without damaging the finish. Regularly wiping down hardware and hinges with a soft cloth prevents rust and ensures smooth operation.
For deeper maintenance, I personally use a small electric polisher with a soft pad on wooden surfaces once every six months. This restores shine and removes minor scratches. Additionally, applying furniture wax or a protective sealant periodically helps maintain the integrity of wood surfaces. When I notice loose hardware or hinges, I keep a DeWalt Cordless Drill handy for quick tightening—saving me trips to the handyman and keeping my storage solutions secure.
Tools I recommend for ongoing upkeep
Beyond basic cleaning, having the right tools makes a significant difference. I can’t recommend a cordless drill enough for tightening or adjusting hardware without hassle. Its portability allows me to reach tight corners easily. For detailed cleaning, a flexible microfiber duster like the Swiffer Duster Extender is perfect for getting into corners and behind fixtures.
For wood surfaces, I prefer an electric polisher, which I found effectively removes minor scratches and restores a polished look. I also keep a set of precision screwdrivers for minor adjustments, and a level to ensure everything remains perfectly aligned, especially after cleaning or minor repairs. These tools are essential to avoid unintentional damage and to keep your installations looking professional.
The future of storage maintenance and scaling
Looking ahead, I predict that smart maintenance tools will become more integrated with IoT technology, enabling homeowners to monitor the condition of their built-ins remotely. Imagine sensors that alert you to humidity levels, which can affect wooden surfaces, or automated cleaning devices that keep surfaces spotless with minimal effort. As these technologies evolve, maintaining your storage solutions will become even easier and more efficient.
For now, I encourage you to implement a regular maintenance routine using the tools I’ve mentioned. Start by doing a thorough clean every few months, tighten hardware as needed, and apply protective finishes periodically. This simple yet effective approach ensures your investment continues to serve and impress for years to come. And if you’re ever unsure about repairs or upgrades, don’t hesitate to reach out to experts through professional guidance.

The Hardest Lesson I Learned About Vanities and Storage Solutions
Early in my renovation journey, I underestimated how crucial precise measurements are. I once ordered a built-in unit that looked perfect on paper but was too large for my space. That costly mistake taught me to double-check every dimension and visualize before committing. Now, I always use painter’s tape to map out each element, saving time and avoiding unnecessary returns or rework.
Why Overdoing It Can Backfire on Your Space
I used to think more storage meant better organization. Turns out, cramming too many cabinets makes a space feel cluttered and overwhelming. I’ve learned that thoughtful, well-planned storage—like integrated drawers with dividers—can maximize efficiency without sacrificing style. Less truly is more when you focus on smart placement and accessibility.
Trust the Experts, Not Just Your Gut
When I faced complex installation challenges, I hesitated to hire professionals. That was a mistake. Professionals bring a level of precision that DIY can’t match, especially with wall anchoring and finishing touches. Investing in expert help ensures your built-ins are safe, durable, and beautifully finished—saving you headaches in the long run. For reliable guidance, I recommend reaching out through professional installers.
Curated Resources That Changed My Approach
- My Essential Toolkit for Storage Solutions: A cordless drill, microfiber duster, and a level are my must-haves. These tools make maintenance and adjustments effortless and keep my installations looking pristine.
- Books That Changed How I View Space Optimization: I highly recommend exploring design books like “Small Space, Big Style”—they opened my eyes to innovative storage ideas that don’t clutter.
- Online Inspiration and Guides: Websites like creative built-ins and storage ideas have been invaluable for visualizing my projects and staying current with trends.
Your Turn to Try
Remember, transforming your vanity and storage solutions doesn’t have to be perfect from the start. Embrace the learning process, start small if needed, and don’t hesitate to seek help when necessary. Every upgrade is a step toward a more organized and stylish home. Are you ready to take the plunge and create the space you’ve always wanted? Share your plans or questions below—let’s make your dream space a reality!
3 Replies to “Revamp Your Space with Smart Vanities & Built-in Storage Solutions in 2025”
Leave a Reply
Related Posts
Trust Smart Built-ins & Vanities for Seamless Home Upgrades in 2025
Have you ever stood in your bathroom or bedroom, frustrated…
Efficient Vanities & Storage Solutions for Modern Home Renovations
Ever stood in front of your bathroom mirror, desperately trying…

Top Vanities & Built-in Cabinets for Seamless Home Upgrades 2025
I still remember the moment I realized my bathroom storage…
This post resonates with me because I recently started planning a bathroom renovation and am considering built-in storage to maximize space and enhance the room’s aesthetics. I appreciate the emphasis on careful planning and measuring; I learned the hard way that rushing into installations without proper assessment can lead to mismatches and frustration. The idea of mapping out the layout using painter’s tape is a great tip—simple yet effective. I also wonder, for those who have installed smart lighting in their vanities, what are your favorite features? Do you recommend adjustable LED strips for customizing ambiance around the mirror or vanity area? It seems like a small detail, but good lighting can truly make a difference in daily routines and overall style.
Reading through this post brought back the memories of my own experience with vanity upgrades. I used to spend ages trying to find my favorite lipstick among cluttered drawers, which was so frustrating, especially during busy mornings. Since installing a customized built-in with dedicated compartments, my routine has become much smoother, and my space looks much cleaner. The tips about measuring carefully and visualizing the layout with painter’s tape are spot on — I can’t stress enough how many headaches a small oversight can cause during installation. One thing I’ve also found useful is integrating smart lighting that varies color temperature; it really sets the mood and enhances visibility around the mirror. Has anyone experimented with color-changing LED strips? I’m curious if they add much to the functionality or just create a nice aesthetic. Overall, thoughtful planning really pays off, and I’d love to hear others’ experiences with different lighting options or storage styles that worked well in small spaces.
I really relate to the points made here, especially about measuring meticulously before purchasing or installing storage. It’s such a simple step but can save so much hassle later. I remember one time, I skipped this step and ended up with a vanity that was too large for my space, which was frustrating. Since then, I always take the time to measure carefully and use painter’s tape to visualize. It’s such an easy yet effective way to prevent mistakes. Also, I’ve experimented with adjustable LED strip lighting around my mirror, and it’s been a game-changer for both functionality and ambiance. The ability to change color temperature depending on the time of day or mood really enhances the experience and makes makeup application much easier. Has anyone found certain brands or features that work better for smaller spaces or provide more flexibility? I’d love to hear about others’ experiences with smart lighting—are there particular settings or features you find most useful for daily routines?