I remember the frustrating moment when I was installing a new built-in cabinet in my bathroom. The shelves didn’t align properly, and I realized I had overlooked crucial details in the planning phase. That lightbulb moment taught me a valuable lesson: a successful installation isn’t just about how it looks but how seamlessly it fits into your home. If you’ve ever faced similar challenges, you’re not alone. Many homeowners feel overwhelmed by the idea of installing or upgrading their built-in storage solutions, especially when aiming for that sleek, modern look in 2025.
Why Smart Storage Installations Matter More Than Ever
In today’s busy world, clutter can easily take over our homes, turning sanctuary into chaos. Efficient storage isn’t a luxury anymore—it’s a necessity. The good news is, smart built-in storage cabinets can dramatically enhance a space’s functionality while maintaining a seamless aesthetic. But here’s the catch: improper installation can lead to frustration, wasted time, and money. That’s why mastering the top installation tips is essential for a successful upgrade.
Did you know that according to a recent study, poorly installed cabinets can reduce your home’s value and lead to costly repairs down the line? Well-executed built-ins not only boost home value but also optimize space usage—crucial for small or awkward nooks. I’ve learned that even small mistakes during installation, like misaligned shelves or inconsistent finishes, can undermine the entire project. Trust me, I’ve been there.
For those wondering whether investing time and effort into expert tips is worth it, I say absolutely yes. Proper installation ensures your cabinets’ durability and seamless integration. Plus, with the latest trends in 2025, such as creative and customizable designs, the right methods make all the difference.
If you’re ready to transform your space into a tidy, stylish haven, understanding these essentials sets the foundation for success. And don’t worry—we’re about to dive into the detailed steps that will help you avoid common pitfalls and achieve professional results. Ready to get started? Let’s go!
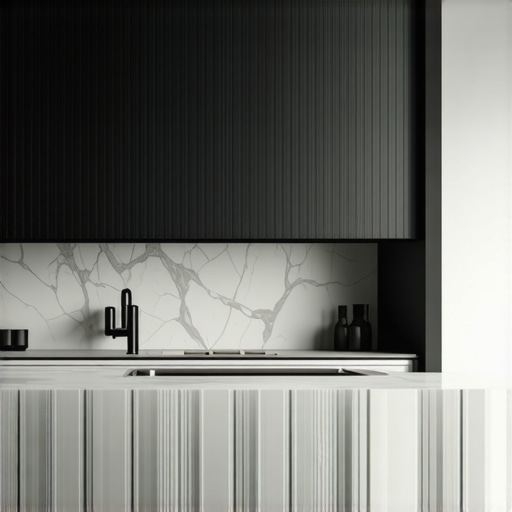
Start with Precise Measurements
Before any tools touch your wall, measure twice—literally. Use a reliable tape measure and a laser level to mark out the cabinet’s footprint. I once tried eyeballing the placement for a bathroom storage nook, and the shelves ended up crooked. That mistake cost me time, but now I always double-check and mark out key reference points, ensuring perfect alignment. Think of it as laying the foundation for a house; accuracy prevents headaches down the line.
Choose the Right Materials and Tools
Gather quality plywood, screws, brackets, and your preferred finish—whether paint or veneer. A cordless drill, level, stud finder, and clamps are must-haves. During my own project, I initially opted for cheaper screws, which warped under the weight of the shelves. Upgrading to stainless steel screws and using clamps during assembly kept everything aligned. Visualize framing a picture; using the right nails and steady hands results in a professional look.
Establish a Stable Frame
Build the cabinet frame on the ground or a worktable. Use the clamps to hold pieces steady while fastening. When I built a custom walk-in closet, I assembled the frame in sections, then mounted it to the wall. This method allowed me to ensure each segment was square and durable before hanging. Consider this step as constructing a skeleton—sturdy and true to your measurements, it supports everything else.
Secure the Frame to Wall Studs
Identify your wall studs with a stud finder and mark their locations. Anchor the frame with heavy-duty screws directly into these studs. I learned the hard way that drywall anchors won’t support heavy built-ins over time. Using 3-inch screws into the studs ensured the installation held firm. Think of this as attaching a mural to a wall—you need a solid anchor for the masterpiece to stay put.
Install the Cabinets and Shelves Carefully
With the frame in place, mount the cabinet carcasses, double-checking for levelness, and shim if necessary. For the shelves, use a spirit level to mark their exact height. During my latest project, I pre-drilled holes for adjustable shelves, which allowed flexibility later. This step is like hanging a picture frame; small adjustments ensure everything looks straight and balanced.
Finish with Seamless Detailing
Sand rough edges, apply paint or veneer, and install handles or knobs. I once left uneven edges, which caught crumbs and dust, turning a sleek project into a headache. Finishing touches like caulking gaps and sealing surfaces make the built-in feel integral to your space. Think of it as the icing on the cake—final details elevate the entire look and durability.
If you’re aiming for a truly professional result, consider consulting a specialized team. They can handle complex aspects like custom fittings and seamless integration, as discussed in creative built-ins.
While many homeowners focus on selecting stylish vanities or efficient storage, they often overlook the subtle complexities that can compromise long-term success. One common misconception is that installing built-ins is straightforward—simply follow the instructions, and everything will align perfectly. However, this oversimplification ignores critical nuances such as precise framing, structural support, and material behavior over time. For example, even slight miscalculations in measurements or ignoring wall irregularities can lead to gaps, uneven surfaces, or sagging shelves—problems that can be costly and frustrating to fix.
An advanced mistake many make is assuming that quick fixes, like drywall anchors, suffice for heavy installations. In reality, anchoring into the wall studs ensures durability, especially for substantial cabinetry or vanities. This underscores the importance of understanding your home’s unique structure rather than relying solely on generic solutions. For further insights, exploring expert tips on installation can help you avoid these pitfalls; consider reviewing professional installation tips.
A significant nuance often missed is the impact of material expansion and contraction with temperature and humidity changes. Solid wood, for instance, may swell or shrink, causing misalignments or cracks over time if not properly accounted for in the design. This advanced consideration is critical, especially in bathrooms or kitchens where moisture levels fluctuate. Incorporating adjustable features and choosing appropriate finishes can mitigate these issues. More about this can be found at creative built-in solutions.
Making these nuanced adjustments isn’t just about avoiding problems; it elevates the overall quality and longevity of your installations. Think of it as investing in the craftsmanship that transforms good design into exceptional functionality. Keep in mind that even small oversights can erode your project’s value over time, making meticulous planning indispensable. Let this serve as a reminder that mastering these hidden details will save you time, money, and future headaches. Have you ever fallen into this trap? Let me know in the comments.Maintaining your built-in cabinets and vanity installations is crucial to preserving their appearance and function over time. One of the most effective ways to ensure longevity is investing in the right tools and adopting a regular maintenance routine. I personally swear by a few specialized tools that make upkeep much easier, such as a digital moisture meter, which helps monitor for humidity-induced expansion or contraction, especially in bathrooms or kitchens where moisture variances are common. Regularly inspecting for loose screws or hinges with a magnetic screwdriver set ensures that your storage solutions remain stable and secure. Using a soft microfiber cloth and mild cleaning agents prevents damage to finishes and veneers, helping your high-quality materials stay pristine for years.
When it comes to planning long-term results, I recommend scheduling seasonal checkups. For example, during spring and fall, I examine seams, caulking, and finishes for signs of wear or damage. Applying a layer of protective wax or sealant every couple of years can also sustain the aesthetic and structural integrity of your built-ins, especially if they feature natural wood. For more complex issues or if you want to upgrade your design, consulting with professionals can save you time and prevent costly mistakes. If you’re unsure about how to handle structural support or intricate details, professional guidance is just a click away at our contact page.
Looking ahead, I think the trend in maintenance tools is leaning toward smart, automation-enabled devices. Imagine a storage system that alerts you when moisture levels rise or when hinges need tightening, all connected to your smartphone. This integration will make ongoing upkeep far more manageable and less prone to oversight. To get started today, try incorporating a digital humidity gauge into your maintenance routine—it’s a small investment with big payoffs.
### How do I keep my built-in storage functioning flawlessly over time?
Start by adopting a proactive approach with targeted tools like moisture meters and precision screwdrivers. Schedule seasonal inspections to catch issues early, and consider using protective finishes regularly to guard against environmental damage. Remember, consistent care is your best defense against long-term wear and tear—so make it a habit! For more expert insights, explore effortless storage maintenance tips.
The Hidden Lessons I Wish I Learned Sooner
One of the most profound lessons I discovered was that precise measurements and thorough planning are the backbone of successful built-in installations. I once underestimated the importance of wall irregularities, which led to misaligned shelves—costing me time and frustration. Now, I double-check every inch and incorporate flexibility in my designs, knowing that perfection is a moving target but still worth striving for.
Another deep truth I uncovered is that investing in quality materials and tools not only simplifies installation but also ensures durability. Using sturdy brackets and professional-grade screws makes a world of difference, especially when dealing with heavy or long-term storage solutions. Trusting the experts’ recommended tools has saved me countless headaches and future repairs.
Lastly, I realized that seamless integration of built-ins demands attention to detail during finishing touches. Smoothing rough edges, applying appropriate finishes, and adding hardware might seem minor, but they elevate the entire project from good to exceptional. It’s these finishing nuances that make built-in storage solutions both beautiful and long-lasting.
Related Posts

Top Installation Tips for Effective Built-ins & Storage Solutions Today
Imagine this: you’ve finally decided to take on that home…
Smart Built-in Cabinets & Storage Ideas for Seamless Home Design
My Journey into the World of Built-In CabinetsWhen I first…
Hide the Office: 5 Built-in Desk Fixes for Small 2026 Rooms
Have you ever wrestled with a tiny room where even…