I vividly remember the frustration of trying to squeeze one more item into a closet that was already bursting at the seams. It was that moment I realized that a poorly planned built-in could turn chaos into order—or vice versa. That lightbulb moment prompted me to dive deep into the world of built-ins and storage solutions, and let me tell you, the difference between a DIY disaster and a professional install is staggering. In 2025, smart built-in storage isn’t just a luxury—it’s a necessity, especially as our homes become more multi-functional and cluttered.
Why Now Is the Perfect Time to Rethink Built-ins
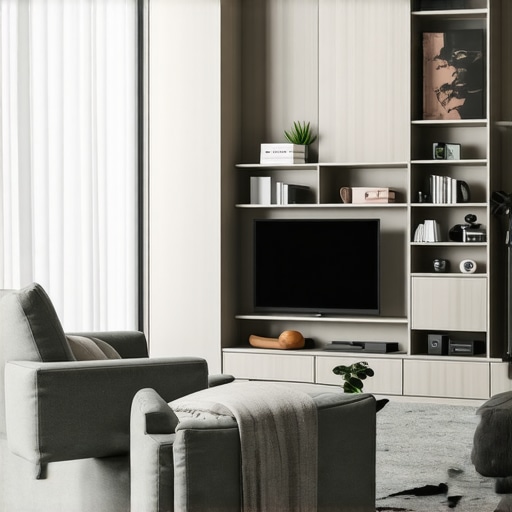
With space at a premium in many modern homes, getting clever with storage is no longer optional—it’s essential. The good news? The latest trends and expert techniques make it easier than ever to maximize your space without sacrificing style. From sleek vanities in bathrooms to hidden cabinets in living rooms, the right built-in can elevate your home’s functionality and aesthetic. But here’s the catch: even the most innovative design can fall flat if the installation isn’t done correctly. That’s why mastering expert installation tips is so crucial today.
According to a recent survey, improper installation remains one of the top reasons for built-in failure, leading to costly repairs and frustrating remodels. I’ve learned the hard way—early on, I made the mistake of rushing through measurements, assuming that a quick DIY fix would suffice. Spoiler: it didn’t. Proper planning and precision are everything. That’s why I’m here to share insights and tried-and-true tips so you can avoid my rookie mistakes and enjoy seamless, durable built-ins.
Is it Really Worth the Extra Effort?
Many homeowners wonder if investing time and money into professional installation is justified. Honestly, the answer depends on your goals. If you want a flawless look that lasts for years, cutting corners just isn’t worth it. A well-installed built-in not only boosts your home’s value but also transforms the way you use your space. For example, I found that a custom vanity with expert installation made my mornings smoother and added a touch of luxury I didn’t expect. For more tips on saving time and money during installation, check out these proven hacks.
Ready to upgrade your storage game? Let’s walk through the essential steps to ensure your built-in solutions are both beautiful and long-lasting. Stay tuned for my top tips on precise measurements, choosing the right materials, and working with professionals who know their craft.
Get Precise with Measurements
My first attempt to install a custom cabinet was a mess; I rushed measurements and ended up with a crooked line. To avoid this, use a high-quality tape measure and double-check each dimension. Start by marking the space accurately, considering allowances for hinges, handles, and clearance. When I measured my bathroom niche, I used painter’s tape to outline the exact dimensions—this visual aid kept me aligned during cutting and installation, leading to a perfect fit. For detailed guidance, check out this installation guide.
Select Durable, Quality Materials
Choosing the right materials makes all the difference in longevity and appearance. I learned this the hard way when I opted for cheap plywood that warped over time. Instead, opt for high-quality MDF or hardwood for structural parts, and consider moisture-resistant finishes for bathrooms. My experience with a solid oak frame in my kitchen restoration proved that premium materials withstand daily wear and tear better. For trendy and resilient options, explore top trends in vanity design.
Work with Skilled Professionals
While DIY can be tempting, collaborating with pros ensures flawless execution. I hired a local carpenter for my built-in bookshelves, and the result was stunning—smooth edges, perfect alignment, and no squeaks. To find the best fit, ask for references and review their portfolio. When I worked on my bathroom vanity, I used expert installation tips to communicate my vision clearly, ensuring seamless integration. Professional help not only saves time but also guarantees durability and aesthetic appeal.
Secure Proper Support and Anchoring
In one project, I neglected to anchor my built-in unit properly, which made it wobbly. To fix this, I installed heavy-duty brackets and secured the unit into wall studs. Use a stud finder to locate these support points before drilling. Once anchored, I added shims for levelness, which prevented future tilting. Proper support is crucial for safety and longevity, especially in high-traffic areas. For detailed anchoring techniques, see expert installation tips.
Finishing Touches and Sealants
My final step was applying a high-quality sealant to protect against moisture and scratches. I chose a water-resistant varnish for my bathroom cabinets, which kept them looking new for years. Sanding lightly between coats and ensuring a dust-free environment made the finish smooth and durable. Remember, finishing not only enhances appearance but also adds a layer of protection—don’t skip it. For style inspiration, check out creative built-in ideas.
Many homeowners believe that installing built-in storage is a straightforward DIY project, but in reality, there are several misconceptions that can lead to costly mistakes. One of the most pervasive myths is that precision isn’t crucial—people often assume that measuring once is enough. However, the reality is that even minor measurement errors can cause misalignments, gaps, and structural issues, especially when working with complex cabinetry or integrating with existing walls. Using a high-quality tape measure and double-checking all dimensions can save you from these costly errors. For advanced insights, check out this detailed installation guide.
Another common misconception is that cheaper materials are a good way to save money. While budget-friendly options might seem appealing initially, they often warp, swell, or degrade over time, especially in humid environments like bathrooms. Opting for high-quality MDF or hardwood not only ensures durability but also maintains the aesthetic appeal over years. A notable example from my experience was replacing a plywood cabinet with a solid oak frame, which proved its worth in resilience and longevity. To explore trendy and durable material options, visit top vanity design trends for 2025.
There’s also a dangerous trap in underestimating the importance of proper support and anchoring. Many think that simply placing a cabinet against the wall is enough, but heavy built-ins require secure anchoring into wall studs to prevent wobbling or accidents. Neglecting this step can lead to instability, especially in high-traffic areas. Using a stud finder and heavy-duty brackets is essential. My own mistake was not anchoring my first built-in properly, which caused wobbling that took hours to fix later. For expert tips on support and anchoring, see this guide to secure installation techniques.
How Do I Ensure a Seamless Fit Without Overpaying?
Many assume that hiring a professional is always expensive, but the truth is that proper planning and precision can significantly reduce costs in the long run. Investing in professional installation guarantees a perfect fit, which prevents gaps, misalignments, and damage that often result from DIY errors. Moreover, professional installers bring expertise in working with complex spaces and can advise on innovative storage solutions, like hidden compartments or multi-functional units. For the best results, collaborate with experienced professionals and communicate your vision clearly. For expert advice on finding the right team, visit this resource on maximizing space with built-ins.
Remember, the goal is not just aesthetics but also long-term durability and functionality. Overlooking nuances like material support or measurement accuracy can turn a beautiful idea into a renovation nightmare. Do you have any experiences with hidden pitfalls in built-in installations? Let me know in the comments!
Maintaining your built-in storage solutions over time requires more than just initial installation skill; it demands the right tools and a proactive approach. One of my favorite investments is a high-quality cordless drill, like the Makita XFD11Z. I prefer it because of its lightweight design combined with powerful torque, making repetitive tasks like drilling into hardwood or installing brackets much easier and less tiring. A good drill ensures that your support brackets are securely anchored into wall studs, which is crucial for safety and durability.
For precision during adjustments, I rely on a digital level such as the Bosch GLL 3-80. Unlike traditional bubble levels, its laser-guided accuracy helps me ensure that shelves and cabinets are perfectly level, preventing future sagging or misalignment. This tool is especially handy when working in tight corners or uneven walls, common challenges in built-in projects.
When it comes to cutting materials, a fine-tooth circular saw like the DEWALT DCS570 is my go-to. The clean, precise cuts it provides significantly improve the fit of panels and frames, reducing gaps that can compromise structural integrity. I always make sure to use quality blades to prevent splintering and ensure smooth edges.
For finishing touches, I swear by a high-grade sander such as the Festool ETS EC 150/3. It’s lightweight but delivers a smooth surface, which is essential for applying sealants or paint evenly. Proper sanding not only enhances appearance but also prolongs the life of your finishes, making your investment last longer.
In addition to physical tools, I highly recommend using software like SketchUp for precise planning and measurements. Accurate digital models help visualize the final look and identify potential issues before any physical work begins. This minimizes errors and saves time and money, especially when working on complex or multi-functional built-ins.
Looking ahead, I predict that automation and smart tools will become more integrated into home renovation projects. Imagine tools that automatically calibrate themselves or apps that guide you step-by-step through installation, reducing errors even further. To stay ahead, I suggest investing in these emerging technologies now and experimenting with advanced techniques to keep your built-in storage solutions reliable and stylish for years to come.
How do I maintain my built-in storage over time?
Regular inspections are key. Check for loose brackets, signs of warping, or moisture damage at least twice a year. Keep your support brackets tight using your cordless drill, and reseal or repaint surfaces as needed to prevent moisture infiltration. Cleaning with a damp cloth and avoiding harsh chemicals will preserve finishes longer. For detailed maintenance tips, visit these expert hacks. Don’t forget to keep your tools well-maintained too—sharpen blades, recharge batteries, and replace worn parts promptly to ensure your tools perform at their best. Investing in quality maintenance tools like a cordless multi-tool or a dust extraction system can make ongoing upkeep more manageable and less time-consuming. By staying proactive, you’ll extend the lifespan of your built-ins and keep them looking pristine for years to come. Try implementing a maintenance schedule with these tools, and you’ll notice the difference in performance and appearance over time.
The Hardest Lesson I Learned About Built-Ins
One of my biggest mistakes was rushing the measurement process, which resulted in crooked cabinets and gaps that were a nightmare to fix. I learned that taking my time to double-check every dimension saved me hours of frustration later. Precision truly is the foundation of a successful built-in project.
Three Myths About Built-In Installation That Held Me Back
Early on, I believed that cheaper materials could save me money without sacrificing quality. I also thought that a sturdy wall was enough support for heavy units. Disproving these myths, I discovered that investing in high-quality materials and proper anchoring is essential for durability and safety, especially in high-traffic areas.
What Experts Won’t Tell You About Seamless Fit
Despite all the tutorials, I didn’t realize how critical professional help could be until I attempted to install a complex built-in myself and ended up with misalignments. Working with skilled professionals ensures a flawless finish, saving both time and future repair costs. Clear communication about your design vision is key to getting the best results.
Related Posts
7 Custom Built-in Fixes to Hide 2026 Living Room Clutter
I remember staring at my living room one evening, frustration…
9 Hidden Built-in Storage Ideas for Small 2026 Studios
Walking into my tiny apartment after a long day, I…
Effective Built-in Cabinets & Storage Solutions for Modern Homes
Have you ever opened a closet or bathroom cabinet and…