

I stood there with a lukewarm coffee in one hand and a level in the other, staring at the gap on my master vanity drawer that seemed to grow every time I looked away. Just two weeks ago, I had finished a full vanity installation that I was incredibly proud of. But there it was: the top left drawer front was drooping like a tired eyelid. It’s the kind of thing guests might not notice, but once you see it, it is all you see. I tried the ‘old reliable’ method of just cranking down on the screws until my knuckles turned white. Big mistake. I ended up stripping the pilot holes, making the drawer front even looser than before. It was a classic case of rushing the finish and ignoring the physics of the cabinet. Today, we are going to stop that sagging for good. I’m going to show you how to realign those fronts and, more importantly, how to keep them that way without ruining your woodwork.
That Annoying Gap That Just Wont Go Away
[IMAGE_PLACEHOLDER] When you invest in built-in storage ideas to declutter your home, you expect precision. However, wood is a living material. Even the best-built cabinets can suffer from ‘mechanical creep’ over time. According to the Architectural Woodwork Institute, moisture content changes in wood can lead to dimensional instability, which is often the silent culprit behind hardware shifting just enough to throw off your visual lines. I learned the hard way that vanity installation hacks are only as good as the final adjustment period. If you do not account for the weight of the items you put in the drawer, that perfect alignment you had on day one will vanish by day ten. I remember my first big bathroom remodel; I was so focused on the plumbing that I treated the drawer fronts as an afterthought. I figured a couple of screws and a bit of ‘eyeballing it’ would suffice. Within a month, the drawers were clashing against each other, chipping the custom paint. It was embarrassing and entirely avoidable. Have you ever spent hours leveling a cabinet only to have it shift the moment you actually started using it?
Is My Cabinet Just Cheaply Made?
It is easy to blame the manufacturer when things go sideways, but even high-end custom units need a bit of TLC. The real secret lies in the adjustment screws on the drawer slides and the way the front is anchored to the box. If you’ve noticed uneven gaps in custom built-in doors or drawers, it is usually not a structural failure but a symptom of settling. We are not just looking for a temporary fix; we are looking for a rock-solid calibration that holds up to daily use. By using an expert guide to flawless vanity installation, you can master the micro-adjustments that make your DIY project look like a high-end professional job. Let’s dive into why those screws keep loosening and how to lock them in place permanently so you never have to stare at a crooked drawer again.
Get Real with Your Drawer Hardware
The first thing you have to accept is that your drawer slides are not just rails; they are precision instruments. If you look at the mounting clips on the underside of your drawer box, you will see small thumbwheels or screw heads. These are your best friends during the ‘calibration phase.’ I learned this during a frantic weekend while trying to fix uneven gaps in custom built-in doors and drawers. I realized that high-end hardware is designed to be tuned like a guitar string. Most modern undermount slides offer three-way adjustments: height, side-to-side, and depth. To fix a drooping front, you usually need to turn the height adjustment wheel toward the rear of the cabinet. This lifts the front of the drawer box relative to the slide. If the drawer is hitting the cabinet frame on the left, you use the lateral adjustment tab. Do not just force the drawer in and out; make small, incremental turns and test the ‘reveal’—the gap between the drawer and the frame—after every single adjustment.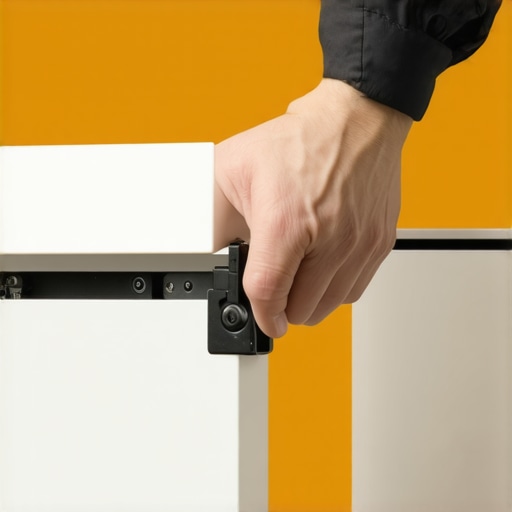
The Toothpick Solution for Stripped Holes
When I mentioned stripping my pilot holes earlier, I was in a minor panic. If you have ever felt that sickening ‘pop’ where a screw just spins freely in the wood, you know the feeling. The common instinct is to reach for a fatter screw, but that often splits the delicate face frame. Instead, use the ‘old-school’ woodworker’s fix. Dip two wooden toothpicks in wood glue, jam them into the stripped hole, and snap them off flush with the surface. Once the glue dries for about twenty minutes, you have a solid plug of wood that acts as a fresh anchor. This is a vital part of an expert guide to flawless vanity installation because it preserves the integrity of your custom cabinetry without requiring expensive fillers. I used this trick on a heavy oak vanity three years ago, and those drawer fronts haven’t budged a millimeter since, despite daily use.
Balance the Load Before Gravity Takes Over
A drawer that looks perfect when empty will almost always sag once you fill it with five pounds of lotions and spare towels. This is why you must account for ‘live load’ during the setup. If you find your soft close drawers are slamming or hanging low, the tension and tilt need to be dialed in. You want to set the rear of the drawer slide slightly lower than the front—about 1/16th of an inch. This creates a subtle ‘uphill’ climb for the drawer, which gravity will naturally level out once the drawer is loaded. For deeper units, you might even need to stop drawer bind on heavy pantry pull-outs by ensuring the slides are perfectly parallel. If they are even a fraction of an inch wider at the back than the front, the hardware will fight itself, leading to that annoying ‘catch’ every time you try to open it. Measuring the distance between slides at the front and the back with a spacer block is the only way to be 100% sure you are perfectly square.Most homeowners and even some seasoned DIYers operate under the myth that more screws automatically equal more stability. In my early days, I was the king of ‘over-securing.’ I’d drive three-inch cabinet screws into every available inch of the hanging rail. However, the Forest Products Laboratory has shown through various studies that over-fastening can actually weaken the substrate, especially in engineered woods like MDF, by creating internal stress fractures. The truth is that two well-placed, high-quality fasteners into the center of a stud are far superior to five poorly placed ones that split the wood grain. I’ve seen beautiful projects ruined because someone thought they could ‘force’ a cabinet to be level by over-tightening the mounting screws against a bowed wall, causing the entire box to rack out of square.
Why Do Heavy Floating Vanities Always Seem to Dip After Six Months?
This is the ultimate test of an installer’s expertise. You might think your wall is solid, but the hidden nuance is ‘live load’ versus ‘dead load.’ A quartz countertop is a dead load—it doesn’t change. But the moment you lean on that vanity to brush your teeth, you’ve added a dynamic live load that most standard fasteners aren’t rated for. If you aren’t using a steel plate fix for sagging vanities, you are essentially asking the wood fibers to hold up hundreds of pounds of pressure indefinitely. I once saw a massive master vanity literally peel the drywall paper off because the installer didn’t realize that standard 2×4 studs can slightly flex under that much cantilevered weight. This is why you must learn how to support quartz counters on custom floating vanities using internal bracing rather than just relying on the cabinet’s back panel. 
Trust the Floor Before You Trust Your Eyes
Another common trap is assuming your bathroom floor is even remotely level. I’ve walked into multi-million dollar homes where the floor sloped half an inch over a three-foot span. If you don’t use the leveling move for vanities on slanted floors, your drawer slides will never stay aligned because the entire box is sitting at a rhomboid angle. You might get the face frames to look okay, but the internal hardware will be under constant lateral tension. This leads to the hardware wearing out prematurely, which is a primary reason soft close drawers start slamming or catching after just a few months. Have you ever spent a weekend leveling a cabinet only to realize the wall was actually the problem? Let me know in the comments if you’ve fallen into the ‘shimming nightmare’ trap before. For those tackling deep storage, remember that hidden pull-out fixes for deeper cabinets often require you to scribe the unit to the floor perfectly to avoid that annoying ‘creep’ where the drawer rolls open on its own. Taking the extra twenty minutes to scribe a base is what separates a ‘renovation’ from a ‘restoration.’
The Hardware I Trust More Than My Own Eyes
I have spent a small fortune on tools that eventually ended up gathering dust, but there are three things in my kit I refuse to start a job without: a self-leveling cross-line laser, a 5mm shelf pin jig, and a long-nose pattern marker. When you are following a step-by-step guide to vanity installation for beginners, you might think a standard bubble level is enough. It is not. Houses are dynamic environments; they breathe, settle, and shift. I use the laser every six months to check the ‘datum line’ of my built-ins. If I see a door starting to rub, I don’t just guess which way to turn the screw. I fire up the laser, and it tells me exactly where the cabinet box has settled. This level of precision is how I managed to ensure how we fixed deep vanity drawers that kept hitting plumbing without having to rebuild the entire internal structure. Using a pattern marker allows me to reach through narrow hardware holes to mark exact drilling points on the drawer face, eliminating the ‘drift’ that happens when you try to eyeball a drill bit into a pre-drilled hole.
How can I keep my custom built-ins working perfectly for the next decade?
The secret to longevity isn’t just in the installation; it is in the ‘seasonal tune-up.’ Wood expands in the humid summer and contracts in the dry winter. This cycle puts immense stress on your fasteners. Every year, when the seasons change, I take ten minutes to go through my vanity and tighten the mounting screws. Blum, a global leader in functional furniture fittings, specifies in their technical documentation that high-quality hinges are tested for 200,000 opening and closing cycles. However, that rating assumes the hinge remains perfectly aligned. If a door begins to sag, it puts lateral pressure on the hinge cup, which will eventually strip the wood. By integrating creative storage solutions for vanities, you can distribute weight more evenly, preventing the ‘bottom-heavy’ sag that kills lower cabinets. I also recommend a quick wipe-down of the drawer slides with a dry PTFE lubricant. Never use WD-40; it attracts dust like a magnet and will turn your precision slides into a gritty mess within months. Keeping things clean is the simplest way to achieve effortless storage solutions for a tidy, stylish home.
Why Your 2030 Bathroom Will Be Smarter Than You Think
Looking ahead, I see a major shift toward modularity and ‘active’ maintenance. We are already seeing the rise of innovative storage solutions to transform your bathroom that include built-in moisture sensors. Imagine a vanity that sends an alert to your phone the second a slow leak starts under the P-trap, before the wood even has a chance to swell. I predict that the next generation of custom cabinetry will move away from permanent adhesives and toward mechanical, ‘click-lock’ sub-frames that allow you to swap out door styles or repair structural components without tearing out the drywall. This modularity will make scaling your storage as easy as adding a Lego brick. For now, the most advanced thing you can do is perform the ‘quarter-turn’ test: every six months, check your hinge screws. If they turn more than a quarter-circle before resisting, they were already on their way to failing. Try this on your heaviest drawer today and see just how much it has settled since you installed it.
Lessons from the Bottom of My Vanity Tool Belt
After years of wrestling with wood that seems to have its own agenda, I’ve realized that the first 48 hours after an install are a lie. Never assume your drawer fronts are perfect until they’ve sat with weight in them for a few days. I’ve gone back to jobsites a week later only to find that “settling” had moved my reveals by an eighth of an inch. Another big one? Don’t trust factory screws. Many manufacturers include basic hardware that strips easily; I always swap them for high-torque cabinet screws to ensure a bite that lasts.
I also learned that humidity is your master. If you live in a coastal area, your drawers will behave differently in August than they do in January. I now leave a tiny bit more “breathing room” in my gaps during summer installs to prevent clashing when the wood swells in the winter. It is a nuance that separates the pros from the weekend warriors.
[IMAGE_PLACEHOLDER]
The Gear That Keeps My Built-ins Square
You don’t need a warehouse full of tools, but these four are non-negotiable for me:
- The 5mm Shelf Pin Jig: Precision is impossible without consistent spacing. I use this for more than just shelves; it helps me align internal drawer rails with mathematical certainty.
- Titebond II Wood Glue: Whether I am doing the “toothpick trick” or reinforcing a dovetail, this is the only adhesive I trust for long-term moisture resistance in bathrooms.
- A Quality Scribe: If you are trying to scribe built-in cabinets to slanted kitchen floors, a cheap compass won’t cut it. Get a dedicated scribing tool to ensure your base hits the floor without gaps.
- A Digital Angle Finder: It is the only way to prove to a homeowner that the wall is the problem, not your craftsmanship.
Stop the Sag and Reclaim Your Space
Fixing a drooping drawer front might seem like a small win, but it is the difference between a room that feels “renovated” and one that feels “refined.” By following an expert guide to flawless vanity installation, you aren’t just turning screws—you are maintaining the value and integrity of your home. Don’t let a sagging door be the thing that keeps you from being proud of your DIY work. Grab your level, check your reveal, and get it done this weekend.
Have you ever spent hours leveling a cabinet only to find it tilted the next morning? Let me know your biggest installation headache in the comments below!