

I’ll never forget the sound of my wife’s favorite ceramic vase rattling against the oak shelf every time I walked past the living room built-ins. I had spent three full weekends measuring, cutting, and staining, only to realize I’d built a beautiful, three-hundred-pound jelly-mold. It looked like a million bucks, but one accidental hip-bump made the whole structure shiver like a leaf in a gale. I thought I was being clever by using heavy-duty wood screws and a prayer, but I was just ignoring the physics of leverage. That wobbly realization was my turning point. I had to stop the sway before a guest or a clumsy pet brought the whole thing down. [image placeholder]
Stop Living with That Nervous Built-in Shake
The problem isn’t usually your craftsmanship; it’s the hidden war between gravity and standard fasteners. We often assume that a few extra screws into the studs will keep things rigid. But wood is organic; it compresses, and over time, those holes widen just enough to let the shimmy begin. I made the classic mistake of relying on simple glue blocks during my first big project, which turned out to be about as effective as wet cardboard. Today, we’re going to fix that once and for all. We’re moving beyond basic carpentry and borrowing a move from commercial framing: the hidden steel plate. I’ve seen people try every shim in the book, but often the hidden sub-frame move for supporting massive quartz-top vanities is what’s actually needed to stop the sway from the floor up. If your project involves a workspace, you might want to look at the hidden steel plate fix for wobbly floating desks specifically. It’s the same logic we use when stopping floating vanities from dipping under their own weight.
Is a bit of steel really necessary for wood cabinets?
You might be thinking, I am a woodworker, not a welder. I get it. The skepticism is real. Why buy expensive plates when another five-dollar box of screws is right there? But here is the reality: according to the USDA Forest Products Laboratory, wood is an anisotropic material, meaning its strength and stability change depending on the direction of the load and the moisture content. Steel doesn’t care about your humidity. It stays rigid. By integrating thin, quarter-inch steel plates behind your face frames or under your bases, you’re creating a structural skeleton that keeps everything square. Have you ever spent hours leveling a cabinet only to have it start leaning or shaking six months later? It is time to stop the cycle. Let’s look at how to tuck these steel plates out of sight so your built-ins feel as solid as a stone wall.
Stop the Sway with Precision Recessing
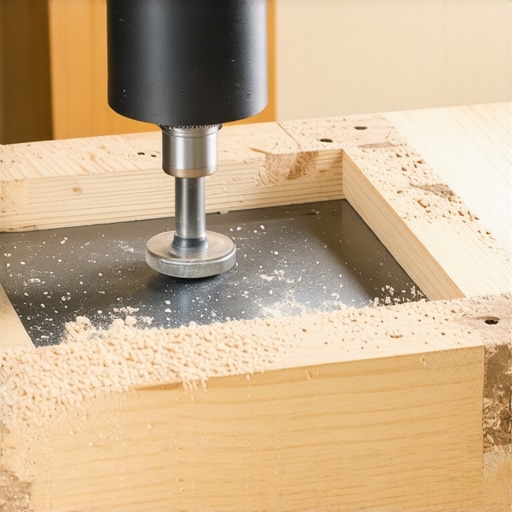
To turn a wobbly cabinet into a fortress, you have to stop thinking of the cabinet box as a stand-alone unit and start seeing it as a bridge. A bridge needs a rigid chord to prevent it from buckling. We achieve this by routing a shallow channel into the back of your face frame or the side of the cabinet carcass. This channel houses a 1/4-inch thick steel plate. Think of it like a bone inside an arm; the wood is the flesh that looks good, but the steel is what provides the actual structural leverage. This is the same principle I use when implementing the hidden sub-frame move for supporting massive quartz-top vanities. Without that internal rigidity, the moment you put weight on the top, the wood starts to bow, and your joints begin to scream under the pressure.
The Time My Mudroom Project Almost Ended in Divorce
A few years back, I was building a set of floor-to-ceiling lockers for our entryway. I thought I could skip the recessing and just bolt the steel plates directly to the back of the wood. Big mistake. The face frames wouldn’t sit flush against the wall, leaving a hideous 1/4-inch gap that caught every piece of dust and dog hair in the house. My wife pointed it out every time she hung up her coat. I ended up having to disassemble the entire thing and use a plunge router to create a ‘pocket’ for the steel. It was a messy, sawdust-filled Saturday, but the result was a structural fix for wobbly entryway lockers that hasn’t budged an inch in five years. Even with three kids hanging off the hooks, those lockers feel like they are part of the foundation.
Anchor Your Units Where It Actually Counts
A common mistake is anchoring only at the top of a tall unit. This creates a pendulum effect where the base can still shift or vibrate when someone walks by. If you are working with bathroom fixtures or heavy storage, you need to ensure the base is locked down as tightly as the top. Often, the ways to brace a wobbly vessel sink vanity involve connecting the internal steel frame directly to the floor joists or the wall studs at multiple points. It is not just about more screws; it is about the pattern. I prefer a staggered triangular pattern for my fasteners. This prevents the wood from splitting along a single grain line while maximizing the surface area the steel plate is actually gripping. This logic is also essential when you need to stop sagging fireplace mantel shelves where the leverage is working against a heavy stone facade.
Why You Must Double Down on Floating Features
If you are moving away from traditional floor-standing units toward a more modern look, the stakes for stability get much higher. For instance, the hidden steel plate fix for wobbly floating desks is non-negotiable because you don’t have legs to distribute the load. The steel becomes the legs. You are essentially creating a cantilever. When I install these, I make sure the steel plate extends at least twelve inches into the wall cavity, bolted through the center of the studs. This creates a rock-solid platform that can handle the weight of a heavy monitor setup without a hint of a dip. You want your furniture to be silent. If it creaks when you lean on it, it is telling you that the wood is doing a job it was never meant to do alone.
But let’s get into the stuff they don’t teach you in the weekend workshops. Most people believe that once the bubble in their level is perfectly centered, the battle is won. In my experience, that’s actually where the real trouble begins. If you aren’t accounting for floor deflection, your ‘perfect’ installation is just a ticking clock. I’ve seen countless DIYers obsess over the level, only to find their doors sticking six months later because they didn’t realize the floor actually sinks when the cabinet is filled with heavy books or dishes. You need to master the leveling move for vanities on slanted bathroom floors while also predicting how much that floor will move under load.
Your Level is Actually Lying to You
Here is a contrarian take that usually gets me some sideways looks: a perfectly level cabinet can be a structural failure in the making. According to the American Wood Council, residential floor joists are designed to deflect—meaning they literally bend—under ‘live loads.’ When you install a massive floor-to-ceiling unit and level it while it’s empty, you aren’t seeing the final state. The moment you load those shelves with five hundred pounds of hardcovers, the floor dips, the cabinet tilts forward, and your beautiful crown molding starts to pull away from the ceiling. This is exactly why most floor-to-ceiling cabinets gap at the top over time. You have to ‘over-level’ slightly or, better yet, use a floating sub-base to decouple the cabinet from the flexing floor joists.
Should You Trust Studs Alone to Hold Up a Heavy Unit?
I get asked this constantly by guys who are worried about their massive pantry builds. The short answer? No. Studs are great for vertical shear, but they are surprisingly bad at resisting the outward ‘pull’ of a top-heavy cabinet that wants to tip. If you are relying solely on three-inch screws through a 1/2-inch plywood backer, you are inviting disaster. I always recommend using a horizontal steel ledger or the hidden sub-base for leveling heavy media walls on carpet to distribute that weight across the floor. This provides a secondary fail-safe that doesn’t rely on the pull-out strength of a few screws in old pine studs. Using an expert guide to flawless vanity installation tricks will show you that the pros always look for at least three points of contact on different planes.
The Ceiling Gap Trap That Ruins Finishes
The biggest ‘oops’ factor I see in high-end built-ins is the lack of an expansion joint at the top. We all want that seamless, ‘built-for-this-house’ look where the wood meets the ceiling perfectly. But houses breathe. During the winter, your joists shrink; in the summer, they swell. If you bolt your cabinet tight to both the floor and the ceiling with no room to move, the house will literally try to crush your cabinetry. I’ve seen stunning face frames crack right down the middle because the installer didn’t understand why your built-in cabinets are pulling away from the ceiling. Always leave a 1/8-inch ‘shadow gap’ or use a two-piece crown molding system that allows the house to move independently of your furniture. Have you ever fallen into this trap and heard your cabinets ‘pop’ in the middle of the night? Let me know in the comments, and let’s talk about how to fix it before the wood splits.
Even with all the steel reinforcement in the world, your house remains a living, breathing entity that shifts with the seasons. I learned early on that the job doesn’t end when I drive the last screw; you have to anticipate how the home will react to shifting humidity and foundation settlement. This is why I always reference an expert guide to flawless vanity installation tricks to ensure the initial setup is bulletproof. Personally, I never start a project without my Sola digital level. Unlike a standard bubble level, it gives me a precise numerical readout of floor deflection. I record these numbers in my project notebook so that when I come back six months later, I can see exactly if and where the floor has dropped. 
How do I keep my built-ins looking new years later?
Maintenance is about more than just a quick dusting; it requires monitoring the physical geometry of your work. I have seen why your soft close hinges are snapping in person, and it is almost always because the cabinet box has shifted slightly out of square, placing unnecessary lateral stress on the internal pistons. Every spring, I perform a ‘hinge audit.’ I take a screwdriver and ensure the gaps between the doors are perfectly consistent. If they have drifted, that is your house telling you the structure has moved. For massive projects, I have transitioned to using the hidden sub-frame hack for massive library built-ins. I no longer rely on the cabinet carcass alone; I build a secondary internal ladder frame to carry the load. According to technical guidelines from the National Kitchen & Bath Association (NKBA), wall-mounted storage systems should be engineered to withstand a static load of at least 600 lbs to safely account for both the contents and the accidental force of a person leaning on the unit. I predict that in the next few years, we will see thin carbon fiber strips replacing steel plates as the industry standard for reinforcement because they can be epoxied directly into the wood grain for a truly invisible profile. If you want to level up your craftsmanship today, I recommend trying how we fixed a tilted floating vanity with hidden leveling shims on your next bathroom remodel. It is the definitive way to achieve a professional-grade finish that stays level for a lifetime.
Lessons Learned the Hard Way Under a Three-Hundred Pound Cabinet
Looking back at my earliest projects, the biggest mistake I made wasn’t a bad cut or a messy stain; it was assuming that wood is static. I learned that fastener fatigue is real—those screws you drive today will eventually create tiny oval-shaped holes as the wood expands and contracts. This is how the rattle begins. If you are aiming for creative built-ins for seamless storage and home aesthetics, you have to acknowledge that the prettier the design, the more it needs a hidden backbone. Another lightbulb moment came when I realized that leverage is your enemy on tall units; a cabinet is essentially a long lever trying to pull itself off the wall. Finally, I stopped trusting the ‘bubble’ level for everything. A bubble tells you if something is level *now*, but it doesn’t tell you how much the floor will deflect once you add five hundred pounds of books. This is why I now prioritize the structural fix for floor-to-ceiling library units before I even think about the decorative trim.
The Tools That Saved My Sanity
You don’t need a warehouse full of machinery to achieve this level of stability, but you do need a few specific items. I never go into a job without my Sola digital level, which gives me the precise numerical data I need to calculate floor deflection. I also swear by quarter-inch A36 steel flat bars; they are inexpensive at any local metal yard and provide more rigidity than four inches of solid oak. For those looking for more built-in storage ideas to declutter and enhance your home, I highly recommend keeping a copy of the NKBA Kitchen & Bathroom Planning Guidelines on your workbench. It provides the weight-bearing standards that prevent ‘catastrophic sag.’ Lastly, a high-quality plunge router with a carbide-tipped straight bit is essential for creating those clean, hidden recesses that house your steel reinforcement without ruining the flush fit of your cabinetry.
[image placeholder]
Stop Overthinking and Start Anchoring
It is easy to get paralyzed by the physics of it all, but the fix is simpler than you think. By integrating steel into your wood projects, you are bridging the gap between old-world craftsmanship and modern engineering. You deserve a home that doesn’t creak when you walk through it, and your built-ins should feel like a permanent part of the architecture, not a temporary furniture piece. Whether you are building a massive library or a small entryway bench, take the extra hour to route that channel and bolt in a steel plate. You will thank yourself ten years from now when your doors still swing perfectly and your shelves haven’t sagged a millimeter. Have you ever felt that heart-stopping rattle when someone walks past your favorite display? Let me know in the comments below how you handled the shake!