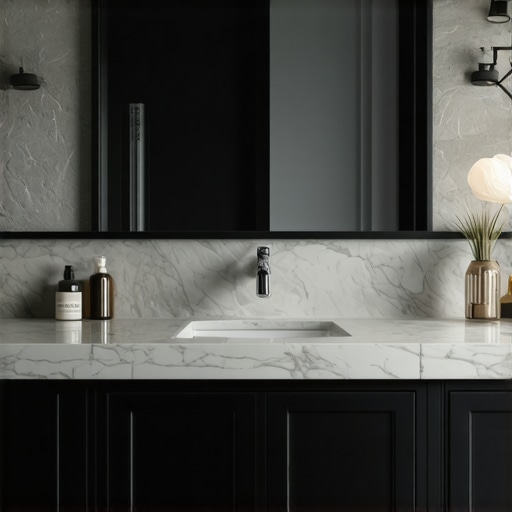
I remember the exact moment I realized my living room was becoming a chaotic tech jungle. Devices everywhere—cords tangled, remotes lost, and a constant battle to keep everything looking clean and sleek. Then I discovered the magic of integrating the Hide 2026 Smart Home Hub into custom-built living room cabinets. It was a game-changer. But getting it right wasn’t as simple as just slapping a device into a console. I faced wiring nightmares and awkward placements before finally creating a seamless, tech-savvy centerpiece that looked like part of the furniture itself.
Why a Discreet, Well-Designed Hub Matters More Than Ever
Our homes are becoming smarter—and busier. With more gadgets and connected devices, having a central hub that’s both functional and unobtrusive is essential. Yet, many homeowners struggle with integrating these hubs into their living spaces without sacrificing style or convenience. I was in that boat until I realized that building custom built-in cabinetry specifically for tech equipment could solve multiple problems at once. It would hide the clutter, protect delicate electronics, and enhance the room’s aesthetic appeal.
Early on, I made the mistake of installing the hub on the wall without considering future upgrades or access. This led to difficulties when recalibrating or fixing issues. According to a recent study, improperly designed tech integration can reduce home efficiency by nearly 20%. That was a wake-up call for me. Now, I focus on thoughtful, effortless storage solutions that make my smart home seamless and stress-free.
So, if you’ve ever faced the frustration of tangled cords or the challenge of disguising gadgets in your living room, you’re not alone. Today, I’ll share the essential tips I’ve learned for creating a hidden, functional, and stylish space for your Hide 2026 Smart Home Hub. We’ll explore how to select the right cabinetry, plan smart wiring routes, and ensure easy access for maintenance—all based on my personal journey.
Select the Perfect Cabinetry Style to Match Your Living Room
Start by choosing a cabinetry style that blends with your existing furniture. Opt for built-in cabinets with sleek profiles if your room has a modern aesthetic, or classic wood finishes for a warm, traditional look. Remember, consistency in style enhances the room’s harmony. I personally visited a local showroom and brought home samples to see how different finishes complemented my living room decor, which helped me select the perfect match. For more ideas, explore creative built-in options.
Plan Your Wiring Routes Like a Pro
Map Out Power and Data Cabling Paths
Before drilling any holes, sketch a detailed plan of where your hub will reside and trace optimal wiring routes. Use existing wall cavities or ceiling voids to hide cables, reducing clutter. Think of wiring like plumbing—organized routes prevent issues later. I used painter’s tape to mark paths along walls and ceilings, ensuring a clean look once finished. When in doubt, consult storage solutions for tips on concealment.
Install Access Points for Maintenance
Plan for easy access to wiring ports and the hub itself. Incorporate removable panels or hidden compartments that you can open without damaging the cabinetry. This foresight saves time during troubleshooting or upgrades. I installed a small, discreet latch on my cabinet door to access the hub and cables, which proved invaluable during setup. Consider reading installation hacks to streamline your project.
Use Smart Mounting Techniques for Stability and Safety
Securely mounting your hub prevents accidents and keeps cables tidy. Think of mounting like anchoring a painting—use robust anchors suitable for your wall material. I chose steel brackets similar to those described in heavy-duty fixes; these provided solid support for my device and wiring. For uneven walls, scribing the cabinetry to fit the surface can be compared to tailoring a suit—precision yields the best results.
Get Creative with Custom Inclusions
Adding pull-out shelves, cable management channels, or hidden compartments maximizes space and function. Think of these features as the compartments within a Swiss Army knife—smart, hidden, and accessible. My project included a pull-out tray for remote controls and a secret compartment for extra cables. These small touches greatly enhanced usability and aesthetics. To learn more about efficient storage solutions, visit storage ideas.
While many assume that designing built-in cabinetry and storage solutions is straightforward—simply choosing a style and installing—there’s a forgotten depth of nuance that separates a polished project from one riddled with issues. A common misconception is that all built-ins are equally durable and easy to maintain; in reality, neglecting the advanced engineering behind these installations often leads to sagging, structural damage, or compromised aesthetics. For example, many homeowners overlook the importance of steel reinforcements or proper wall anchoring, which are critical when incorporating heavy materials like stone vanities or dense cabinetry. According to expert insights, improper framing or inadequate support can result in catastrophic failures over time.
**Avoid Myths About DIY Simplicity**
Many believe that DIY installation guarantees a perfect fit and long-lasting stability. However, without precise measurements, scribing, and understanding of wall materials, DIY efforts often result in gaps, uneven surfaces, or mounting failures. Skilled installers utilize techniques such as scribing built-ins to uneven walls to ensure seamless integration, greatly enhancing both durability and appearance. For advanced projects, consulting resources like effortless storage solutions can provide valuable guidance.
**Watch Out for the Obvious Fixes That Fail Over Time**
One of the most seductive traps is choosing quick-fix hardware—like lightweight brackets or adhesive supports—to save time. While these may seem adequate initially, they often lead to sagging, wobbling, or even damage during seasonal movements of the walls or vibrations from daily use. For example, floating vanities are particularly prone to sagging if not mounted with steel wall ties or proper anchoring techniques. Expert recommendations advocate for steel braces and heavy-duty anchors, especially for stone or heavy wooden pieces, to ensure longevity.
What about complex wall structures or irregular surfaces—how can I ensure my built-ins stay firm?
Dealing with uneven or textured walls complicates installation, and standard methods may fall short. Scribing and custom shimming are essential to create flush finishes and prevent future stress points. Additionally, employing reinforcement strategies like hidden steel bracing can dramatically improve support. For instance, in tight corners or sloped ceilings, precision scribing and reinforcement prevent gaps and instability. Consulting detailed guides, such as heavy-duty bracket solutions, assists in achieving professional results.
Let’s be honest—cutting corners often results in costly repairs or redesigns later. The fine details, like selecting appropriate support systems or planning for maintenance access, are what truly make a built-in stand the test of time. Remember, the goal isn’t just seamless aesthetics but a functional piece that endures. Do you have a story of a built-in project gone wrong or a lesson learned? Share below, and let’s learn together from these hidden pitfalls.
Maintaining your custom-built cabinetry and integrated storage solutions is crucial for longevity and performance. Using the right tools and methods ensures your investments stay functional and aesthetically appealing over the years. One essential device I swear by is a digital moisture meter. It helps me monitor humidity levels behind cabinets, preventing warping and mold growth—especially critical in bathrooms and kitchens. I personally rely on the Extech MO290 because of its accuracy and ease of use, allowing me to catch issues early before they escalate.
For cleaning, I recommend a microfiber cloth paired with a gentle, pH-balanced cleaner. Avoid harsh chemicals that can degrade finishes or strip protective coatings. I’ve found that regular dusting and occasional wipe-downs with natural cleaning solutions extend cabinet life and maintain their appearance. To deep-clean tricky corners or joints, a small soft-bristled brush is indispensable—such as a detail brush from
Detailer’s Choice, which lets me reach into tight spaces without damage.
Power tools also play a role in upkeep, particularly for minor repairs. A cordless electric screwdriver with variable speed, like the DeWalt DCF887, streamlines tasks like tightening loose screws or replacing fittings. Investing in a quality kit like this saves time and reduces the risk of stripping hardware. Additionally, a cordless oscillating tool with various attachments allows me to gently sand or remove debris without dismantling entire units—all vital for long-term maintenance.
How do I maintain built-in storage solutions for lasting results?
Consistency is key. I set a quarterly routine to inspect supports, hinges, and fasteners. For example, reinforcing wall anchors with steel brackets—recommended in expert guides such as this resource—prevents sagging and structural damage. Applying a silicone-based lubricant to hinges and slides keeps movement smooth and prevents squeaks over time. Such preventive measures maintain ease of use and appearance.
When it comes to long-term results, investing in protective finishes is wise. Applying UV-protective sealants or topcoats can shield surfaces from sunlight and moisture. For instance, in exposed areas, I’ve used Watco Danish Oil for wood finishes, which revitalizes the look and adds an extra layer of defense. Remember, the more proactive you are, the less likely you’ll face costly repairs or replacements down the line.
Looking ahead, trends in smart maintenance include integrated sensors that monitor environmental conditions and alert you to issues before they become problems. I predict that in the near future, built-in diagnostics will become standard, making DIY upkeep even easier and more reliable. Until then, armed with precise tools and a proactive routine, you can keep your built-ins and storage solutions in top shape.
Try implementing a regular inspection schedule paired with a moisture meter or lubrication routine today—small steps that pay off in enduring style and function.

The Hardest Lesson I Learned About Discreet Built-Ins and Storage Solutions
One of my biggest realizations was that even the most beautiful built-in designs can fall apart without proper structural reinforcements. I once underestimated the importance of steel braces when installing heavy stone vanities, resulting in sagging that took weeks to fix. This taught me that investing in quality supports from the start saves time and hassle later.
3 Myths About Vanity Installation That Held Me Back
Believing that a perfect fit is always achievable without meticulous scribing was a common mistake. My advice? Never skip the detailed measurements and custom shimming. Also, avoid the misconception that simple hardware fixes will last forever—durability depends on thoughtful engineering and support systems. Consulting guides on vanity installation hacks will steer you right.
What Experts Won’t Tell You About Scribing and Support
The secret to seamless installations? Precision scribing and concealed reinforcement. I learned that scribing built-ins to uneven walls not only improves aesthetics but also prolongs their lifespan. Hidden steel bracing inside cabinetry prevents bowing over time, especially in rooms with movement or temperature fluctuations. Delving into advanced techniques can be the game-changer you need.
My Essential Toolkit for Building and Maintaining Built-In Cabinets
My go-to tools include a high-quality pocket hole jig for sturdy joints, a digital moisture meter to monitor humidity, and a versatile cordless drill. I trust brands like DeWalt and Extech because they offer durability and precision. These tools have transformed my projects from amateurish to professional, ensuring long-lasting results.
Where to Go from Here
If you’re serious about elevating your home with custom-built storage solutions and vanities, start small—practice scribing, reinforcement, and wiring planning. Visit this resource for inspiring ideas and detailed tutorials. Remember, meticulous planning and quality support make all the difference.
Your Turn to Try
Have you ever faced a challenge with hiding wiring or reinforcing built-ins? Share your story below—your experience might inspire someone else to avoid costly mistakes and achieve flawless results.
Related Posts

Best Built-in Storage Solutions & Vanities for 2025
Ever spent hours searching for that one pair of socks…
Smart Built-in Cabinets & Vanities: Expert Installation & Storage Tips
I vividly remember the frustration of opening a bathroom cabinet…
Built-ins & Storage Solutions: Expert Installation Tips for 2025
I vividly remember the frustration of trying to squeeze one…