

I will never forget the sound—a sickening, grinding crunch of plaster followed by the silence of a mirror leaning at a forty-five-degree angle. It was 2 AM. I had just finished what I thought was a solid install of a heavy oak-framed cabinet. My mistake? I trusted those cheap plastic ribbed anchors that come free in the box. They are basically toys. I spent the next three hours holding the cabinet up with my shoulder, sweating, and realizing that if I did not find a better way, my brand-new bathroom vanity was going to be covered in shards of glass. That is when I discovered the toggle bolt trick, and honestly, it changed how I approach every heavy hanging project in the house. [image_placeholder_1]
Stop Holding Your Breath Every Time You Close the Cabinet Door
We have all been there. You find the perfect mirrored cabinet that offers all the smart storage solutions you need, but the moment you lift it, you realize it weighs as much as a small car. Drywall is notoriously fickle. If you are not hitting a stud—and let us be real, the studs are never where the mounting holes are—you are basically playing Russian roulette with your porcelain sink. Today, I am going to show you how to walk away from a project knowing that cabinet is not going anywhere, even if you slam the door. This is the same level of security I look for when I am working on an expert guide to flawless vanity installation.
Do These Little Metal Wings Actually Work?
It is natural to be skeptical. How can a tiny piece of metal flaring out behind the wall hold up thirty or forty pounds of glass and wood? According to technical specifications from fastener manufacturers like Hillman, a single 1/4-inch toggle bolt can technically support up to 90 pounds in 1/2-inch drywall, though I would never suggest pushing it that far in a high-moisture bathroom. The trick is not just buying the bolts; it is the specific way you tension them against the back of the wall to prevent the dreaded forward tilt. I learned the hard way that why your heavy mirror cabinet is tilting usually comes down to the hole being slightly too large or the toggle not snapping open fully.
The Night I Almost Lost My Sanity and My Sink
Early in my DIY journey, I thought I could skip the heavy-duty hardware if I just used more screws. I turned my wall into Swiss cheese. It was a mess. If you have ever felt that sinking feeling in your gut when you see a gap appearing between the cabinet and the wall, you know exactly what I am talking about. Have you ever had a secure cabinet start to pull away the second you put a bottle of cologne inside? It is a nightmare. But once you master the toggle bolt move, you can handle anything from vanity installation for beginners to hanging massive art. We are going to dive into the exact mechanics of the pre-load technique that ensures a rock-solid fit every time.
Stop Your Cabinet from Tilting Forward
The secret to a rock-solid mount is not just the bolt itself, but the physics of tension. When you are dealing with a heavy mirrored unit, the center of gravity is often pulling out and down simultaneously. To combat this, you need more than a simple screw; you need a mechanical bond that uses the surface area of the back of the drywall. This is where the toggle bolt method for anchoring heavy mirrored bathroom cabinets becomes your best friend. By spreading the load across several inches of gypsum, you prevent the ‘punch-through’ effect that ruins standard plastic anchors. This is one of those essential vanity installation hacks that save time and money because it avoids costly drywall repairs later on.
Why You Need a Massive Drill Bit
It always feels wrong the first time you do it. To fit a 1/4-inch toggle bolt, you usually have to drill a hole that is nearly 5/8 of an inch wide. It looks like you are destroying the wall. But remember: the wings of the bolt have to fold completely flat to pass through the drywall. If the hole is too tight, you will end up stripping the threads or snapping the spring mechanism before it ever gets to the other side. I remember a project in a tight hallway where I tried to ‘cheat’ the hole size by wiggling a smaller bit. I ended up forcing the toggle, the spring snapped, and I heard that clink-clink-clink as the metal wing fell down inside the wall cavity. I had to buy a whole new pack just for one wing. Now, I always use a sharp spade bit for a clean, perfectly sized entry. 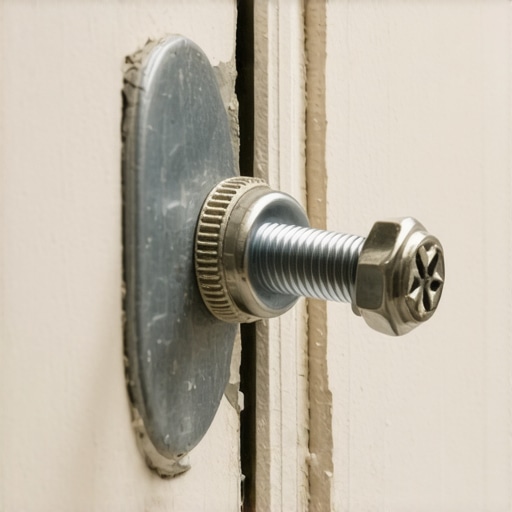
The Umbrella Move for Total Security
Think of the toggle bolt as a reverse umbrella. You must assemble the ‘sandwich’ before it goes into the wall: Bolt, then the cabinet mounting bracket, then the wings. Once those wings go through the hole, they snap open. The biggest mistake people make is not holding the bolt under tension while tightening it. If you don’t pull the cabinet toward you while you turn the screwdriver, the wings will just spin aimlessly in the dark void behind your wall. You need to create friction. I call this the ‘guitar string’ technique—pull back until the bolt feels as tight as a tuned string, then drive it home. This ensures the cabinet sits flush, which is a core part of an expert guide to flawless vanity installation.
Pull Back Hard for a Flush Fit
As you tighten the bolt, you will feel the resistance increase. This is the metal wing biting into the paper backing of the drywall. This is the moment where you solve the mystery of why your heavy mirror cabinet is tilting. If you leave even a millimeter of slack, gravity will eventually pull the top of the cabinet away from the wall. I always give the cabinet a firm downward tug once the first two toggles are in place. If there is even a hint of movement, I go another half-turn. When done correctly, the cabinet should feel like it is part of the house’s framing, even though you haven’t hit a single stud. This level of stability is exactly what I recommend when designing creative built-ins for seamless storage and home aesthetics where clean lines and safety are the top priorities.
Weight Ratings on the Box Are Only Half the Story
We are often told that if an anchor is rated for 100 pounds, we can just throw four of them into a cabinet and call it a day. In my experience, this is the quickest way to end up with a pile of rubble. The rating on the box is the static load capacity under perfect laboratory conditions, not the dynamic reality of a bathroom where people are leaning on the counter or slamming a mirrored door. The real nuance that pros know is the ‘perforation effect.’ If you place three high-capacity toggle bolts too close together in a vertical line, you aren’t making the cabinet three times stronger; you are essentially creating a perforated line in the drywall, making it easier for the entire section to tear out. This is a common mistake I see when homeowners try to maximize your space with custom vanities by cramming too much weight into one small area.
What Happens When Your Cabinet Frame Is the Weakest Link?
It is easy to blame the wall, but often the failure starts within the wood itself. Many off-the-shelf cabinets use a thin 1/8-inch backing board that is barely stapled to the side panels. When you tighten a toggle bolt against this, the bolt might hold the wall, but the cabinet literally pulls itself off its own back. To avoid this ‘oops’ factor, I always recommend reinforcing the internal mounting rail with a strip of 3/4-inch plywood before you even think about drilling into the wall. This is a level of detail you won’t find in most basic guides, but it is standard practice for built-in storage ideas to declutter and enhance your home safely. 
The Perforated Cracker Trap You Must Avoid
If you find yourself needing more than two or three toggle bolts to feel secure, you shouldn’t be using more anchors—you should be using a ledger. Citing structural guidelines from the Gypsum Association (GA-216), the integrity of the drywall is heavily dependent on the spacing of fasteners to prevent localized ‘shear failure.’ Basically, if you turn your wall into a Swiss cheese pattern, the gypsum loses its structural bond. Instead of adding a fourth or fifth anchor, I prefer effortless storage solutions for a tidy stylish home that utilize a hidden support cleat. This distributes the weight horizontally across the wall rather than putting all the stress on a few vertical points. For truly massive setups, I always look toward the hidden sub-frame move for supporting massive quartz top vanities to ensure the floor takes some of that burden. Have you ever fallen into this trap where you used too many anchors and it actually made the wall feel weaker? Let me know in the comments. We also need to be careful about how we handle the ceiling line, as why your built-in cabinets are pulling away from the ceiling and the fix usually comes down to this same lack of structural foresight. Take the extra ten minutes to prep the frame, and you will never have to listen for that 2 AM crashing sound again.
The Leveling Tool That Actually Saved My Sanity
For years, I relied on a standard four-foot bubble level and a prayer. I thought I was being a pro, but the reality is that when you are wrestling a forty-pound mirrored unit alone, your eyes lie to you. The minute I switched to a self-leveling cross-line laser, like the Bosch GLL series, the game changed. I now project a perfectly horizontal and vertical line across the entire wall before I even pick up a drill. This ensures that even if I am using the toggle bolt method for anchoring heavy mirrored bathroom cabinets, my starting points are mathematically perfect. If you have ever felt the frustration of a cabinet that looks straight but makes your toothbrush roll off the shelf, you need the leveling move for vanities on slanted bathroom floors to correct for those inevitable structural quirks. 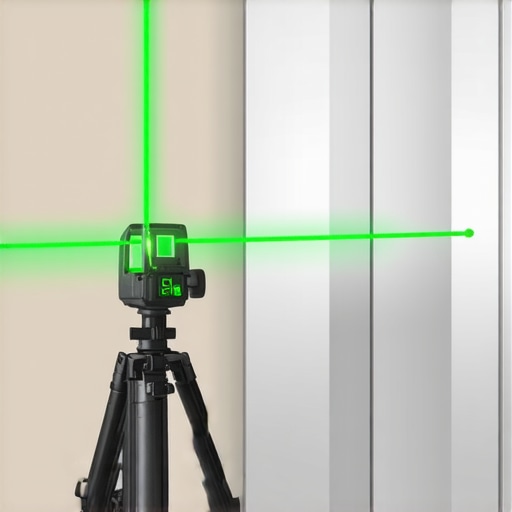
How Do I Keep My Heavily Anchored Units Working Perfectly Over Time?
Maintenance is the part of the DIY journey that most people ignore until something snaps. According to technical documentation from Blum, a leader in cabinetry hardware, high-quality hinges are tested for over 200,000 opening cycles, but they only reach that lifespan if they are kept in alignment. The weight of a mirrored door puts constant torque on the screws. Every six months, I take a screwdriver and give the mounting plate screws a quarter-turn. This prevents the hinge from loosening, which is exactly why cabinet doors sag. I also keep a close eye on the dampening pistons, because moisture can degrade the seals; knowing why your soft close hinges are snapping before it happens can save you from an expensive replacement. To combat the environment, always apply the trick to stop cabinet doors from warping in humid bathrooms, such as ensuring your vanity has adequate ventilation and a proper seal.
The Future of Integrated Bathroom Tech and Mounting
Looking ahead to 2025 and beyond, we are seeing a massive shift toward ‘smart mirrors’ that include built-in defoggers, Bluetooth speakers, and LED arrays. These units are significantly heavier than the cabinets of five years ago. I predict that the industry will move away from simple drywall anchors entirely, favoring internal wall-track systems that spread the load across multiple studs. Staying ahead of top trends in vanity designs you need to know in 2025 means preparing your walls now for the tech of tomorrow. For anyone planning a renovation, I strongly suggest trying my favorite advanced tip: install a ‘hidden ledger.’ Screw a temporary, level piece of scrap wood into the studs just below where your cabinet will sit. Rest the cabinet on this ledger while you install your toggle bolts. It turns a two-person struggle into a one-person breeze and ensures a flawless vanity installation every single time. It is a level of security similar to the hidden blocking strategy for heavy bathroom grab bars, providing peace of mind for years to come.
Lessons Learned From That 2 AM Plaster Disaster
Over the years, I have realized that the wall is a living thing that reacts to every hole you drill. My biggest takeaway is that drywall is only as strong as its paper facing; if you tear that paper with a dull bit, your toggle bolt has nothing to bite into. I also learned to never trust a ‘self-drilling’ anchor for anything heavier than a picture frame. When you are following an expert guide to flawless vanity installation, the sound of a toggle wing snapping open behind the wall is the most satisfying sound in DIY—it is the sound of absolute security. Finally, always buy a few extra bolts because losing a wing inside the wall cavity is a rite of passage every homeowner goes through at least once.
The Tool Kit That Guarantees a Rock Solid Mount
I do not step into a bathroom renovation without a few specific items. First, a high-quality spade bit is essential for creating the clean, oversized holes required for the toggle wings. Second, I always keep a set of shims on hand to address any wall irregularities. If you find your project getting complicated, checking out vanity installation hacks that save time and money can provide those small efficiency gains that make the weekend move faster. For those truly tricky layouts where the wall seems to crumble, you might need to contact us for professional advice on structural reinforcement before you proceed.
Your Bathroom Deserves This Level of Care
Installing a heavy mirrored unit is about more than just storage; it is about creating a space where you feel safe and organized. By mastering the toggle bolt method for anchoring heavy mirrored bathroom cabinets, you are taking a professional approach to home maintenance that prevents future headaches like why your heavy mirror cabinet is tilting. You have the skills and the right hardware now, so go ahead and mount that cabinet with total confidence. Have you ever had an anchor fail on you in the middle of the night? Let me know your worst DIY horror story in the comments!