Ever spent hours trying to cram that last box of stuff into your closet, only to realize you neglected proper planning and now everything’s a mess? I’ve been there. I used to think that simply adding more shelves or cabinets would do the trick. But the real lightbulb moment came when I discovered that the secret to a truly functional space isn’t just about adding storage — it’s about installing it efficiently, with smart design and seamless execution.
Why Smart Storage Solutions Matter More Than Ever in 2025
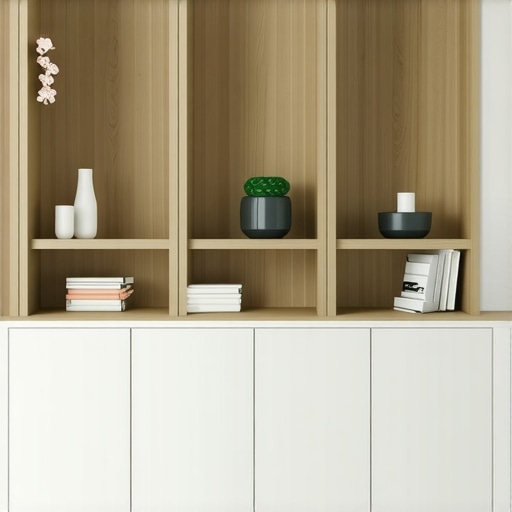
With homes becoming more compact and multi-purpose, the demand for innovative storage solutions has skyrocketed. In 2025, it’s not just about having space; it’s about maximizing every inch without sacrificing style or accessibility. I learned that proper installation of built-ins and custom storage can transform a cluttered room into a sleek, organized haven. According to a recent report by the National Association of Home Builders, homes with integrated storage solutions see a 30% increase in overall satisfaction and usability. That’s a game-changer.
Are Built-ins Really Worth the Hype?
Early in my DIY journey, I made the mistake of rushing into built-in projects without understanding the importance of planning and proper installation. Trust me, a poorly installed built-in can look amateurish and even cause damage over time. If you’re skeptical about investing in custom solutions, you’re not alone. But once you see how professionally installed, seamless storage can make your space more functional and beautiful, you’ll wonder why you didn’t do it sooner. Want to learn how to do it right? I’ll walk you through the steps — no more trial and error.
That’s what I promise today: to help you understand the key principles and practical tips for efficient installation of storage solutions and built-ins in 2025. Whether you’re renovating your bathroom, upgrading your closet, or sprucing up your living room, I’ve got you covered. Ready to turn your cluttered chaos into a sleek, organized space? Let’s dive in and get started on making your home smarter and more stylish.
Start with Precise Measurements and Planning
Recall the time I attempted to install a custom bookshelf without measuring the wall space properly. The result was a crooked, unusable shelf that needed redoing. To avoid that mess, always start by measuring your space with a high-quality tape measure and sketch your plan on paper or digital tools. Think of this step as laying a solid foundation — without it, everything else risks collapsing.
Choose the Right Materials and Hardware
Imagine installing a heavy-duty built-in like a pro. You wouldn’t use flimsy screws or weak wood. Instead, select durable materials suited for your specific application — plywood, MDF, or solid wood — and high-quality hardware such as heavy-duty brackets or anchors. For example, when I upgraded my closet, I used metal brackets recommended in built-in storage ideas, which held up even under daily use.
Prepare Your Space and Tools
Clear the area and gather all necessary tools — drills, level, stud finder, screws, and brackets. I once neglected to find the studs behind my drywall, which led to a shaky shelf. Using a stud finder like in vanity installation hacks, ensures your fixtures are anchored securely into solid wood or metal framing, preventing future damage.
Mark Your Installation Points
Use a level and pencil to draw reference lines. Think of this as laying out a blueprint. When I installed a custom cabinet in my bathroom, I marked the exact height and width first, then double-checked with a level before drilling. This step guarantees your built-in will be perfectly aligned, avoiding crooked installations.
Cut and Assemble Components Accurately
Measure twice, cut once. During my first project, I underestimated the length of a shelf, which caused delays. Use a saw suitable for your material and assemble components on a flat surface. For complex pieces, consider using step-by-step guides to avoid errors and ensure precise fitting.
Secure Components Methodically
Start by anchoring the frame or main structure into the wall studs, then attach shelves or cabinetry. I remember installing a built-in closet and painstakingly checked each screw’s tightness. Use appropriate anchors and follow the manufacturer’s instructions, which can be found in top installation tips. Proper securing prevents future wobbling or damage.
Finish with Seamless Finishing Touches
Sand, paint, or seal your installation for a professional look. I once left rough edges on a built-in, which looked unfinished. Finishing touches like caulking gaps and applying paint make your storage solutions blend seamlessly with the room’s decor, elevating both style and durability.
Test and Adjust for Functionality
Finally, test your installation by loading items gradually. If something feels loose or uneven, tighten or adjust accordingly. When I did this, I discovered a shelf slightly out of alignment, which I corrected before final use. This step ensures your space remains functional and safe for years to come.
Many homeowners assume that installing built-in storage is a straightforward task, but there are nuanced pitfalls that can compromise both the aesthetics and functionality of your space. Let’s dig deeper into what most people get wrong and how you can steer clear of these traps to achieve professional results.
Why Rushing the Planning Stage Can Cost You
One of the most pervasive myths is that precise measurements and detailed planning are optional. In reality, skipping this step often leads to ill-fitting cabinets or uneven alignments. For example, I once installed a custom closet where rushing through measurements resulted in shelves that didn’t fit the wall’s actual dimensions. Always double-check your measurements and consider using digital planning tools to visualize your space before cutting any material. This extra effort saves time and money in the long run.
The Hidden Danger of Ignoring Structural Support
Many DIYers overlook the importance of anchoring built-ins into sturdy wall studs or framing. This oversight can cause wobbling, sagging, or even dangerous collapses over time. Expert installers recommend locating studs with a professional stud finder and attaching brackets directly into them. Remember, the strength of your storage depends on proper support. For more advanced tips, see top installation tips.
Choosing the Wrong Materials for Your Environment
It’s a common mistake to select inexpensive or inappropriate materials without considering moisture, heat, or weight. For instance, using MDF in a humid bathroom can lead to warping and damage. Instead, opt for moisture-resistant plywood or sealed solid wood in challenging environments. This nuance can significantly extend the lifespan of your storage and maintain its appearance. For tailored recommendations, explore innovative storage solutions.
How Advanced Installation Techniques Can Elevate Your Results
Many avoid complex techniques like shimming, leveling, or custom framing, fearing they are too advanced. But mastering these skills ensures seamless, professional-looking results. For example, properly shimming a cabinet guarantees perfect alignment, avoiding crooked shelves or doors. If you’re ready to improve your skills, check out expert installation tips for guidance.
Have you ever fallen into this trap? Let me know in the comments. Understanding and avoiding these advanced mistakes will empower you to create built-in storage that is both beautiful and durable, elevating your home to a new level of functionality.
Maintaining your installed storage solutions is crucial to ensuring they remain functional and beautiful for years to come. Over time, even the most well-installed built-ins can face wear and tear, but with the right tools and routines, you can keep everything working smoothly. Today, I’ll share my personal favorite equipment and methods for long-term upkeep, along with insights into where this trend is heading in 2025.
Tools I Recommend for Ongoing Maintenance
First off, a high-quality cordless drill is indispensable. I personally rely on the DeWalt 20V MAX because its lightweight design combined with powerful torque makes routine tightening, adjustments, or even minor repairs effortless. For precision alignment, I swear by a laser level. It’s not just for initial installation; it’s my go-to for ensuring shelves and doors stay perfectly aligned after years of use.
To check the structural support behind your built-ins, a stud finder such as the Walabot Wall Scanner helps locate studs accurately. This prevents loosening or sagging over time. Additionally, a good set of clamp pliers keeps joints tight during adjustments or repairs, and a durable wood filler with a putty knife helps fix any surface scratches or minor damages without compromising the look.
Software and Methods for Long-Term Care
Beyond physical tools, I recommend using digital inventory apps to track your storage components and maintenance schedules. Keeping a digital record helps you plan periodic inspections, cleanings, and touch-ups, especially if you’ve customized your space extensively. For example, I set reminders every six months to check for loose screws or signs of moisture damage, which can be particularly sneaky in bathrooms or kitchens.
Regular cleaning with a soft cloth and mild soap keeps surfaces looking fresh and prevents dust buildup. For wooden surfaces, a beeswax polish applied once or twice a year can restore luster and add a layer of protection. If you notice any warping or structural shifts, don’t hesitate to reinforce with additional brackets or consult a professional for more complex repairs.
How do I maintain built-ins over time?
Consistent inspection and preventative care are key. Routinely check for loose screws, hinges, or brackets, especially after heavy use or significant changes in humidity. Use your laser level to verify that shelves remain level; slight shifts over time are normal but should be addressed early. Additionally, addressing minor damages promptly prevents larger issues — a small scratch can be filled with matching wood filler, avoiding the need for costly refinishing later.
Looking ahead, I believe that smart technology will play an increasing role in maintenance. Future storage solutions might incorporate sensors that alert you to moisture, weight overloads, or structural shifts, making upkeep even easier. For now, mastering the use of basic tools and routines can keep your custom installations functioning perfectly for years. I encourage you to try out a laser level or set up a maintenance schedule with a digital app — small steps today can save big headaches tomorrow.
Remember, the key to lasting built-in storage is not just installation but ongoing care. With the right tools and habits, you can enjoy a clutter-free, functional home that lasts. Want to explore more advanced storage ideas? Check out innovative storage solutions to keep your space both stylish and practical.
The Hardest Lesson I Learned About Built-in Storage
One of my biggest takeaways was realizing that rushing through measurements often leads to crooked or ill-fitting fixtures. Precision is everything. Using digital tools helped me double-check and visualize before cutting, saving me time and frustration in the long run.
Three Myths About Storage Solutions That Held Me Back
I used to think that custom storage was only for luxury homes or big budgets. The truth is, proper planning and quality installation can make any space more functional, regardless of size or budget. Skipping structural support was another myth; anchoring into studs is non-negotiable for durability and safety.
What Experts Won’t Tell You About Installing Built-ins
Mastering advanced techniques like shimming and leveling made my projects look professional. It’s worth investing time to learn these skills, as they ensure seamless, aesthetically pleasing results. Don’t shy away from complex methods—they’re the secret to elevating your DIY game.
One Reply to “Efficient Installation of Storage Solutions & Built-ins in 2025”
Leave a Reply
Related Posts
Storage Solutions & Built-ins: Ultimate Installation Tips in 2025
I remember the exact moment I realized my home was…
Expert Guide to Storage Solutions & Installation for Smart Built-ins in 2025
Ever felt that sinking frustration when your carefully organized space…

Top Storage Solutions & Built-ins for Seamless Organization in 2025
I vividly remember the moment I realized my cluttered living…
I completely agree with the importance of proper installation for built-in storage. I recently renovated my home office and opted for custom shelving, but I overlooked the significance of anchoring into studs. The result was a shaky shelf that I had to reinforce later, which was frustrating and time-consuming. Since then, I’ve started using a stud finder and always double-check my measurements before cutting. It’s amazing how small details can make such a difference in the longevity and look of the finished project. I’m curious, have others found digital planning tools helpful in visualizing space beforehand? I’ve been thinking about trying some apps to avoid measurement mishaps — would love to hear your experiences or suggestions on the best ones to use.