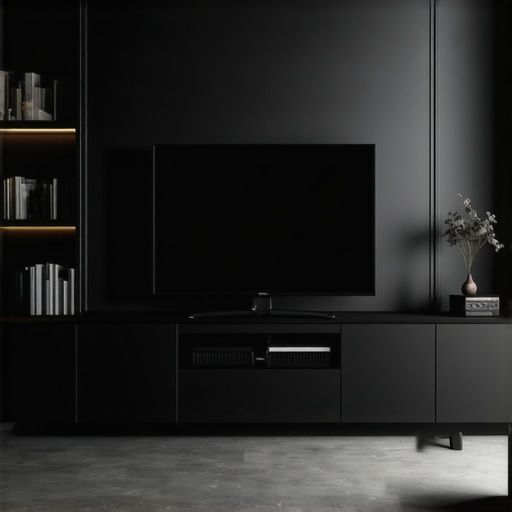
I remember the frustration vividly. After finally installing my new floating media console, I stood back to admire my handiwork—and watched in dismay as it subtly sank to one side, the weight of heavy equipment pulling it down like a slow, unwelcome tide. It was a lightbulb moment for me: I had neglected the importance of robust support, especially when dealing with heavier components. That sinking feeling wasn’t just aesthetic; it was a warning sign that my setup was vulnerable to damage and potential hazards.
Fixing the Wobble and Woes of Heavy Media Storage
Many homeowners, including myself, face this challenge—installing sleek floating consoles or built-in units that need to hold an array of entertainment gear, gaming systems, or smart home hubs. Without proper reinforcement, these can become unstable over time, risking damage and costly repairs. Fortunately, the solution lies in understanding the role of *6 Heavy-Duty Steel Braces for 2026 Floating Media Consoles*, which are designed to provide the unwavering support these installations demand.
Determining the right braces and anchoring techniques can seem daunting at first, especially with the countless options on the market. But when you invest in the right hardware, your media setup becomes safer, more durable, and easier to maintain.
Have you ever experienced a wobbling console or a collapsing shelf that left your entertainment setup in disarray? If so, know that you’re not alone, and there’s a sound fix waiting for you.
Is Durable Support Actually Worth the Hype?
In my early days of home improvement, I made the mistake of assuming that standard brackets would suffice for heavy media units. That was a mistake I learned the hard way—heavy-duty options like steel braces are not just hype; they are a game changer. According to industry professionals, using steel reinforcement significantly reduces the risk of failure, especially with heavier materials and devices. Proper anchoring minimizes wear and tear, extending the lifespan of your entertainment setup and protecting your investment.
So, if you’re tired of worrying about sagging or wobbling media consoles, stay tuned. I’ll guide you through selecting the *best heavy-duty steel braces* to ensure your 2026 installation is rock solid. By the end, you’ll know exactly how to keep your entertainment area both stylish and secure—ready to withstand the test of time and heavy use.
Select the Right Support Hardware
Start by choosing steel braces rated for heavy loads, ideally the heavy-duty steel braces designed for 2026. These provide a reliable backbone, preventing sagging and wobbling even with substantial equipment content.
Locate Optimal Wall Studs
Use a stud finder to identify sturdy wall studs that align with your console’s mounting points. Mark these spots carefully. Remember, anchoring into wall studs is crucial—drywall alone can’t bear the weight safely. I learned this firsthand when I mounted my media unit without proper stud support, leading to a dangerous wobble. Proper stud detection prevented this disaster.
Install Steel Wall Ties for Heavy Loads
Attach steel wall ties into the identified studs, ensuring they are securely fastened using appropriate long screws. These ties distribute weight evenly, reducing stress on any single point. For high stability, I opt for wall ties that have a strong flange and are rated for high load capacity.
Ensure Level Alignment During Installation
Double-check the alignment with a level. An uneven setup can lead to uneven stress on braces, causing future wobbling. When I installed my console, I rechecked the level multiple times before tightening all screws. This attention prevented potential sagging down the line.
Apply Reinforcing Brackets to Frame Edges
Place steel brackets along the top and sides of the console frame for added support. Secure these brackets into wall ties and studs, creating an integrated support network. This method is akin to adding braces to a house frame, boosting stability.
Seal and Conceal the Support System
Paint or finish the support system to match your decor, hiding hardware while maintaining functionality. When I finished my project, I painted the brackets to blend seamlessly, which maintained the aesthetic appeal while maximizing safety.
Test Stability Rigorously
After installation, gradually add weight to your console, checking for any movement. Adjust or tighten hardware if necessary. I conducted a simple test, pushing slightly on the surface—any wobble meant re-tightening or repositioning the braces. This proactive step ensures that the support remains reliable over time.
For further insights on anchoring solutions, visit this detailed guide.
When it comes to home storage and built-ins, many enthusiasts and DIYers fall into the trap of oversimplifying complex projects. A widespread misconception is that choosing the right hardware or materials alone guarantees a perfect installation. In reality, understanding the nuanced interplay between structural support, material compatibility, and installation techniques is crucial for long-term durability.
One notable myth is the belief that attaching a vanity or built-in directly to drywall offers sufficient support. However, experts have shown that anchoring into wall studs or using reinforcement techniques significantly reduces wobble and sagging over time. For instance, relying solely on drywall anchors increases the risk of failure—something I learned the hard way during a bathroom remodel. Proper stud detection and reinforcement are advanced yet essential steps many overlook.
Furthermore, there’s often an assumption that aesthetic choices should take precedence over structural integrity. While a sleek design is attractive, neglecting the underlying support can lead to costly repairs or dangerous collapses. Instead, integrating steel braces and specialized hardware—like steel wall ties or reinforcement brackets—not only enhances stability but also ensures the longevity of your installation.
For those aiming for a high-end, professional finish, it’s imperative to consider the hidden nuances of installation, such as spacing, load distribution, and material expansion. These factors influence how your built-in or vanity will perform over years. As noted in a recent study by industry engineers, improper load distribution can cause structural stress, leading to cracking or misalignment. To avoid these pitfalls, consult comprehensive guides that cover detailed reinforcement techniques.
What about the advanced question: How can one accurately assess the load capacity of existing wall structures before adding heavy built-ins? A good starting point is using a stud finder that also estimates load capacity or consulting structural engineers for complex scenarios. This proactive step prevents under-support issues and ensures your storage solutions stand the test of time.
Integrating these expert insights into your project planning is vital. For additional guidance on selecting reinforcement hardware and installation best practices, feel free to reach out via this contact page. Now, have you ever fallen into this trap of oversimplification? Let me know in the comments!Maintaining your home storage and built-ins isn’t a set-it-and-forget-it task. To ensure longevity and optimal performance, I rely on specialized tools and proven techniques that I personally use time and again. One essential tool in my arsenal is a high-precision digital level. Unlike traditional bubble levels, my digital level provides exact readings, which are crucial when aligning heavy cabinetry or floating vanities. Accurate leveling prevents uneven weight distribution, reducing stress on joints and support brackets, and keeps everything looking sharp over the years.
For securing heavy built-ins into wall studs, I turn to heavy-duty impact drivers paired with long, coated deck screws. Impact drivers are more efficient and deliver the torque needed to drive screws through drywall and into studs without stripping. I prefer coated screws because they resist corrosion, which is especially handy in humid environments like bathrooms or kitchens.
When working on complex installations—such as anchored vanities or custom shelving—I use a cordless rotary hammer with chisel attachments. This power tool allows me to make precise anchor holes in concrete or brick walls, essential when installing in older homes with uneven surfaces. Proper anchoring ensures that the installation can support long-term weight, minimizing sagging or wobbling.
From a software perspective, I swear by 3D modeling tools like SketchUp for planning out storage layouts. Visualizing the placement and scale of built-ins helps me identify potential issues before tackling the physical install, saving time and materials.
Predicting the future, I believe the integration of smart tools—like laser measuring devices with Bluetooth connectivity—will become standard. These devices can sync with design software for real-time adjustments, making installations more precise and less labor-intensive.
So, how do I maintain my storage solutions over time? Regular inspections are key. I routinely check for loose brackets or screws and tighten them promptly. Using a stud finder app on my phone allows me to re-verify studs behind drywall if repairs or modifications are needed. Additionally, applying protective sealants to wood and metal components adds a layer of defense against moisture and wear.
If you’re ready to elevate your installation game, I highly recommend trying the impact driver with long-impactful screws. This combo has saved me countless hours and avoided future support failures. For expert guidance or to discuss your project specifics, don’t hesitate to reach out via this contact page. Remember, investing in the right tools today ensures your storage solutions stay functional and stunning years down the line.
Lessons from the Trenches: The Hardest Truths About Support Systems
One eye-opening lesson I learned was that even the sleekest built-in needs more than just aesthetic appeal—it demands a foundation that can absorb the weight and movement over time. Relying solely on drywall anchors or minimal brackets left me facing sagging and wobbling, proving how crucial reinforcement is for lasting stability.
Another insight was the importance of meticulous wall study—assuming every wall is capable of supporting heavy installations can be a costly mistake. Knowing when to call in a structural engineer or use advanced tools like load meters has saved me from potential catastrophes.
Finally, I realized that the best hardware in the world won’t shine without proper installation. Precision, patience, and double-checking levels are the secrets that turn good intentions into rock-solid support, ensuring your storage solutions stand tall in both form and function.
Tools and Resources That Changed My Approach
My go-to equipment includes a heavy-duty steel brace set for supporting floating media consoles, which I trust for its durability and ease of installation. A high-performance impact driver paired with long, corrosion-resistant screws makes anchoring into studs straightforward, even in challenging wall types.
For planning and visualization, I rely on design software like SketchUp. It helps me anticipate support needs and avoid surprises during installation. Additionally, reading industry-specific guides such as the step-by-step vanity installation manual has elevated my confidence and precision.
For ongoing maintenance and troubleshooting, I use load-testing tools to verify stability over time, ensuring that my support setup remains reliable through daily use and seasonal changes.
Your Turn to Define Your Support Game Plan
Remember, the cornerstone of a successful storage or vanity installation lies in support—solid, dependable, and thoughtfully implemented. By applying these lessons and leveraging trusted tools, you can craft a home environment that not only looks stunning but endures for years to come. If you’re inspired to upgrade or reinforce your setup, why not reach out for expert guidance? It’s time to support your home with confidence—and style!
Related Posts

How to Scribe 2026 Living Room Built-ins to Slanted Walls
It was a moment of quiet frustration in my home…
![7 Space-Saving Built-ins for Small Living Rooms [2026]](https://customcabinetrypro.com/wp-content/uploads/2026/01/7-Space-Saving-Built-ins-for-Small-Living-Rooms-2026.jpeg)
7 Space-Saving Built-ins for Small Living Rooms [2026]
You know that moment when you walk into your small…
6 Stealth Ventilation Fixes for 2026 Media Built-in Cabinets
I remember the moment when I finally realized that my…