Have you ever stared at your bathroom or bedroom and felt that nagging sense of frustration every time you open a closet door or try to find that one elusive item? I remember the moment I realized my home was fighting back—cluttered, inefficient, and crying out for a serious upgrade. That lightbulb moment hit me hard: I needed a smarter, more seamless way to organize and elevate my space. Trust me, I’ve been there.
Why Traditional Storage Just Doesn’t Cut It Anymore
For years, I relied on off-the-shelf cabinets and random storage hacks, but they only masked the chaos. I kept thinking, “There’s got to be a better way.” And there is—thanks to the innovative world of Trust Smart Vanities & Built-in Fixtures.
These solutions aren’t just about aesthetics; they’re about making your daily routine smoother, your home more organized, and your space truly work for you. They blend seamlessly into your design, giving you a sleek, modern look without sacrificing function. Plus, they’re easy to install—no more messy DIY fails or costly renovations. But before you jump in, let’s address some common fears.
Is Trust Smart Vanities Actually Worth the Hype?
Honestly, I made a mistake early on—thinking that all built-in fixtures were too complicated or expensive. Turns out, with the right guidance, they’re an investment that pays off in comfort and style. I wish I had known sooner about the precise tips and tricks from experts, like those outlined in this step-by-step installation guide.
So, if you’re tired of cluttered spaces and want to upgrade with confidence, stay tuned. I’ll walk you through practical steps and share insider secrets that will help you achieve a seamless, beautiful home transformation—without the headaches.
,
Measure Your Space Precisely
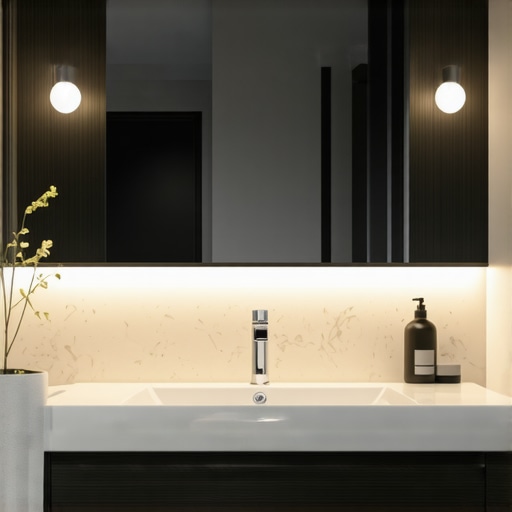
Before diving into installation, I measured my bathroom to determine the ideal size for my new built-in vanity. I used a tape measure to get exact dimensions—width, depth, and height—and sketched a rough layout. Trust me, skipping this step can lead to mismatched fittings or the need for costly adjustments later. Accurate measurements are the foundation of a seamless upgrade. For detailed tips, check out this guide on maximizing space with custom vanities.
Choose the Right Style for Your Home
Select a vanity style that complements your existing decor. I went for a sleek, modern look with minimalist lines, which matched my contemporary bathroom. Use the style selection guide to identify options that fit your aesthetic. Remember, the right style not only elevates your home’s look but also ensures the fixture blends seamlessly into your space. I found that visualizing different styles using mood boards helped me make confident choices.
Plan Your Storage Layout for Efficiency
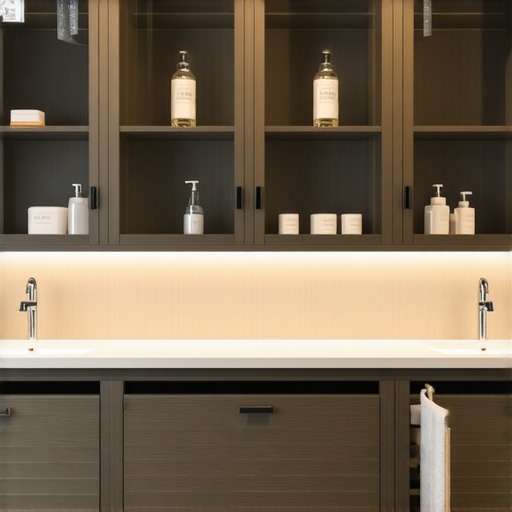
Effective storage is key to a clutter-free home. I drafted a layout for the interior compartments—drawers for small items, shelves for larger essentials. I used the built-in storage ideas resource to maximize every inch. When I installed, I realized that dedicated zones made daily routines smoother—no more hunting for misplaced toiletries. Think about your specific needs: do you need more drawers, open shelves, or hidden compartments? Planning ahead saves time and effort during installation.
Prepare for Installation Carefully
Gather all tools and materials before starting. I laid out my drill, screws, level, and shims, following the step-by-step installation guide. I also watched tutorial videos to familiarize myself with the process. During installation, I used a level frequently to ensure everything was perfectly aligned—this prevents wobbling or uneven surfaces later. Take your time, and don’t rush; precision here makes or breaks the final look. If you encounter unexpected obstacles, don’t hesitate to consult experts via the contact page.
Secure and Finalize the Fixture
Once the vanity was in place, I double-checked all connections and secured it firmly to the wall. Using brackets and screws, I anchored the fixture into studs for stability. For a polished finish, I applied caulk around edges and wiped away any excess. This step ensures the fixture is both safe and aesthetically pleasing. Remember, a well-secured vanity not only looks great but also lasts longer. For advanced tips, see installation hacks that can save you time and money.
Enjoy Your Seamless Upgrade
With everything in place, I organized my new storage compartments, feeling a wave of satisfaction every time I opened the doors. The transformation was more than cosmetic; it made my daily routine effortless. Trusting the process and following these steps turned a daunting project into a rewarding DIY achievement. Now, your turn—use these core techniques to upgrade your space with confidence. For more inspiration, explore effortless storage solutions and start planning your home makeover today.
When it comes to upgrading your home with Trust Smart Vanities or built-in storage solutions, many homeowners fall prey to misconceptions that can lead to costly mistakes. As an expert who has guided numerous clients through these renovations, I want to shed light on some of the most pervasive myths and the hidden nuances that often go unnoticed.
Why Most People Overlook the Nuances of Custom Storage
Many believe that all built-in fixtures are overly complicated or expensive. In reality, the truth is far more nuanced. While traditional thinking suggests that custom solutions are only for luxury homes, today’s Trust Smart Vanities are designed with affordability and ease of installation in mind. They offer tailored functionality without the hefty price tag or extensive remodeling. A common misconception is that these fixtures are rigid, but in fact, they are highly adaptable. Knowing the right design and layout options can make all the difference, especially when you consider space maximization strategies.
The Hidden Trap of Underestimating Installation Complexity
One of the most frequent mistakes I see is homeowners thinking that installation is a simple plug-and-play process. This is a dangerous oversimplification. Even with step-by-step guides, there are critical nuances—like ensuring precise measurements, proper wall anchoring, and leveling—that can make or break the final look. Skipping these details can result in wobbly fixtures, gaps, or even damage to your walls. It’s essential to invest time in understanding the installation intricacies or hire professionals who are familiar with these advanced nuances.
How to Avoid Falling for These Myths and Mistakes
Myth-busting begins with education. Read authoritative resources, such as the expert guides on built-in cabinet installation, and don’t rush your decision. Remember, quality and precision are key, especially when integrating fixtures into existing space. For example, using innovative storage ideas can help you avoid common pitfalls related to space constraints or aesthetic mismatches.
Lastly, don’t underestimate the importance of professional consultation. A seasoned installer can spot potential issues before they turn into costly repairs. Trust me, a small investment in expert advice can save you a lot of headaches down the line.
Have you ever fallen into this trap? Let me know in the comments!
Maintaining your custom-built vanities and storage fixtures is just as important as installing them. Regular upkeep ensures they stay functional, beautiful, and efficient for years to come. Over time, dust, grime, and wear can accumulate, which is why I recommend a set of specific tools and methods that I personally use to keep my installations in top shape. These tools aren’t generic; they’re selected for their precision, durability, and ease of use, making ongoing maintenance a breeze.
Invest in Quality Cleaning Tools for Longevity
First and foremost, I swear by a microfiber cloth and a soft-bristled brush for daily dusting. Microfiber cloths are gentle yet effective at trapping dirt without scratching surfaces. For deeper cleaning, I opt for a mild, non-abrasive cleaner like a mixture of warm water and a few drops of dish soap. I avoid harsh chemicals that can degrade the finish or wood over time. A spray bottle makes application easy and controlled. These simple tools help me maintain a sleek look without risking damage.
Power Tools for Minor Repairs and Adjustments
When it comes to minor tweaks, I rely on a compact cordless drill and a multi-bit screwdriver set. These tools are invaluable for tightening loose screws, replacing hardware, or re-aligning fixtures. I prefer brands like DeWalt or Makita for their reliability and battery life. Keeping these tools charged and within reach allows me to address small issues immediately, preventing them from escalating into bigger problems. Regularly inspecting and tightening fixtures extends the lifespan of your installation and keeps everything looking professional.
Use Specialized Products for Long-Term Care
For wood surfaces, applying a high-quality furniture polish or wax every few months preserves the finish and adds a protective layer. I personally recommend a wax-based polish that’s easy to buff and offers a subtle shine. For metal parts, a light application of silicone-based lubricant on hinges and sliding mechanisms prevents squeaks and corrosion. These products are designed to enhance durability and keep your fixtures operating smoothly, saving you money on repairs or replacements down the line.
Implement Systematic Maintenance Routines
Beyond tools, creating a routine helps ensure consistent upkeep. I schedule a quick cleaning and inspection session once a month, focusing on tightening hardware, checking for signs of wear, and cleaning surfaces. This habit catches potential issues early, avoiding costly repairs or replacements. Documenting your maintenance activities can also serve as a helpful reference, especially if you’re managing multiple fixtures or planning future upgrades.
Predicting Future Trends in Maintenance
Looking ahead, I believe the integration of smart sensors and IoT technology will revolutionize home maintenance. Imagine fixtures that alert you when a screw loosens or when cleaning is needed—making upkeep even more effortless. Staying informed about these innovations through trusted sources like privacy policies and expert updates will prepare you to adopt future-proof solutions.
How do I keep my built-in fixtures working for years?
The key is using the right tools, performing regular inspections, and applying the proper maintenance products. Start with quality microfiber cloths and a soft brush for daily care, then move on to power tools for quick adjustments. Don’t forget to schedule routine check-ups and stay informed about emerging technologies that can simplify upkeep. By adopting these practices, you’ll ensure your space remains beautiful and functional long-term.
Why not try incorporating a monthly inspection routine with your existing tools? It’s a small step that can save you significant time and expense down the road.
The Hardest Lesson I Learned About Home Upgrades
One of the biggest realizations I had was that rushing through measurements or choosing the first style I liked could lead to costly setbacks. Precision matters more than I initially thought, and taking my time to plan thoroughly helped avoid mismatched fittings and frustrated moments. I also learned that integrating storage solutions requires a deep understanding of my daily routines; what seems attractive might not be practical. These lightbulb moments taught me patience and the importance of expert guidance.
My Essential Toolkit for Home Refinements
From a high-quality tape measure that ensures perfect dimensions to a cordless drill from trusted brands like DeWalt or Makita for quick tweaks, having the right tools makes all the difference. I also rely on microfiber cloths and gentle cleaners to keep surfaces pristine. For ongoing maintenance, a soft brush and a good furniture polish are staples. These tools have become my trusted companions, helping me maintain the beauty and functionality of my built-in fixtures long-term.
Your Turn to Make a Change
Upgrading your home with Trust Smart Vanities and built-in storage isn’t just about aesthetics—it’s about creating a space that works for you, making daily routines effortless. Remember, every small step you take brings you closer to a more organized, stylish home. Don’t wait for the perfect moment; start planning today and enjoy the transformation. Your space deserves it!
3 Replies to “Trust Smart Vanities & Built-in Fixtures for Seamless Home Upgrades”
Leave a Reply
Related Posts
Smart Vanities & Built-ins: Ultimate Installation & Design Guide
I still remember the moment I realized my bathroom was…

Vanities & Built-in Storage: Expert Tips for Seamless Installation in 2025
Discovering My Perfect Vanity: A Personal JourneyWhen I decided to…
Efficient Vanities & Storage Solutions for Modern Home Renovations
Ever stood in front of your bathroom mirror, desperately trying…
This post really resonated with me, especially the emphasis on precise measurements and planning before installation. I remember rushing through my first DIY vanity project without double-checking dimensions, which led to awkward gaps and a lot of frustration. Since then, I’ve learned that taking extra time at the measurement stage saves so much headache later. I also agree with the suggestion of visualizing styles using mood boards — it really helps clarify what will best suit your space and aesthetic. What’s everyone’s favorite storage hack for small bathrooms or bedrooms? I’ve found that incorporating hidden compartments or pull-out shelves maximizes space without sacrificing style. It’s inspiring to see how upgrading with built-ins can truly transform a cluttered, chaotic home into a sleek and functional haven. I’d love to hear other ideas or experiences from readers who have tackled similar projects!
Reading through this post really made me reflect on my own experience with home upgrades. I once underestimated the importance of proper lighting when installing built-in fixtures, which affected the overall look and functionality. It’s not just about the fixtures themselves but also about how they connect with the rest of the space. I’ve also found that involving a professional for the tricky measurements and installation can make a huge difference—especially for first-timers. Has anyone here tried combining smart technology with their storage solutions, like automated lighting or sensor-driven drawers? I believe integrating tech could elevate the whole experience and make maintenance even more effortless.
I really appreciate this detailed insight into upgrading with Trust Smart Vanities. I recently tackled a similar project in my master bedroom, and I underestimated the importance of precise measurements, which caused some issues with fitting. Your mention of planning the storage layout resonated with me – I found that thoughtful organization really transformed the space and made everything more accessible. One tip I’d add is to consider adjustable shelving and hardware that can be repositioned as needs change over time. Also, integrating lighting inside cabinets or drawers could add both convenience and a modern touch. Have others experimented with smart features like motion sensors or automatic lighting in built-in fixtures? I’d love to hear how those innovations have worked for you—anything that made daily routines easier or added that extra ‘wow’ factor? Upgrading with these solutions truly does elevate the comfort and style of a home.