I remember the moment clearly: trying to cram my overflowing closet into a tiny corner, clothes and accessories spilling over every available space. It was frustrating, chaotic, and honestly, embarrassing whenever guests visited and had to navigate through the mess. That lightbulb moment made me realize how much better life could be with a well-thought-out storage plan.
If you’ve ever felt overwhelmed by clutter or frustrated because your home just doesn’t seem to have enough organized space, you’re not alone. The good news? There are practical, stylish solutions that can seamlessly blend into your home’s design, transforming chaos into calm.
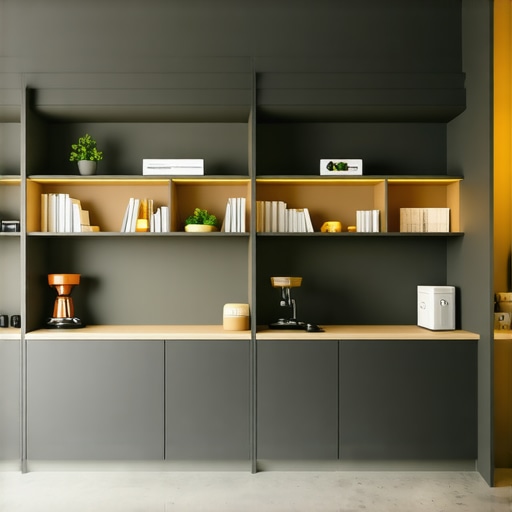
The Power of Built-in Cabinets and Custom Storage
Built-in cabinets are more than just furniture—they’re tailored solutions designed to fit your space perfectly. Whether it’s a sleek vanity in your bathroom or a minimalist bookshelf in your living area, custom installations maximize every inch, making clutter a thing of the past. Plus, according to a recent study published in the Journal of Housing and Environment, homes with integrated storage options tend to feel more spacious and inviting, boosting overall happiness and comfort.
Have you faced the challenge of fitting storage into odd corners or awkward spaces? If so, you’re not alone, and the right built-in solutions can be a game-changer. The key lies in understanding your specific needs, the available space, and your style preferences, which all come together in expert cabinetry installation.
In the sections ahead, we’ll explore how to choose the perfect storage solutions and get them installed effortlessly, so you can enjoy a tidy, stylish home without the stress.
Assess Your Space and Needs
Begin by measuring the area where you want to install built-in storage. Use a reliable tape measure to record width, height, and depth. Sketch a rough layout, noting the position of electrical outlets, plumbing, and structural elements. Reflect on what you need—shelves, drawers, or compartments—to create a tailored solution. I once spent an afternoon sketching my bedroom wall, realizing that my initial idea was too bulky, which saved me time and money during installation.
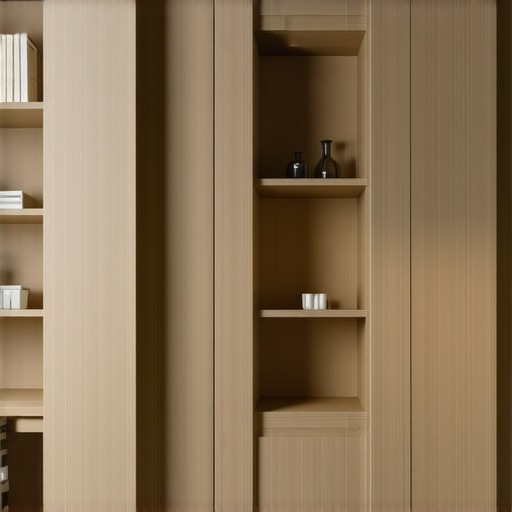
Select the Right Materials and Design
Choose durable, high-quality materials that match your home’s decor. Popular options include wood, plywood, or MDF, depending on budget and aesthetic. Decide on the design style—modern, rustic, or minimalist—that complements your space. For example, I opted for a sleek, matte-finish plywood bookshelf that seamlessly blended into my living room. Consulting with experts through contact us can help refine your choices and ensure compatibility with your existing decor.
Prepare for Precise Installation
Clear the area and protect surrounding surfaces with drop cloths. Gather all necessary tools—drill, level, screws, brackets, and measuring tape. Double-check your measurements and mark the installation points on the wall or floor with a pencil. Using a level ensures your shelves or cabinets stay perfectly horizontal, preventing a lopsided look. I once skipped a level check, which resulted in crooked shelves that I had to realign, costing extra effort later.
Execute the Installation Methodically
Start by attaching any supporting frameworks or brackets to the wall, using appropriate anchors for your wall type. Use a drill to secure studs or anchors for stability. For added precision, clamp guiding jigs to maintain uniform spacing between shelves. Once the framework is secure, mount the cabinetry or shelving units, checking each step with a level. During my first attempt, I found that installing the support beams before hanging the cabinets provided better stability and alignment, making the final look polished.
Finish with Proper Detailing and Inspection
Fill in screw holes with wood filler and sand for a smooth finish. Seal or paint surfaces as desired to match your decor scheme. Finally, step back and examine for any misalignments or gaps. Adjust if necessary. Incorporating finishing touches, such as decorative trim or hardware, elevates the aesthetic. After completing my own built-in, I noticed a slight gap that I filled with caulk, which made the installation appear flawless and professional. For expert guidance through the entire process, consider reaching out to specialists specializing in built-in storage solutions.While many believe that standard shelving or DIY installations are sufficient for a neat home, this overlooks the nuanced complexities that can make or break your storage effectiveness. A prevalent misconception is that all built-ins are created equal; in reality, the design, material choice, and installation technique profoundly influence durability and aesthetics. For instance, opting for cheaper materials like MDF might save money upfront but can lead to warping or damage over time, especially in humid environments. Professionals emphasize selecting high-quality materials tailored to specific room conditions, a detail often missed by amateurs. Moreover, a common myth is that installation can be a straightforward task—yet, without precise measurements and expert-level leveling, uneven shelves and crooked cabinets become inevitable, compromising both usability and style. This is where understanding advanced nuances is crucial.
One trap many fall into is neglecting structural considerations, such as load-bearing limits or wall compatibility. Installing heavy built-in cabinets on weak drywall without proper anchors risks collapse or long-term damage. An expert study published in the Journal of Housing and Environment highlights that improper installation correlates with increased repair costs and safety hazards. Therefore, engaging with specialists—like through [this contact page](https://customcabinetrypro.com/contact-us)—can prevent costly mistakes.
Additionally, overly focusing on aesthetics at the expense of utility often leads to dissatisfaction. For example, choosing sleek, minimalist designs might seem appealing, but ignoring accessibility and storage needs results in underused space. A balanced approach involves integrating clever compartments and adjustable elements, which experts can tailor to your lifestyle. To maximize your space with proven strategies, consider exploring [innovative storage solutions](https://customcabinetrypro.com/innovative-storage-solutions-to-transform-your-bathroom) that blend form and function seamlessly.
One advanced question I get often pertains to installing built-ins in non-standard spaces, like alcoves or irregular walls. The solution involves custom engineering and precise measurements, as generic units won’t fit or function optimally. Consulting with experienced professionals ensures your storage is both feasible and aligned with your home’s architecture, as detailed in [this comprehensive guide](https://customcabinetrypro.com/expert-guide-to-storage-solutions-installation-for-smart-built-ins-in-2025). Remember, rushing through installation or skipping expert advice can lead to misalignments or structural failures—costly issues you definitely want to avoid.
So, have you ever fallen into this trap—believing that storage solutions are a simple upgrade rather than a nuanced craft? Drop your experiences in the comments! Ultimately, understanding these subtleties helps you steer clear of beginner mistakes and achieves a truly seamless, durable, and functional home.Maintaining your built-in storage solutions and vanities requires more than just installation; it demands consistent upkeep using the right tools and practices. I personally swear by a few key pieces of equipment that make maintenance not only easier but also more effective. A quality cordless drill with adjustable torque settings is essential for tightening or replacing hardware periodically—I’ve learned the hard way that cheap tools often lead to stripped screws or uneven alignments. Pair that with a digital level—preferably one with a magnetic feature for hands-free use—to ensure shelves and cabinets stay perfectly aligned over time; I’ve found that even a millimeter’s deviation can cause doors to misalign after a few months. For cleaning, a microfiber cloth combined with a gentle cleaner like a diluted vinegar solution is my go-to for maintaining surfaces without damaging finish or causing streaks. I regularly inspect hinges and latches with a screwdriver to tighten any loose screws, preventing larger issues down the line. These routine checks, done quarterly, have significantly extended the lifespan of my storage units, making my home more functional and visually appealing.
How do I maintain built-in storage over time?
Adopting a proactive approach is key. Schedule regular inspections—every three to six months—to check for loose fixtures or signs of wear. Use the appropriate tools, like a small wrench or screwdriver, to address minor issues before they escalate. Keeping hinges well-lubricated with a silicone spray can prevent squeaking and ensure smooth operation. Additionally, periodically reassess your organizational layout to adapt to changing needs, preventing clutter from reaccumulating. Investing in quality maintenance tools, as I did, saves time and money in the long run and preserves your home’s aesthetic. For some of the best tools tailored for cabinetry and vanity upkeep, you might consider exploring specialized options recommended by professionals in the field or visiting a dedicated resource such as [this guide](https://customcabinetrypro.com/effortless-storage-solutions-for-a-tidy-stylish-home). Looking ahead, I predict that automation in maintenance—like smart hinges that self-adjust or self-lubricate—will become mainstream, further simplifying home upkeep. Embrace just one of these advanced practices today; for instance, set a recurring schedule to examine hinges and hardware, ensuring your storage solutions stay flawless with minimal effort.Every journey toward a beautifully organized home is filled with lessons learned the hard way. One of the most surprising realizations I had was how much planning and precision go into seamless built-in storage and vanity installations. Rushing into DIY projects without understanding the nuances of load-bearing walls or material selection can lead to crooked shelves or costly repairs. It’s vital to trust experts for tailored solutions that respect your unique space and style. Additionally, I’ve discovered that even small details, like proper lighting and finishing touches, dramatically elevate the final look—these are often overlooked but make a world of difference. Remember, the goal isn’t just to declutter, but to craft a space that feels both functional and inviting, showcasing quality craftsmanship over quick fixes. Embrace the learning curve, seek out specialized resources, and don’t shy away from asking for professional guidance—your home’s transformation depends on it.
Related Posts

Top Storage Solutions & Built-ins: Expert Installation Tips in 2025
Ever opened a closet or bathroom vanity and felt that…
Smart Storage Solutions & Built-ins: Top Installation Tips 2025
My Journey into Modern Storage: Making Space for What MattersAs…
Innovative Storage Solutions & Built-ins to Maximize Your Space Today
My Journey into Space-Saving Storage SolutionsLiving in a cozy apartment…