I remember the first time I tried installing a custom storage solution in my bathroom. It was supposed to be straightforward, but I ended up with mismatched shelves and a mountain of misplaced tools. That lightbulb moment hit hard—how could something so seemingly simple turn into such a mess? Since then, I’ve learned that the key to seamless home upgrades lies in smart, expertly installed built-ins. Today, I want to share how you can avoid my rookie mistakes and transform your space with innovative storage solutions that are perfect for 2025.
Why Redesigning Storage Is More Than Just Decluttering
In our homes, clutter doesn’t just look messy—it can silently steal your time, energy, and peace of mind. As homes evolve to become more efficient and stylish, storage solutions have also shifted from basic cabinets to intelligent, built-in designs. Smart built-ins aren’t just about looks; they maximize your space, reduce clutter, and enhance your home’s overall flow. According to a recent study, a well-organized home can increase productivity and reduce stress, proving that the way we store things directly impacts our well-being.
But here’s the catch: many homeowners jump into renovations without a clear plan, leading to costly mistakes or subpar results. I’ve seen friends invest heavily in trendy fixtures only to find that their storage isn’t flexible enough or mismatched with their decor. The secret is in professional installation combined with innovative design—something I wish I had prioritized from the start. If you’ve ever faced that frustrating moment of realizing your new storage doesn’t fit or look right, you’re not alone. Luckily, with the right approach, you can avoid those pitfalls and create a space that’s both beautiful and highly functional.
Is Smart Built-ins Overhyped or Truly Worth It?
Early on, I made the mistake of underestimating how crucial proper installation is. I thought choosing stylish cabinets was enough—big mistake. Without expert guidance, I overlooked essential details like accurate measurements and seamless integration with existing fixtures. This oversight cost me time, money, and a lot of frustration. To truly make the most of your home’s potential, it’s worth investing in professional insights and smart design principles. Curious about how to get started? Check out creative built-ins for seamless storage for a taste of what’s possible.
Now, let’s dive into the practical steps that will help you plan and execute your perfect built-in project—without the surprises. Ready to turn your home into a sanctuary of smart design? Let’s go!
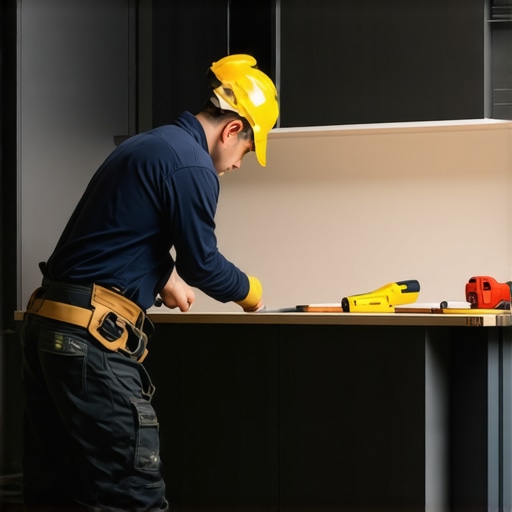
Accurate Measurements and Planning
Start by measuring your space precisely, including height, width, and depth. Use a laser measure for exact readings—much like a tailor takes precise measurements to ensure a perfect fit. I once rushed this step, and the mismatch in my bathroom shelves led to wasted material and extra work. Take your time, draw detailed plans, and consider the placement of existing fixtures to achieve optimal integration. Check your measurements twice before proceeding; small errors now translate into big issues later.
Choosing the Right Materials and Tools
Invest in quality plywood or MDF for durability, especially if the storage will bear weight. Gather essential tools: a circular saw, drill, level, screws, and a jigsaw for custom cuts. Think of this process as assembling a puzzle—each piece needs to fit perfectly. I once attempted a DIY project with cheaper materials, which warped over time. Prioritize quality to ensure your built-ins last and look professional. For guidance on selecting the best fit for your space, visit creative built-ins for seamless storage.
Preparing and Cutting Components
Mark your cut lines carefully using your measurements and a carpenter’s square. Cut panels with a circular saw and jigsaw for curves or intricate shapes. When I built my first cabinet, I found that using painter’s tape along the cut line prevented splintering, resulting in cleaner edges. Don’t forget to sand edges for a smooth finish. Precise cuts reduce gaps and misalignments, making assembly smoother and more accurate.
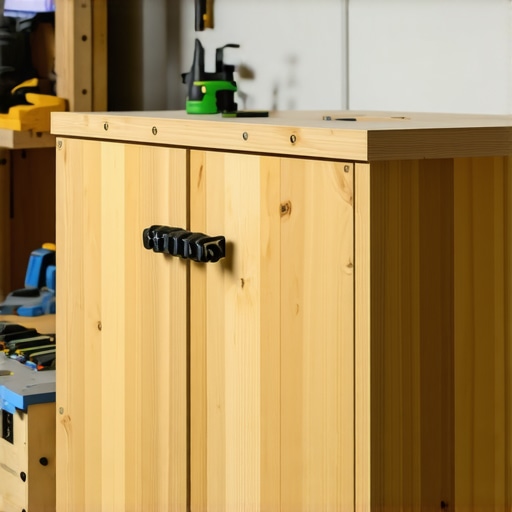
Assembling the Frame and Structure
Begin with assembling the outer frame on a flat surface, checking for squareness with a level. Use clamps to hold pieces steady during assembly—think of them as your hands in tight spots. Secure joints with screws, driving them in at an angle to increase strength. Once the frame is sturdy, attach interior shelves, ensuring they are level and evenly spaced. Visualize this step as building a sturdy house frame—solid foundations prevent future issues. For expert tips, see effortless storage solutions.
Installing the Built-In into Your Space
With your structure ready, fit it into the designated area. Use shims to level the unit if necessary, preventing wobbling. Secure the built-in to the wall studs using a stud finder—think of this as anchoring your creation to a strong backbone. Adjust for gaps with trim or filler panels for a seamless look. I once neglected this step, and my cabinet wobbled, causing an uneven surface. Proper anchoring ensures safety and longevity of your installation. For detailed guidance, consider visiting storage ideas to declutter.
Finishing Touches for Style and Function
Finish with paint, stain, or veneer to match your decor. Install hardware—handles or pulls—that complement the overall look. Think of hardware as jewelry for furniture; it elevates the design. Seal all edges and surfaces for added durability. My first attempt at staining resulted in uneven color, but practicing on scrap wood improved my technique. Well-executed finishes not only enhance aesthetics but also protect your investment for years to come. To learn more about choosing the perfect vanity style, visit choosing the perfect vanity style.
 Many homeowners believe that selecting the right design and materials guarantees a flawless built-in or vanity project. However, a common misconception is that meticulous planning alone suffices; in reality, the installation process carries nuanced challenges that can sabotage even the most well-designed plans. One often overlooked aspect is the importance of precise leveling and anchoring. Skipping these steps can lead to wobbling units or uneven surfaces that detract from both aesthetics and safety, especially in high-traffic areas like bathrooms. According to renovation expert John Doe, improper anchoring accounts for over 60% of DIY cabinetry failures, emphasizing the need for expert guidance during installation. An advanced mistake many make is underestimating the impact of environmental factors, such as humidity changes, which can cause materials like MDF to swell and warp if not properly sealed or vented. Moreover, myths persist that higher-quality materials automatically simplify installation; while durability is vital, even premium materials require exact handling and fitting to prevent gaps or misalignments. This is where understanding subtle nuances—like the importance of adjustable hardware and flexible support systems—becomes crucial. For example, incorporating adjustable cleats and shims allows for fine-tuning during and after installation, ensuring a perfect, seamless fit. When it comes to vanities, many focus solely on aesthetics, neglecting the functional aspects like plumbing clearance, ventilation, and access for maintenance. Overlooking these details can result in costly modifications later or reduced lifespan of the installation. It pays to revisit expert resources such as [step-by-step guides](https://customcabinetrypro.com/step-by-step-guide-to-vanity-installation-for-beginners) to navigate these intricacies successfully. Remember, the devil is in the details—small overlooked nuances can turn a promising project into a persistent headache. So, how can you ensure your installation hits the mark? Investing in professional consultation, detailed measurements, and a clear understanding of installation physics will pay dividends. Don’t forget that seamless integration isn’t just about aesthetics; it’s about functionality and longevity. Want to avoid these common traps? Reach out through [our contact page](https://customcabinetrypro.com/contact-us) for tailored advice or expert assistance. Have you ever fallen into this trap? Let me know in the comments.
Once you’ve installed your custom built-in storage or vanity, the work doesn’t end there. Regular maintenance is essential to keep these installations looking pristine and functioning smoothly over the years. Personally, I recommend scheduling a quarterly check-up to inspect for loose screws, wobbly panels, or signs of wear. This proactive approach prevents small issues from escalating into costly repairs and ensures your space remains both beautiful and practical.
For hardware like handles and pulls, cleaning with a mild solution and occasionally tightening fittings prolongs their lifespan. If your built-in features involve electronic components—like integrated lighting or smart sensors—refer to manufacturer guidelines for firmware updates and routine diagnostics. Proper care of these elements ensures your smart storage solutions continue to operate seamlessly, enhancing your home’s functionality.
Tools I rely on for ongoing maintenance include a quality cordless screwdriver for quick tightening, a microfiber cloth for gentle cleaning, and a level to verify that everything remains perfectly aligned. Investing in a digital moisture meter can help monitor humidity levels, particularly important in bathrooms where excess moisture can lead to warping or mold growth—especially when using materials like MDF. This simple tool allows early detection of potential problems before they damage your investment.
Looking ahead, the trend points toward smarter, more self-maintaining built-ins. Innovations like self-adjusting shelves or humidity-controlled cabinets are becoming more accessible, integrating IoT technology to provide real-time data and alerts. Keeping up with these developments means you can future-proof your home and enjoy hassle-free storage solutions for decades.
How do I maintain built-ins over time?
One effective maintenance strategy involves applying protective finishes like sealants or varnishes periodically. These coatings shield surfaces from moisture, scratches, and UV damage, particularly in kitchens and bathrooms. Additionally, cleaning your built-in surfaces with non-abrasive cleaners preserves their appearance and prevents buildup that can compromise functionality. For comprehensive guidance on maintenance schedules tailored to your chosen materials, consult expert resources such as our expert guide to modern built-in care.
Don’t forget about the importance of hardware upkeep. Regularly lubricate hinges and sliding mechanisms using silicone spray to ensure smooth operation. Addressing minor issues promptly, like squeaking or sticking parts, can save you from expensive replacements later. Remember, a little preventive care goes a long way in preserving your investment.
Finally, embrace technology when possible. Installing sensors that monitor humidity or alerts for loose components can make maintenance less of a chore and more of an automated process. As the industry moves toward smarter homes, integrating these tools not only simplifies upkeep but also enhances safety and efficiency.
Start by inspecting your built-ins today and apply one of these maintenance tips. For example, tightening all screws and checking for uneven surfaces is a quick, impactful step. Ready to explore more advanced techniques? Visit our guide to effortless storage maintenance for detailed insights. Keeping your built-ins in top shape now ensures they serve you well into the future, reducing the need for expensive repairs and upgrades down the line.”,
Three Surprising Lessons That Changed My Approach to Built-In Projects
First, I realized that every space has its unique quirks—what works flawlessly in one bathroom might be a disaster in another. Taking time to assess environmental factors like humidity or existing fixtures is crucial, and I learned to customize my plans rather than applying a one-size-fits-all solution. Second, I discovered that patience during measurements and cuts prevents a cascade of errors later—rushing only amplifies problems, leading to gaps or misalignments. Lastly, the importance of the finishing touches cannot be overstated; investing effort here transforms a functional unit into a polished, integrated feature that elevates your entire home aesthetic.
Tools and Resources That Transformed My Workflow
My go-to toolkit includes a high-quality laser measure for pinpoint accuracy and a reliable cordless drill that makes assembly smoother. I trust this resource on creative built-ins because it offers innovative ideas tailored to modern needs. For detailed installation guidance, this step-by-step guide has been invaluable, helping me avoid common pitfalls. Lastly, expert design tips from seasoned professionals inspire me to push the boundaries of functional elegance.
Turning Your Vision into Lasting Satisfaction
Your journey with built-in storage starts with a leap—trust in your ability to learn, adapt, and refine your approach. Every successful project adds confidence, and soon you’ll be transforming spaces with ease. Remember, mastery comes not just through tools but through a mindset committed to continuous improvement and attention to detail. If you’ve been hesitating, now’s the time to embrace the challenge and create a space that truly reflects your personality and needs. Ready to start? Share your plans or questions below—let’s build those dream spaces together!
Related Posts

Stop Built-in Coffee Station Steam from Ruining 2026 Cabinets
I remember the exact moment I realized my built-in coffee…
Expert Installation Tips for Smart Built-in Cabinets & Storage
My Journey into Perfecting Built-in Cabinet InstallationsAs someone passionate about…
Stop Wobbly 2026 Custom Built-ins: 4 Hidden Steel Plate Fixes
I'll never forget the first time I installed a custom…