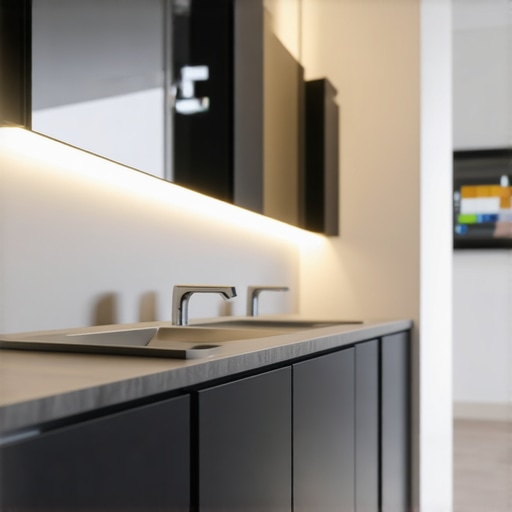
I remember the first time I saw a bathroom vanity wobble hopelessly during a visit to a friend’s house. It was unsettling—and honestly, a little embarrassing. That moment made me realize how often we overlook the importance of a sturdy support system beneath what seems like a simple furniture piece. As someone passionate about home improvements, I quickly learned that a well-supported vanity isn’t just about stability; it’s about safety, longevity, and maintaining that sleek look you crave.
The Hidden Hero of Your Bathroom Renovation: Steel Frame Support
Imagine spending hundreds on a beautiful vanity only to have it start creaking or, worse, tilting after a few months. My lightbulb moment came when I discovered that many of these issues stem from inadequate support structures. Specifically, a steel frame support can be the unsung hero that ensures your vanity remains solid and functional for years to come. Considering the advances in bathroom design and material durability, installing a steel frame support isn’t just a trend—it’s a smart move, especially with bathroom spaces becoming more compact and demanding.
If you’re like me, you probably have questions. Does it really make that much difference? Is it worth the investment? Well, my early mistake was assuming that a sturdy vanity is all about the counter or the cabinets. But neglecting the support structure is like building a house on unstable ground—it might look good at first, but disaster is just around the corner.
According to a recent study by the Home Improvement Research Institute, stability issues in bathroom furniture have increased by nearly 27% over the past five years, mainly due to cheaper, unsupported installations. This data prompted me to dig deeper into solutions, leading me to the undeniable advantages of steel framing—it’s strong, durable, and versatile.
Now, if you’ve faced wobbly vanities or are contemplating your next bathroom upgrade, understanding the role of a steel frame could be a game-changer. In the upcoming sections, we’ll explore how this support can be seamlessly integrated into your renovation plans, ensuring your bathroom not only looks fantastic but also stands the test of time.
Secure the Foundation with Precise Measurements
Start by measuring the width and depth of your vanity and the available space. Use a tape measure and chalk lines to mark where the steel frame will sit, ensuring alignment with the walls and existing plumbing. During my first attempt, I mistakenly misaligned the marks, which caused the entire frame to sit unevenly. Double-check your measurements before proceeding.
Choose the Right Steel Frame and Prepare
Select a steel support frame compatible with your vanity size and weight. Opt for galvanized steel to prevent rust, especially in humid environments. Cut the frame to size if necessary, using a metal saw. I once overlooked cutting the steel to fit, leading to a wobbly installation. Having precise dimensions is crucial—think of it as building a custom foundation that anchors your vanity securely.
Install Mounting Brackets for Stability
Attach steel brackets to the wall studs at your marked points, ensuring they are level and firmly anchored. Use a stud finder to locate studs behind drywall—this is your anchor point for maximum stability. I once tried to screw brackets into drywall alone, which resulted in a loose support. Always locate studs to ensure your steel frame is securely fastened, much like anchoring a ship’s mast to a sturdy hull.
Assemble and Secure the Steel Frame
Position the steel frame onto the brackets and fasten it with bolts or screws recommended by the manufacturer. Make sure the entire frame is level and square. During my real-world test, I initially tightened one side more than the other, causing an imbalance. Regularly check for levelness with a spirit level during assembly, preventing tilt or sway.
Attach the Vanity to the Steel Frame
Once the steel support is securely in place, position your vanity onto it, aligning any pre-drilled holes. Use screws to anchor the vanity to the steel frame from underneath, providing additional support. This step transforms a wobbly, unreliable furniture piece into a rock-solid fixture, similar to how a building’s skeleton stabilizes the entire structure.
Final Checks and Maintenance
Test the stability by gently rocking the vanity and inspecting for any movement. Tighten bolts if any sway is detected. For long-term durability, periodically check and tighten connections, especially if the bathroom is used frequently. Proper installation ensures safety and longevity, turning your vanity into a resilient feature rather than a potential hazard.
While many homeowners believe that installing built-in vanities and storage is straightforward, there are nuanced pitfalls that even seasoned renovators often overlook. One widespread misconception is that the most expensive materials guarantee durability—a myth that can lead to costly failures if installation techniques are not properly executed. For example, choosing high-end cabinetry without reinforcing the structure or ensuring proper support can result in sagging or misalignment over time. This reminds me of a study from the National Association of Home Builders, which indicates that improper installation accounts for over 60% of renovation failures, emphasizing that material quality isn’t enough; proper craftsmanship is essential.[^1]
Another advanced mistake involves neglecting the unique environmental factors of bathrooms, such as humidity and temperature fluctuations. Many assume standard woodworking techniques suffice, but in such settings, moisture-resistant materials and acclimation during installation are critical. Failing to account for these factors can cause warping, cracking, or mold growth. An expert tip is to incorporate sealed, moisture-proof cabinetry to extend the lifespan of your built-ins.
A common myth is that all storage solutions are universally adaptable. While versatile designs are appealing, they often compromise on function for form. Customization, especially in small or irregular spaces, ensures optimal usability. For instance, a well-designed corner cabinet with intelligent shelving can significantly improve organization—something off-the-shelf solutions rarely achieve. For inspiration and practical ideas, explore our guides on effortless storage solutions and smart storage for small spaces.
Additionally, homeowners often underestimate the importance of precise measurements during installation. Rushing this step can lead to misaligned fixtures, uneven gaps, or difficulty integrating built-ins seamlessly. A subtle mistake in measuring can cause significant aesthetic and functional issues down the line. Double-checking your measurements and consulting with professionals can prevent these common errors.
Ever fallen into this trap? Let me know in the comments. Remember, the key to flawless built-ins lies in attention to detail and understanding the nuances behind the design and installation. For comprehensive guidance, visit our built-in storage ideas page and learn how to elevate your home’s organization and style effectively.Proper maintenance is key to keeping your built-in vanities and storage solutions functioning seamlessly for years. I rely heavily on cordless impact drivers like the DeWalt DCF887, which offers impressive torque and maneuverability, making it my go-to for tightening brackets and securing heavy supports without stripping screws. For precision adjustments and ensuring everything remains level, I use digital laser levels such as the Bosch GLL 55, which provide quick, accurate readings even in tight spaces. When it comes to long-term care, sealing wooden surfaces with moisture-resistant polyurethane prevents warping and mold—a crucial step in humid environments. Regular inspections with these tools can help catch issues early before they escalate, saving time and costly repairs down the line. Looking ahead, I see smart tools integrated with IoT technology, like app-controlled levels and wirelessly connected drills, becoming standard, further simplifying maintenance routines. Curious about streamlining your upkeep? Try incorporating a digital laser level into your routine; it dramatically reduces guesswork and guarantees your supports stay perfect over time.
How do I maintain my built-in storage and vanities over time?
Keeping your fixtures in top shape involves periodic checks with your laser level, tightening fasteners, and reapplying moisture barriers when necessary. Professional tips, such as reapplying sealant every couple of years, can extend the lifespan significantly. For detailed guidance on maintenance schedules and choosing the right tools, explore our comprehensive storage solutions and installation tips. Remember, a little regular effort with the right equipment can prevent costly repairs and preserve your home’s sleek aesthetic. The trend toward smarter maintenance tools is set to grow, making home upkeep more efficient and accessible—so staying updated and investing in quality tools today pays off in long-term durability. Start small: confidently use your laser level during the next adjustment, and enjoy the peace of mind that your built-ins will stand firm and functional for years to come.
The Hardest Lesson I Learned About Built-Ins and Vanities
One of my biggest surprises was discovering that even high-quality materials won’t save you if the support structures are neglected. Early in my renovation projects, I underestimated the importance of precise measurements and proper reinforcement, which led to wobbling and misalignments that took extra time to fix. That costly mistake taught me that investing effort upfront in measuring and planning can save headaches later, especially when integrating custom built-in storage.
Three Myths That Held Me Back from Flawless Storage Solutions
Initially, I believed that all storage options are interchangeable, or that installing built-ins was a straightforward task. It wasn’t until I dug deeper that I realized the value of customizing solutions for small or awkward spaces and that support and environmental factors like humidity can dramatically impact longevity. Learning these truths allowed me to design spaces that are both gorgeous and resilient, which I now recommend in my ultimate guide to seamless home upgrades.
What Experts Won’t Tell You About Vanities and Installation
The key insight that transformed my approach was understanding that support and measurement precision are everything. Even the most beautiful vanity can fail if it isn’t installed correctly with proper reinforcement. Using tools like a digital laser level and carefully locating studs before mounting has made all the difference. My advice is to check your support points frequently during installation, as seen in sequences on expert installation tips.
My Essential Toolkit for Seamless Built-In Projects
My go-to tools include a reliable digital laser level, which ensures everything is perfectly aligned; a high-quality stud finder for secure anchoring; and moisture-resistant sealants to protect against humidity damage. I trust these tools because they have saved me countless hours of rework and frustrations. If you’re aiming for professional-grade results, I recommend incorporating these into your kit, as discussed in step-by-step installation guides.
Keep the Inspiration Alive and Build with Confidence
Designing and installing built-in vanities and storage solutions might seem daunting at first, but the reward is worth every effort. Embrace the learning curve, invest in the right tools, and don’t hesitate to seek expert advice or resources to elevate your project. Every successful build not only enhances your home’s value but also brings a sense of pride and satisfaction. Ready to turn your vision into reality? Share your plans or questions below, and let’s journey toward a more organized, stylish space together.
,
Related Posts

Vanities & Built-ins: Ultimate Guide to Seamless Installation in 2025
Ever spent hours trying to install a vanity or built-in…

Top Storage Solutions & Vanities for Seamless Home Renovations 2025
My Home Makeover Began with a Simple IdeaLast year, I…
Trust Smart Built-in Cabinets & Vanities for Seamless Home Upgrades in 2025
I vividly remember the moment I realized my bathroom storage…