Have you ever stood in your living room, surrounded by a sea of clutter, frustrated that your beautiful built-in shelves are more chaos than charm? I remember the lightbulb moment when I realized my existing storage solutions just weren’t keeping up with my tech-savvy lifestyle—things like smart home devices, streaming equipment, and endless cables turning my space into a maze. It felt overwhelming, like trying to tame a wild beast with old tools.
Why Modern Built-ins Need a Tech-Forward Makeover
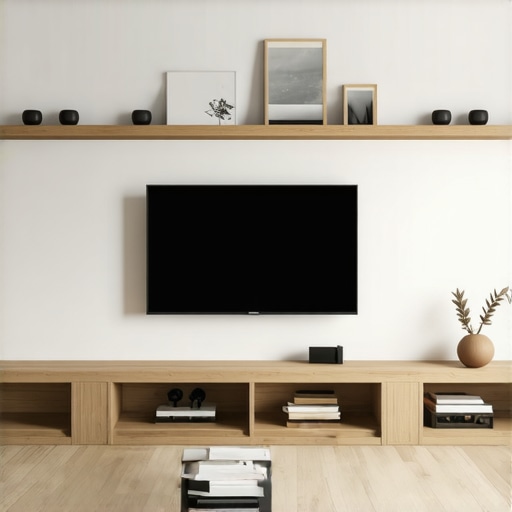
In 2026, our living rooms are more than just gathering spots—they’re tech hubs. Yet many of us struggle with integrating these gadgets seamlessly into our furniture, resulting in clutter and inefficiency. I’ve learned through my own renovation efforts that traditional storage can’t hold a candle to the innovations available today. A study by the CEDIA (Custom Electronic Design & Installation Association) notes that integrated tech solutions can boost home organization by up to 70%, making your living space not just stylish but smarter too.
Is It Really Worth the Hype to Up Your Built-ins?
Early on, I made the mistake of thinking that throwing in a few extra shelves would suffice. Spoiler alert: it didn’t. Without proper planning and understanding of the latest smart solutions, I ended up with more clutter and less peace of mind. If you’re wondering whether these hacks are just fads or genuinely game-changing, trust me—investing in the right built-in upgrades can transform your daily life. Curious? Let’s explore how you can do just that, step by step, without breaking the bank or your back.
So, are you tired of overstuffed cabinets and hidden cables? If yes, then keep reading. We’re about to dive into four innovative, tech-ready hacks that will elevate your living room built-ins in 2026—making your space more functional, stylish, and future-proof. Whether you’re redoing your entire setup or just looking for quick updates, these tips will help you create a seamless blend of design and technology. Ready to get started? Let’s go!
Measure and Plan Your Space Carefully
Start by measuring your wall and furniture dimensions with a reliable tape measure, much like an architect sketches a blueprint before construction. I vividly recall the day I dissected my living room wall, drawing detailed sketches to ensure my custom shelving wouldn’t be too deep or too shallow, avoiding the common mistake of overbuilding. Use painter’s tape to outline potential built-in units on your wall, helping visualize how they’ll fit and function. This step is crucial for identifying awkward spaces or potential obstructions that could derail your project.
Select the Right Materials and Hardware
Choose durable, lightweight materials like plywood or MDF for easy handling, similar to selecting sturdy but manageable Lego blocks for your Lego set. For hardware, opt for soft-close hinges and concealed mounting brackets to create a sleek look—think of them as the invisible threads holding your furniture together seamlessly. I once wasted hours choosing cheap hinges that squeaked and failed within months, so investing in quality hardware truly pays off. Review the options on trusted sites like Effortless Storage Solutions for inspiration.
Prepare Walls for Installation
Before hanging any built-in, ensure your wall surface is level, clean, and reinforced if necessary. Think of wall reinforcement like giving a sturdy foundation to a house—without it, your design could sag or sway. I learned this the hard way when my first attempt resulted in a sagging shelf because I didn’t consider wall strength; installing steel reinforcement brackets (similar to those discussed here) made all the difference. Use a laser level or a water bubble level to ensure your marks are precise for accurate mounting.
Mount and Secure Built-ins Effectively
Position your units carefully and attach them using heavy-duty anchors and brackets, akin to anchoring a ship securely in harbor. Do not underestimate the importance of anchoring heavy pieces—the wrong mounts can result in dangerous collapses. I remember struggling with heavy stone vanity units, but with proper steel brackets, I managed a safe, wobble-free install. For optimal safety and security, refer to these advanced installation tips tailored for 2026. Double-check all fastenings before moving forward.
Seal and Finish for a Seamless Look
Final finishing touches like caulking gaps and painting edges elevate your project from DIY to professional-looking. Think of this as the icing on a cake—it’s all in the details. I once left gaps unfilled, which allowed dust and debris to gather, undermining the whole effort. Use a putty knife to fill gaps, then smooth with sandpaper, and finish with paint or veneer for a polished appearance. For ideas on sleek aesthetics, browse creative built-in designs.
Integrate Tech for Smart Storage Solutions
Adding hidden electrical outlets, cable management channels, and smart devices turns traditional built-ins into high-tech hubs. Imagine a hidden charging station for your gadgets, accessible yet out of sight—like a secret compartment for your devices. During my renovation, installing power strips inside cabinets prevented cable clutter, creating a clean, modern look. Incorporate smart storage systems to make your space as functional as it is stylish. Remember, wiring inside walls calls for careful planning, possibly consulting professional electricians for safety and code compliance.Many homeowners assume that installing vanities and built-in storage is a straightforward process, but overlooked nuances can undermine your efforts. One popular misconception is that more storage space automatically equals better design. In reality, overcrowding a built-in can weigh down the aesthetic and accessibility, especially if you haven’t considered user flow or vertical space optimization. For instance, adding too many shelves without adjusting for height and depth can make access cumbersome, diminishing the very efficiency you seek. Studies from the National Kitchen and Bath Association highlight that thoughtful planning—like integrating hidden compartments and adjustable shelving—enhances usability and longevity, which many overlook in favor of mere volume.
Additionally, there’s a myth that DIY installation is always more cost-effective. While initial savings are tempting, advanced mistakes such as improper anchoring or misaligned cabinetry can lead to costly repairs or unsafe setups. For example, attempting to mount heavy floating vanities without using steel reinforcement or correctly spaced supports can cause dangerous sagging or detachment over time. These pitfalls are often due to a lack of understanding of load dynamics and wall structures, which professionals expertly navigate. For a deep dive into the technicalities, consulting expert installation guides like this resource can save you stress and expenses.
Ever wonder why some built-ins age poorly despite initially looking perfect? The secret lies in ignoring moisture control and material compatibility. Using humid-appropriate materials like marine-grade plywood and sealing edges properly prevents warping and mold, especially in bathrooms. Many overlook this nuance, risking pricey repairs down the road.
What advanced pitfalls do homeowners often miss when planning built-ins?
One critical oversight is neglecting future tech integrations. Modern vanities require concealed wiring channels and power outlets, but planning for these during initial framing is essential. Failure to do so can result in unsightly cables or the need for costly retrofit work later. According to industry experts, pre-planning electrical routes and ventilation improves both safety and aesthetics, making your space truly smart. For detailed strategies, explore these smart storage solutions.” Having a clear understanding of these hidden nuances can make the difference between a successful build and a renovation nightmare. Remember, meticulous planning and professional guidance are your best allies. If you’ve ever fallen into these traps, let me know in the comments! Get ready to transform your space with smarter, more durable solutions.
Everyday Maintenance for Longevity and Functionality
To ensure your built-in units and vanities remain in top shape, establish a regular maintenance routine. I personally recommend inspecting hinges, handles, and seals monthly to catch any early signs of wear. Keep a microfiber cloth and mild cleaner handy—these are perfect for dusting and wiping down surfaces without scratching. Periodic checks for secure mounting also prevent accidents, especially in high-traffic areas. Scheduling bi-annual deep cleans and hardware inspections can significantly extend the lifespan of your installations.
Tools I Advocate for Precision and Ease
Investing in the right tools makes all the difference. I swear by a quality cordless drill with variable speed settings—I use it for everything from installing brackets to adjusting hardware. A laser level is non-negotiable; it ensures your shelves and cabinets are perfectly aligned, saving time and avoiding crooked installations. For measuring, I prefer a digital caliper for accuracy, especially when customizing internal dividers or cable channels. Additionally, having a stud finder with deep detection capabilities helps avoid the disastrous wall failures that can come with blind mounting. These tools, combined with patience and planning, set the stage for successful long-term results.
How do I maintain built-in storage and vanities over time?
Proper maintenance involves more than just tools—it’s about adopting a system. Regularly checking for loose screws or hinges, applying a protective sealant to wooden surfaces, and keeping vents clean if your units include integrated electronics are crucial steps. For tech-integrated cabinets, updating firmware or software and reviewing cable management systems minimizes future troubleshooting. To keep everything functioning seamlessly, I recommend referencing comprehensive guides like Effortless Storage Solutions. Also, consider investing in a small, portable vacuum with narrow attachments—it’s perfect for deep cleaning tight corners and removing dust build-up.
Long-Term Outlook and Future-Proofing
Looking ahead, smart tools and maintenance practices will evolve with technology. I foresee a rise in IoT-enabled hardware that can alert you to issues before they become problems, like hinge failures or moisture intrusion. Staying connected through apps and software updates will become essential for preserving your investment. Taking proactive steps now—such as encrypting electronic wiring or choosing materials resistant to humidity—puts you ahead of potential issues. For a detailed upgrade path, exploring smart storage systems demonstrates how technology can bolster your home’s resilience.
The Power of Professional Guidance
While DIY tools and maintenance routines are invaluable, consulting industry experts can prevent costly mistakes. An external resource like this expert guide provides insights into diagnosing issues early and choosing durable solutions. I encourage you to try applying a high-grade sealant to all joints annually—it’s a small step that yields big benefits in preventing moisture damage and maintaining a sleek appearance. Remember, consistent upkeep paired with reliable tools ensures your built-ins stay stylish and functional for years to come.
The Hardest Lesson I Learned About Vanities and Built-ins
Initially, I believed that more shelves automatically meant better storage, but I soon realized that thoughtful placement and user accessibility are what truly matter—less clutter, more function. This taught me that quality always outweighs quantity when designing built-ins.
3 Myths About Storage and Installation That Held Me Back
One common misconception was that DIY always saves money, yet I underestimated the time, tools, and expertise needed, which sometimes led to costly mistakes. Additionally, I thought concealed wiring was a hassle, but proper planning showed me it’s doable and worth the effort for a sleek look. Lastly, I believed materials don’t impact longevity—selecting moisture-appropriate wood saved me from future warping and repairs.
What Industry Insiders Never Tell You About Seamless Built-ins
Many overlook the importance of wall reinforcement—skipping this step can cause sagging or instability over time. Also, not pre-planning electrical needs can turn your stylish built-in into a tangled mess of cables. And, surprisingly, high-quality hardware like soft-close hinges transforms functional storage into luxury. These secret tips elevate your project from good to exceptional.
Tools That Changed My Approach to Vanity and Built-in Installations
A laser level has been a game-changer for perfect alignment, preventing crooked shelves. A quality stud finder ensures safe, secure mounting—critical when dealing with heavy cabinetry. Additionally, using a digital caliper helped me customize internal dividers perfectly fitting my needs. These tools streamline the process, reduce errors, and give a professional finish to DIY projects.
Let Your Space Reflect Your Style and Smarts
Designing built-ins isn’t just about storage—it’s about creating a harmonious space that blends function with aesthetic appeal. Don’t hesitate to experiment with hidden compartments or feature lighting—these touches make your home uniquely yours. Remember, a well-planned, thoughtfully executed built-in can elevate your living experience and stand the test of time. Ready to embark on your own transformation? Share your biggest challenge below—I’d love to help you overcome it and bring your vision to life!
One Reply to “4 Tech-Ready Hacks for Living Room Built-ins in 2026”
Leave a Reply
Related Posts

7 Stealth Vents for 2026 Integrated Living Room Tech Cabinets
Have you ever installed a sleek living room cabinet only…
3 Mistakes That Ruin Your Living Room Built-ins in 2026
It was a moment I won't forget. I stood in…

3 Ways to Hide an 85-Inch TV Using Seamless 2026 Built-in Slides
I remember the day I finally unboxed my 85-inch TV,…
This article resonates with my recent home upgrade where I finally integrated smart outlets and cable management into my built-ins. I used to struggle with cluttered cables which not only looked bad but also made it hard to access my devices. The step-by-step tips on measuring and reinforcing walls are especially helpful because I learned the hard way that neglecting wall strength can lead to sagging shelves over time. I’ve also found that selecting the right hardware, like soft-close hinges, makes a huge difference in the user experience and overall aesthetic. One thing I’d like to add is the importance of choosing humidity-resistant materials if your built-ins are near kitchens or bathrooms—it prevents warping or mold. How do others plan for future tech upgrades when designing their built-ins? Do you think incorporating wireless charging stations directly into shelves is a good idea or best left as a secondary setup? Would love to hear different approaches to maintaining both function and style long-term.