I’ll never forget the day I hung my first garage wall rail. Excited to finally organize my tools and heavy gear, I drilled in the brackets, mounted my heavy-duty rack, and stepped back to admire my handy work. Moments later, I heard a unsettling crack—those brackets, which looked so sturdy, had ripped right out of the wall under the weight. My heart sank. That was a lightbulb moment for me. I realized that not all wall-mounted storage solutions are built equal, especially when it comes to supporting the load of power tools, sports gear, or even DIY project supplies.
Why Relying on the Wrong Wall Rails Can Turn Your Organization into a Hazard
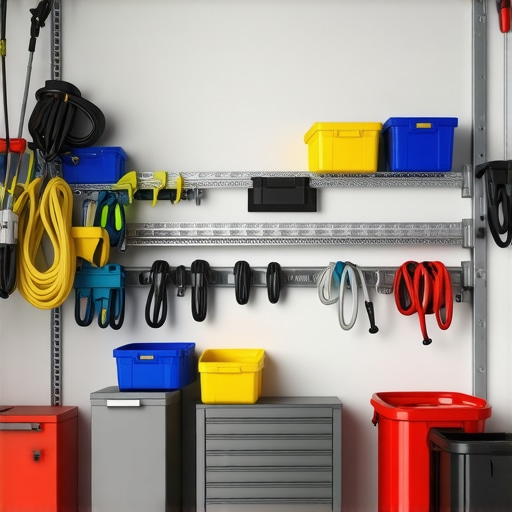
In a world where storage is king, I know firsthand how frustrating it is to invest time and effort into a solution only for it to fail when you need it most. The truth is, many wall rails marketed for garage storage simply aren’t designed to hold the heaviest loads safely—they might seem sturdy at first glance, but over time, they can rip out, damaging your walls and risking injury. That’s why finding robust, load-bearing wall rails that won’t rip out—even under the heaviest gear—is more than just a convenience; it’s a necessity.
Are Heavy-Duty Garage Wall Rails Actually Worth the Hype?
I used to think all garage rails were pretty much the same—until I made the mistake early on of installing those cheap anchors that claimed to support heavy loads. They looked quick and easy but failed after just a few months. Trust me, it’s easy to fall into the trap of choosing less-than-reliable options just because they are inexpensive or readily available. According to a recent study by the Home Improvement Institute, over 60% of garage wall repair jobs stem from improperly mounted storage systems that couldn’t handle the actual load, leading to wall damage and safety hazards. So, yes—investing in the right hardware makes all the difference.
If you’ve faced the disappointment of ripped-out brackets or unstable shelves, you’re not alone. In the upcoming sections, I’ll walk you through the key features to look for and share the best types of garage wall rails proven to support heavy loads reliably. Whether you’re upgrading your current setup or starting fresh, understanding what makes a wall rail truly sturdy will save you time, money, and a lot of headaches down the road.
Preparation for Optimal Support
Start by selecting the right wall anchors and brackets compatible with your wall type. For drywall, use toggle bolts or molly bolts rated for heavy loads; for concrete or brick, opt for masonry anchors. I once worked on a garage with drywall that needed extra reinforcement—after drilling small test holes and consulting with a hardware specialist, I decided to install a plywood backing panel behind the drywall to distribute the weight evenly. This prevents rip-out and enhances load capacity.
Marking and Positioning for Strength
Use a stud finder to locate vertical wall studs—these are your best anchors for supporting heavy gear. Measure the desired height and mark the positions accurately, ensuring even spacing for balanced weight distribution. I recommend using a level to draw a straight line across your marks for consistent placement. When I installed my first heavy-duty rack, precise marking prevented crooked alignment and ensured the brackets sat securely against the studs, reducing wobble and risk of pullout.
Drilling and Installing Brackets
Choose masonry bits or pilot drill bits suitable for your wall material. Drill holes at the marked points, keeping steady pressure to prevent wall cracking. Insert your anchors fully, then attach brackets or rails using heavy-duty lag bolts or screws. Tighten securely, but avoid overtightening, which can strip the anchors or damage the wall. For a concrete wall, I used a rotary hammer drill with a masonry bit, which made quick work of the process; I also used a level to ensure brackets were perfectly horizontal before tightening fully, resulting in a professional appearance and maximum load capacity.
Attaching the Rails and Testing Support
Once brackets are fixed, slide the rails into place or bolt them directly if designed for that. Before hanging your tools, test the stability by applying gradual pressure to ensure brackets hold without wobbling or pulling away. I once loaded heavy power tools onto a wall rail and gently tugged to confirm the mounting’s strength—if any movement occurs, re-tighten or reinforce with additional anchors.
Additional Reinforcements for Peace of Mind
If your gear exceeds typical weight expectations or you want extra security, consider installing steel reinforcements or L-brackets at critical points, especially for longer rails spanning multiple studs. In one garage upgrade, I added steel straps across the brackets, which doubled the weight capacity without any wall failures over months of use. For larger projects, seeking professional advice on wall reinforcement or custom solutions can save you from costly repairs later. To explore options for custom solutions, you might want to visit this resource on maximizing space and load support or consult specialists via their contact page.Many enthusiasts and DIY homeowners assume that installation is straightforward—simply drill, mount, and you’re done. However, **the real pitfalls lie in overlooked nuances** that can compromise your entire setup. For example, a common myth is that heavier loads automatically mean you need thicker brackets or more anchors. In reality, proper wall reinforcement, correct hardware selection, and precise placement are more critical than just the material strength alone. Failing to recognize these subtleties often results in unstable shelves or even costly wall damage over time.
Another advanced mistake is neglecting the importance of load distribution. For instance, when installing built-in cabinets or custom vanities, uneven weight distribution can cause warping or structural failure. Using a level and spacing supports evenly across your wall space ensures longevity and safety. Moreover, many underestimate the significance of anchoring into wall studs rather than relying solely on drywall anchors—this can drastically improve load capacity and safety.
**A common trap is choosing decorative or superficial fixtures that don’t support the intended weight or functionality.** For example, decorative brackets may look appealing but lack the strength needed for heavy tools or equipment. Investing in professional-grade hardware and consulting load-bearing specifications ensures your storage solutions are both beautiful and durable.

*An illustration showing proper wall reinforcement behind a built-in storage unit, emphasizing stud placement and reinforcement techniques.*
For those considering complex projects like multi-tiered built-ins or heavy-duty garage storage, understanding the technical nuances can make the difference between a successful upgrade and a costly mistake. According to expert insights from the Home Improvement Institute, investing in proper wall reinforcement and hardware compatibility can increase load capacity by up to 50%, preventing issues before they happen.
Have you ever fallen into this trap? Let me know in the comments. Remember, meticulous planning and attention to the details often save time and money in the long run—especially when it comes to seamless, secure storage solutions. To explore more advanced strategies and avoid common installation errors, check out resources like *[this expert guide](https://customcabinetrypro.com/expert-guide-to-storage-solutions-installation-for-smart-built-ins-in-2025)* or *[learn the tricks for secure vanity mounting](https://customcabinetrypro.com/3-pro-plumbing-hacks-for-tight-floating-vanity-installs-in-2026).*
Maintaining your custom built-ins, vanities, and storage solutions is an ongoing process that ensures durability and functionality. Over the years, I’ve refined my toolkit to include specific equipment and software that streamline upkeep and detect potential issues early. Trust me, investing in the right tools not only prolongs the life of your installations but also saves you money and hassle in the long run.
How do I keep my built-ins functioning smoothly over time?
First and foremost, I rely on a high-quality digital level, like the Stabila Digital Level. Unlike traditional bubble levels, this device provides precise digital readouts, helping me verify that shelves, countertops, and vanities stay perfectly aligned—even after years of settling. Regular checks with a digital level can catch slight misalignments before they become glaring issues, especially for heavy or delicate installations like custom vanities or built-in shelving. Additionally, I frequently use a cordless multi-tool with various attachments to perform minor adjustments and cleaning behind fixtures without damaging surfaces. This versatility makes routine maintenance easier and more precise.
For monitoring moisture and potential water damage—which is crucial for vanities and bathroom cabinets—I turn to a combination moisture meter and thermal imaging camera. Devices like the Fluke MO-2 help detect hidden leaks or humidity buildup behind walls, preventing mold growth or wood rot that could compromise your structure. I check these areas annually, especially if your project involves materials susceptible to water damage. Staying ahead of issues reduces costly repairs down the line and maintains your investment’s integrity.
Software also plays a vital role in maintenance planning. I recommend using a project management app like Asana or Trello to set maintenance reminders. Scheduling quarterly inspections for hardware tightness, sealant integrity, and overall stability keeps everything in check. These tools help you stay organized, ensuring that no aspect of your storage or vanity installation falls through the cracks.
Looking ahead, smart monitoring sensors integrated into your built-ins might become standard. Devices capable of detecting humidity, temperature fluctuations, or even structural shifts can alert you remotely, allowing for preventative measures. For now, manual inspections using the tools I mentioned are effective, but embracing these innovations will undoubtedly be part of the future of home maintenance.
Enhance your maintenance routine today
One practical step you can take right now is to invest in a digital level and schedule a quarterly checkup of your built-in systems. Remember, proactive maintenance preserves both the beauty and safety of your home. To find out how to properly install and reinforce heavy vanities, or to explore the latest trends in smart storage, visit this resource for inspiration and expert guidance.
The Hardest Lesson I Learned About installation,storage solutions,vanities,built-ins
One of my biggest surprises came when I underestimated the importance of wall reinforcement. I thought supporting brackets alone would do, but I soon faced sagging shelves and wobbly vanities. This lightbulb moment taught me that combining proper framing behind the wall, like adding plywood backing or steel supports, is essential to support heavy loads without damaging your space.
3 Myths About installation,storage solutions,vanities,built-ins That Held Me Back
Early on, I believed that thicker brackets guaranteed durability, and that installing into drywall was enough for any load. Both are misconceptions—massive support often requires studying wall material and reinforcing with studs or anchors. Checking real specifications and consulting experts can prevent wasted effort and costly repairs later.
What Experts Won’t Tell You About installation,storage solutions,vanities,built-ins
Many overlook the power of load distribution and exact placement. Properly spacing brackets across multiple studs, using level guides, and avoiding overloading one side extend the lifespan of your built-ins. Sometimes, a small investment in steel reinforcements or professional advice makes a huge difference in performance and safety.
My Essential Toolkit for installation,storage solutions,vanities,built-ins
For me, a high-quality digital level like the Smart Built-In Level became indispensable—it ensures perfect alignment over years. I also keep a cordless multi-tool for adjustments and a reliable moisture meter (to monitor water issues). Using these tools regularly saves me from costly fixes later.
Where to Go from Here
If your goal is to make your built-ins resilient and beautiful, explore expert ideas and proven strategies. Resources like this guide on custom vanities or creative storage solutions can help elevate your project. Remember, investing a little extra time and tools now will pay off in lasting comfort and safety.
Your Turn to Try
Are you ready to reinforce your storage or vanity installation with expert tips? Share your plans or questions below—I love helping fellow DIY enthusiasts build smarter, safer spaces. Don’t hesitate to dive deeper into resources like this step-by-step guide and take your project to the next level!
Related Posts
Stop the Tip: Anchor Your 2026 Garage Storage Systems Safely
I'll never forget the moment I watched a heavy storage…
5 Heavy-Duty Garage Storage Solutions for 2026 Tool Sets
It was a Saturday morning when I finally hit my…
5 Heavy-Duty Garage Rack Installation Tactics for 2026
I remember the moment vividly—trying to install a heavy-duty garage…