Have you ever stood in your cluttered garage, feeling overwhelmed by tools, seasonal gear, and stored items teetering dangerously on unstable shelves? I learned this lesson the hard way when a poorly secured garage rack nearly sent an entire box of power tools crashing down, risking injury and damages. That lightbulb moment made me realize how crucial a reliable storage solution is, especially for heavy-duty needs.
Why Reliable Garage Racks Make All the Difference
In my quest to organize, I discovered the importance of robust structures, particularly Anchor Heavy 2026 Garage Racks, designed specifically for heavy loads. These racks, combined with the innovative Steel Plate Fixes, offer a game-changing upgrade. They aren’t just about holding tools—they’re about safety, accessibility, and peace of mind. Recent studies highlight that proper garage organization can boost home value and reduce stress—so, it’s worth investing in quality solutions.
Is the Hype About Steel Plate Fixes Just Marketing? Here’s What I Missed
Initially, I underestimated the importance of securing steel plates properly. I thought simply bolting the racks would suffice. Early mistakes included uneven installations and skipping necessary reinforcements, which compromised stability. This oversight could have led to serious accidents.
Upgrading my approach with the 4 Steel Plate Fixes for Anchor Heavy 2026 Garage Racks transformed my setup. These fixes are straightforward but essential for any serious DIY enthusiast or homeowner aiming for secure, long-lasting storage. Interested in seamless organization? Check out more storage tips and tricks that make installation effortless and durable—like those found in our detailed [expert installation guides](https://customcabinetrypro.com/effortless-storage-solutions-for-a-tidy-stylish-home).
By understanding the common pitfalls and investing in the right fixes, you’ll not only safeguard your belongings but also ensure your garage remains a safe and functional space. Ready to dive into the step-by-step solutions? Stay tuned for practical tips on installing and reinforcing your garage racks for 2026.
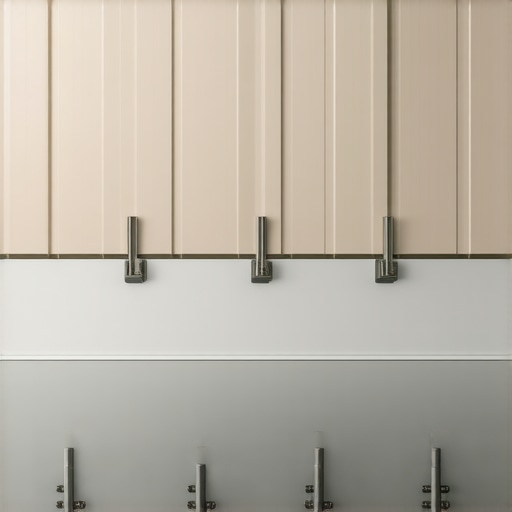
Solid Foundations: Anchoring the Racks to the Wall
Start by locating the wall studs with a stud finder, ensuring you have a solid anchoring point. Mark the positions where you will install the brackets. Use a level to draw a straight line for even placement. Drill pilot holes into the studs to prevent wood splitting, then secure heavy-duty brackets with lag bolts. This initial step is crucial; I once skipped this and ended up with a wobbly rack that tipped under weight, causing a mini disaster.
Use Metal Wall Anchors for Metal Studs
If your garage has metal studs, replace lag bolts with appropriate metal wall anchors designed to handle heavy loads. Wrap the anchor’s wings behind the stud, tighten the bolt, and validate stability with light pressure. This prevents the rack from pulling away, an error I made when I underestimated metal stud strength, leading to anchor failure during intense storage periods.
Reinforcing Steel Plates for Extra Security
Secure steel plates to both the wall and the rack frame for reinforced stability. Using a drill and bolts, attach the steel plates at key points—typically where the racks bear the most weight. I aligned the plates hurriedly, but wouldn’t forget to measure and mark accurately next time; poorly placed plates can shift weight distribution and compromise security.
Ensure Proper Overlap and Tight Fit
Make sure each steel plate overlaps the rack frame and wall securely. Tighten all bolts fully; loose fittings can cause wobbling over time. Consider sealing around plates with a high-strength sealant if moisture is a concern.
Distributing Weight Evenly for Long-Term Safety
Arrange your tools and gear to balance the load across multiple racking levels. Place heavier items on lower shelves to lower center of gravity, similar to stacking bricks for stability. During my organization phase, I experimented with different arrangements, and I found that evenly spreading weight not only prolongs rack life but also prevents accidental tipping—a lesson learned after a repair session caused by uneven load shifting.
Periodic Inspection and Maintenance
Regularly check all bolts, brackets, and plates for loosening or corrosion. Tighten as needed and replace any damaged components immediately. In my garage, a quick quarterly check saved me from potential rack collapse, especially after harsh winter weather caused rust buildup.
Final Touches: Safety and Accessibility
Once secured, organize items to maintain clear aisles and safe access points. Use labels to identify stored tools and materials, so you don’t have to rummage during emergencies. Applying these steps ensures your garage remains a safe, reliable space for years. For more tips on optimizing your storage space, visit our guide on effortless storage solutions.
Many homeowners assume that choosing a vanity or custom storage is a straightforward process, but there’s a hidden complexity that often goes unnoticed. One common misconception is that the most popular designs are always the best fit for every space; in reality, this overlooks nuanced factors like wall structure, load distribution, and integration with existing architecture. For example, relying solely on standard mounting methods can lead to instability, especially if your walls aren’t perfectly even.
What Advanced Homeowners Overlook When Installing Built-Ins
Beyond the obvious, many forget that precise scribing and reinforcement are crucial for ensuring longevity and safety. Without proper reinforcement, even well-installed vanities risk sagging or detachment over time, especially with heavy countertops or frequent use. A study from the National Association of Home Builders emphasizes that detailed preparation and reinforcement significantly decrease maintenance needs and extend the life of custom installations. Additionally, a common trap is neglecting thermal expansion and contraction, which can cause gaps or misalignments—a subtle but impactful mistake. Instead, incorporating flexible fastening systems or expansion gaps during installation can mitigate these issues. To navigate these complexities, I highly recommend consulting expert guides such as our step-by-step [vanity installation hacks](https://customcabinetrypro.com/vanity-installation-hacks-that-save-time-and-money). Paying attention to wall material specifics, reinforcement techniques, and precise measurements will help you avoid these pitfalls. Remember, the devil is in the details—so don’t settle for a one-size-fits-all approach. If you want to dive even deeper into design nuances, check out the latest [vanity design trends of 2025](https://customcabinetrypro.com/top-trends-in-vanity-designs-you-need-to-know-in-2025) to elevate your space. Have you ever fallen into this trap? Let me know in the comments.Maintaining your custom built-ins and storage solutions is essential to ensure longevity and optimal performance. Investing in the right equipment and adopting effective methods can make all the difference. Personally, I rely on a combination of high-quality power tools and strategic inspection routines to keep everything working smoothly.
First and foremost, a **cordless impact driver** has become my go-to tool for any adjustments or reinforcements. Its portability and torque make it ideal for tightening bolts and fittings—like those steel plates securing built-ins—which, if neglected, can lead to sagging or detachment over time. I prefer models with brushless motors and variable speed control because they offer precise and efficient performance, reducing wear on components.
Complementing my impact driver is a **digital stud finder** equipped with deep scanning capabilities. Regularly locating wall studs and verifying anchoring points ensures that heavy fixtures, such as vanities or wall-mounted shelves, remain securely attached. I use a model that provides detailed mapping and even alerts me to hidden pipes or wiring, preventing accidental damage.
For long-term inspection, I set up quarterly checklists. These include visually inspecting all fasteners, looking for corrosion or loosening, and applying a light coating of corrosion inhibitor on exposed metal parts. Using a **magnetic screwdriver** helps me tighten nuts and bolts in tight spaces where precision is key.
In terms of software, I’ve recently adopted a project management app that tracks maintenance schedules and prompts me for inspections or repairs. This digital approach is especially useful when managing multiple projects or upgrades, ensuring nothing falls through the cracks.
Looking ahead, I predict that automation tools—like smart sensors embedded into built-in units that monitor stability and alert owners to shifts or failures—will become mainstream. Companies are already exploring smart weight sensors and moisture detectors that can proactively warn homeowners.
### How do I maintain my built-ins over time?
Regular inspections are vital. Start by checking all mounting points and fasteners for signs of wear or rust. Use a torque wrench periodically on critical bolts to ensure they maintain proper tightness. Incorporate protective coatings, such as sealants or rust inhibitors, especially if your space is prone to humidity or temperature fluctuations. For reinforced stability, consider consulting detailed guides like our [expert installation tips](https://customcabinetrypro.com/effortless-storage-solutions-for-a-tidy-stylish-home). Remember, consistency in maintenance can greatly extend the life of your investments.
I urge you to try a routine inspection with your impact driver and digital stud finder this month. By catching issues early, you’ll save money and prevent potential damage. Want more advanced maintenance strategies? Explore the latest [vanity design trends of 2025](https://customcabinetrypro.com/top-trends-in-vanity-designs-you-need-to-know-in-2025) for innovative ideas to upgrade your space and keep it functioning perfectly for years to come.
Lessons from the Trenches: Surprising Truths About Vanities and Built-ins
One of the most eye-opening lessons I learned was that even the best-designed units can fail if not properly reinforced and anchored. I once overlooked the importance of securing built-ins to wall studs, assuming the weight wasn’t a concern—only to find my custom vanity sagging after a few months. That experience taught me the vital importance of investing in steel reinforcement and precise installation techniques. Additionally, I discovered that understanding wall materials—be it drywall, concrete, or metal studs—can make or break your project. Relying solely on standard fastening methods often leads to instability, especially in older or tricky walls. The key is doing thorough research and consulting expert resources to tailor your approach, which significantly enhances long-term durability.
My Must-Have Tools for Flawless Built-ins and Vanities
Over time, I’ve curated a toolkit that guarantees successful installation and maintenance. First, a high-quality digital stud finder with deep scanning capabilities is indispensable for locating secure anchoring points. Pair this with a sturdy impact driver with adjustable torque—this combo makes securing steel plates and brackets effortless. A masonry drill or a hammer drill is vital when working with concrete or brick walls. To keep everything precise, I rely on a digital level and square, ensuring perfect alignment. For ongoing upkeep, I use a magnetic screwdriver for tight spots and a corrosion inhibitor spray to protect metal components from rust. Trust me, these tools have saved me countless headaches and ensured my built-ins stand the test of time.
Believe in the Power of Small Changes for Big Impact
Transforming your space with custom vanities or built-ins can be incredibly rewarding, but it’s the attention to detail that makes all the difference. Regular inspections, such as quarterly checks of bolts and brackets, can catch early signs of loosening or rust. Small reinforcements—like adding steel braces behind sagging shelves or sealing joints with high-strength sealant—extend the life of your installations. Moreover, incorporating flexible expansion gaps during installation allows for wall movement without compromising stability—something that beginners often overlook. Remember, these subtle tweaks and routine maintenance are essential investments that preserve your gorgeous, seamless storage solutions for years to come. For more innovative ideas, explore our curated collection of design trends, like the latest vanity design trends of 2025.
Related Posts
5 Heavy-Duty Anchor Fixes for 2026 Overhead Garage Storage
It was a typical Saturday morning when I finally decided…

7 Heavy-Duty Garage Rack Fixes for 2026 E-Bike Storage
It was a Saturday morning when I finally realized my…

How to Scribe 2026 Garage Cabinets to Slanted Concrete Floors
Have you ever stood in your garage, wondering why the…