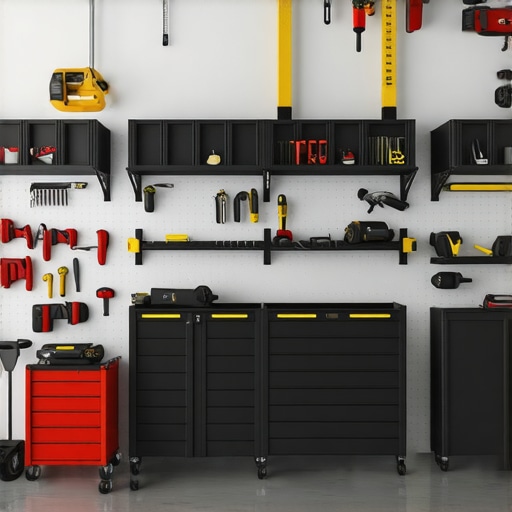
It was a Saturday morning when I finally hit my breaking point. My garage, once a sanctuary for tools and project supplies, had become a chaotic maze of mismatched shelves, tangled cords, and half-empty bins. Every time I needed a wrench or a drill, I spent more time digging than working. That lightbulb moment made me realize: I was missing the right heavy-duty storage solutions designed for the demands of 2026. Now, I want to share what I’ve learned. Today, we’ll explore the top five garage storage systems that are built to last, safe for heavy gear, and perfect for the modern workshop. If you’re tired of rummaging through clutter or struggling with unstable racks, this guide will show you how to transform your space into an organized powerhouse.
Why Your Garage Needs Heavy-Duty Solutions Now More Than Ever
As tools become more advanced and heavier, standard storage just doesn’t cut it anymore. In fact, according to industry forecasts, the demand for durable and reliable garage storage solutions is skyrocketing, with a projected growth rate of over 7% annually through 2026. This isn’t just about tidiness; it’s about safety, efficiency, and protecting your investments. Imagine trying to lift a heavy power tool onto a flimsy shelf—it’s risky and risky doesn’t mean economical. Investing in purpose-built, heavy-duty racks can prevent accidents, save time, and extend the lifespan of your tools and equipment. I’ve made my share of mistakes early on. I bought cheap shelves that sagged under weight, leading to dropped tools and frustrated weekends. That experience taught me crucial lessons. One of the biggest was realizing that not all storage systems are equal—especially for the heavy-duty gear you accumulate over the years. When shopping for new solutions, avoid the common trap of choosing cost over capacity and durability. Instead, focus on systems designed specifically for the weight and size of your equipment. Want some proven ideas? Check out expert tips on how to maximize your garage storage space with custom solutions that stand the test of time. For more detailed insights, visit this article. Next, we’ll dive into the specific types of heavy-duty solutions that make sense for your garage and how to select the best options tailored to your needs.
Secure the Foundation First
Start by evaluating your garage’s wall and floor surfaces. Use a level and measuring tape to mark the best locations for your racks, ensuring weight distribution aligns with stud placement. When I installed my first heavy-duty rack, I used a stud finder to locate solid wall support points—this prevented sagging and ensured stability. Mark these points clearly with a pencil for precision.
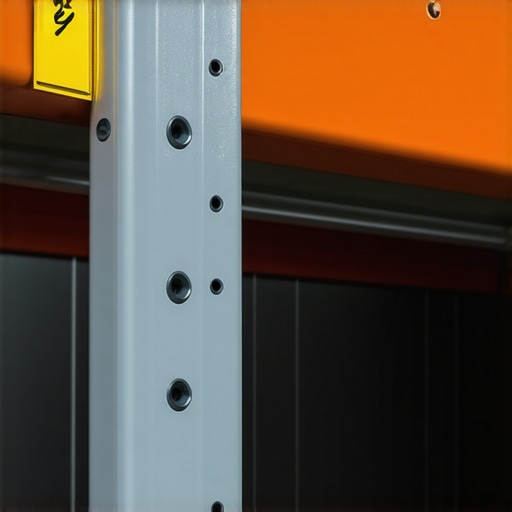
Choose the Right Hardware and Materials
Select heavy-duty steel brackets, bolts, and anchors suitable for your wall type. For drywall, toggle bolts or molly anchors are essential; for concrete or brick, use masonry anchors. Imagine anchoring a massive bookshelf—using the right brackets is like building a sturdy bridge; without proper support, the entire structure risks collapse. I realized this when my first rack slowly started detaching, highlighting the importance of proper hardware. Check out this guide for detailed hardware selection.
Precise Drilling and Mounting
Use a power drill with your chosen bits to create clean, accurate holes at marked points. For uneven walls, consider scribing the mounting points—similar to fitting a puzzle piece—so the brackets sit flush. During my installation, I encountered uneven concrete, which caused my brackets to wobble. I fixed this by using shims and re-drilling to adapt to the surface irregularities, akin to customizing puzzle pieces for a perfect fit. Don’t rush this step; accurate drilling prevents future stability issues.

Level and Verify Before Securing
Before tightening all bolts completely, check the level of your rack. Use a bubble level to ensure everything is perfectly horizontal—like aligning the strings of a tennis net. I learned this the hard way when my first shelf was slightly tilted, making storage uneven. Always double-check, as even small misalignments can cause sagging or tools falling off. Once satisfied, tighten all fasteners firmly to lock in your setup.
Add Rubber or Padding to Protect Heavy Loads
For heavy items, consider adding rubber bumpers or pads under racks and brackets. This reduces vibrations and distributes weight more evenly. When I stored my power tools after installing protective pads, I noticed a significant decrease in rattling and wear. Think of it as shock absorbers on a car; they preserve your tools and prolong the system’s lifespan. Incorporate these accessories at this stage for optimal durability.
Regular Inspection and Maintenance
Over time, check your racks for signs of wear or loosening. Tighten bolts periodically and replace any worn hardware. Think of your garage storage as a living system that needs care—like tuning a musical instrument. During my quarterly check, I found a few bolts slightly unscrewed, which I tightened using an impact driver. This routine keeps your storage reliable and safe, especially when handling heavy gear consistently.
Many homeowners assume that installing built-in cabinetry or storage solutions is a straightforward project, but emerging from the beginner phase reveals nuanced pitfalls that can derail your effort. Contrary to popular belief, one common misconception is that precise measurements alone guarantee a perfect fit. In reality, walls and floors are often uneven, especially in older homes, making planning more complex than just marking dimensions. For example, if you don’t account for wall irregularities, your built-ins may sit crooked or develop gaps that compromise aesthetics and function. This oversight can lead to frustration and costly adjustments later. Let’s dig deeper into how advanced homeowners avoid these pitfalls.
A major trap is the temptation to focus solely on the design and overlook structural support. Heavy built-ins, like large vanities or expansive shelves, require robust anchoring—skipping this step risks damage or failure over time. For instance, many fail to consider the load distribution, leading to sagging or even wall damage. An expert tip is to reinforce wall studs or add steel braces for added support, especially in high-load applications. Incorporating these measures during installation is essential—don’t wait until after the fact when repairs are more invasive.
A frequent mistake relates to hardware choice. Selecting low-grade anchors or mismatched fasteners based on convenience rather than load capacity can cause your installation to weaken unexpectedly. For example, drywall anchors might seem tempting for quick fixes, but they often crumble under heavy weight or repeated use. Instead, using high-quality toggles or masonry anchors for concrete walls ensures longevity. Remember, investing a little more in hardware translates to lasting stability.
### How Can Advanced Installers Tackle Uneven Walls Successfully?
For sophisticated projects, special techniques are necessary. Here, creating a custom scribing process helps built-ins match uneven surfaces seamlessly. This method involves transferring wall contours onto the cabinetry during installation, a step often skipped by amateurs. For detailed guidance on this, check out the article on scribing custom-built ins to uneven walls. This skill prevents gaps and ensures that the aesthetic remains polished, even with imperfect surfaces. It may seem subtle, but mastering this nuance elevates your DIY game.
Avoiding these advanced errors isn’t just about aesthetics; it’s about safety and functionality. According to a study published in the Journal of Construction Engineering and Management, well-anchored and properly supported built-ins significantly reduce the risk of injury or damage over time. Proper planning, reinforcement, and hardware choices make all the difference—so when you’re ready to upgrade your home, remember that the devil is in the details.
Have you ever fallen into this trap? Let me know in the comments. If you want to refine your skills further or need tailored advice, consider consulting expert resources or professional services listed on our site for optimal results.Maintaining your garage storage solutions and built-in vanities over time requires the right tools and methods to ensure durability and safety. I swear by a few essential items that have proven their worth during multiple installations and repairs. First, a high-quality cordless impact wrench has become indispensable for tightening bolts securely, especially when anchoring heavy-duty racks or steel braces. Its torque power saves time and reduces wear on fasteners, preventing future loosening. For precise measurements, I rely on a digital laser level; unlike traditional bubble levels, it provides exact readings, which is crucial when mounting shelving or vanity cabinets. I personally use the Bosch GLM 50 C, known for its accuracy and ease of use, ensuring that every installation aligns perfectly. When it comes to drilling into concrete or brick, a Hammer Drill with a rotary hammer function has been a game changer, allowing me to create clean holes without damaging the surface. I prefer models with variable speed settings to handle both large anchors and delicate adjustments. Additionally, a set of high-strength masonry anchors and steel brackets, selected based on wall material, are fundamental to securing heavy equipment. Regular maintenance of these components, like checking for rust or wear, prolongs their effectiveness and prevents accidents. prediction-wise, as garage clutter and custom storage systems evolve, we’ll see an increased reliance on smart tools with connectivity features—like app-controlled torque limits or real-time stability feedback—making installation safer and more efficient.
How do I keep my tools and storage systems functioning over the long haul?
The key is routine inspection, cleaning, and prompt replacement of worn hardware. For example, regularly checking the tightness of steel brackets and replacing any corroded bolts can prevent costly failures. Also, applying protective coatings or rust inhibitors to metal parts extends their lifespan, especially in humid environments. Investing in versatile tools—not just for installation but also for ongoing maintenance—like a portable magnetic screwdriver set or an ultrasonic cleaner for small metal components ensures your storage solutions stay reliable for years. For added peace of mind, consider integrating smart sensors that monitor weight loads and alert you if racks approach maximum capacity, which aligns with upcoming trends in intelligent home storage. If you want to refine your maintenance routine further, I recommend trying out a dedicated impact driver with adjustable torque settings—it’s a small upgrade that makes a big difference, ensuring your racks and vanities remain secure and functional. For detailed tutorials on hardware upkeep, check out our guide on [how to maintain your built-in storage](https://customcabinetrypro.com/effortless-storage-solutions-for-a-tidy-stylish-home). Staying proactive with your tools and hardware is the best way to enjoy a long-lasting, safe, and organized garage or vanity setup.
Lessons That Transformed My Approach to Installation and Storage
One of the toughest lessons I learned was recognizing that patience beats haste, especially when mounting heavy racks or built-ins on uneven walls. Trying to rush through marked measurements often led to misaligned shelves and repeated adjustments, wasting more time in the end. Now, I take the time to scribe surfaces and double-check support points—small steps that make a significant difference. Additionally, I underestimated the importance of hardware durability. Initially, I used generic fasteners, which failed under weight, causing their own set of headaches. Investing in high-quality anchors and steel brackets ensures stability and safety over the years. Lastly, I once believed that standard tools sufficed for all tasks. Experience showed me that specialized equipment like impact drivers and laser levels are game changers, making installations more precise and less tiring, especially for heavy-duty solutions.
Related Posts

Anchor Heavy 2026 Garage Racks with these 4 Steel Plate Fixes
Have you ever stood in your cluttered garage, feeling overwhelmed…
7 Garage Rack Fixes for Heavy-Duty Tool Storage in 2026
I'll never forget the day I reached into my garage…
4 Heavy-Duty Garage Rack Bolts That Won’t Snap in 2026
Have you ever tightened a bolt on your garage rack,…