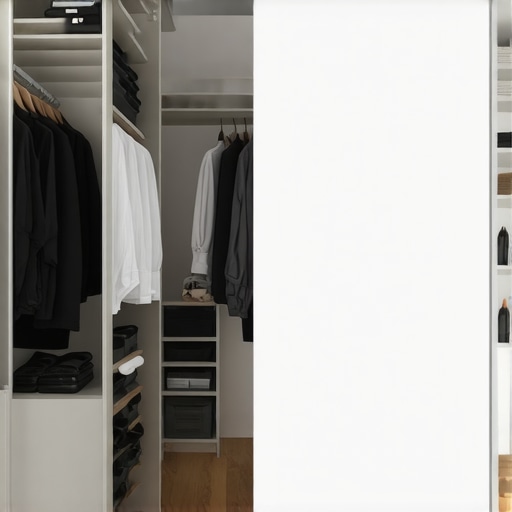
Ever felt that sinking frustration when you open your jewelry drawer, only to find it cluttered beyond recognition? I know that feeling all too well. There was a time when I thought my jewelry storage was as good as it gets—until I realized that hidden issues were silently sabotaging my organization. One day, I opened a drawer and discovered pieces tangled together, earrings lost in the abyss, and a strange, sagging feeling that made me question the stability of my built-ins. Trust me, that was my lightbulb moment.
Why Hidden Drawer Fixes Matter More Than You Think
When it comes to custom jewelry storage, we often focus on aesthetics and accessibility. But overlooked issues—like drawer sagging, misaligned slides, or inadequate support—can turn what should be a smooth, elegant experience into a daily frustration. Research shows that poorly designed storage can lead to damage and loss of valuable items, making the investment in smart fixes absolutely worth it. For example, a study highlighted that organized storage not only reduces clutter but also extends the lifespan of delicate belongings.
If you’ve ever struggled with a drawer that won’t close properly or items that fall from their designated spots, I bet you’ve faced similar issues. And if you’re like me, you might have made a handful of mistakes early on—like ignoring the importance of sturdy mounting or assuming that the standard slides would hold forever. Spoiler: they won’t. That’s why I started digging into hidden fixes that are simple, effective, and sometimes surprisingly affordable.
Is It Really Worth the Hype?
Like many, I was skeptical about the need for elaborate fixes. Custom cabinet solutions sound impressive, but are they necessary? Early on, I failed to realize that cheap hardware could lead to sagging drawers and lost jewelry. Once I invested in quality steel brackets and reinforced slides, everything changed. This mistake taught me that small upgrades—when done correctly—can make a big difference in the longevity and functionality of your built-ins. Curious how these fixes can transform your jewelry storage? I’ll walk you through the most effective tips, so stay tuned.
If you’re experiencing similar frustrations or want to preempt problems before they occur, this post is for you. Ready to turn your storage nightmare into an organized oasis? Let’s delve into the solutions I’ve personally tested and trusted over the years.
Assess Your Current Drawer Setup for Hidden Flaws
Start by thoroughly inspecting your jewelry drawer. Remove all items and examine the condition of the slides, supports, and overall structure. Check for signs of sagging, misalignment, or loose hardware. I once did this after noticing my drawers were not closing smoothly, revealing weak hinges that needed reinforcement. Document problem areas before proceeding to fixes.
Reinforce Structural Support to Prevent Sagging
If you discover sagging or bowing, reinforce the drawer’s framework. Use steel brackets or angle supports—think of them as the bones that keep your drawer upright. Attach these underneath the drawer sides with screws. I used L-shaped steel brackets for my vanity drawer, which instantly stopped the sag and improved stability. For detailed guidance on installing support brackets, check this effortless storage solutions.
Install Heavy-Duty Drawer Slides for Longevity
Upgrade to heavy-duty, full-extension steel slides. These are like the suspension system for your car—designed to handle weight and reduce wear. Remove the old slides by unscrewing them carefully, then align and attach the new slides on each side, ensuring they’re level and securely fastened. Remember, precise installation is crucial; misalignment can cause future sagging or difficulty closing. For step-by-step instructions, consult this vanity installation guide.
Prevent Jewelry Tangling and Lost Items with Custom Organizers
Organize jewelry within the drawer using foam inserts, small containers, or dividers. Think of these as miniature compartments that keep every piece in its place. I personally used foam-lined trays that fit snugly, preventing earrings or necklaces from moving around. This simple addition transformed my cluttered drawer into a neat, accessible space.
Seal Gaps and Protect Items from Damage
Ensure that the drawer seals properly when closed, preventing dust, moisture, or accidental tugs. Pay special attention to the drawer’s alignment and the condition of the slides. If gaps are visible, adjust or replace damaged slides or reinforce the frame. This proactive step extends the lifespan of both the drawer and your jewelry.
For more innovative storage ideas tailored to small spaces or tricky spots, explore this creative built-ins article. Implementing these concrete steps will turn your jewelry chaos into an organized, durable setup that lasts years.
When it comes to installing built-in storage or vanities, many assume that following standard guidelines guarantees success. But in my experience, much of what amateurs get wrong lies in overlooking nuanced details that only seasoned professionals understand. One widespread myth is that cheaper materials or generic hardware will hold up over time. On the contrary, choosing subpar components often leads to sagging, misalignment, or even premature failure, costing you more in the long run. For instance, instead of relying solely on standard screws, experts recommend steel studs and reinforced brackets for critical support, especially in high-load areas; neglecting this can cause your built-ins to wobble or pull away from the wall.
Keeping It Working: Tools I Recommend for Longevity and Precision
If you’re serious about maintaining your custom built-ins, having the right tools at hand is crucial. I personally swear by a high-quality cordless drill with adjustable torque settings, which simplifies every installation or reinforcement project. A cordless drill allows for quick adjustments, whether you’re attaching reinforced brackets or installing new drawer slides, minimizing the risk of over-torquing and damaging delicate materials. Additionally, a digital level, such as the Bosch Digital Spirit Level, ensures perfect alignment of shelves and supports, vital for preventing sagging over time. I prefer models with digital readouts because they provide precise measurements instantly, saving time and reducing errors. For ongoing maintenance, a small socket set and a cross-head screwdriver are indispensable for tightening loose hardware or replacing worn components without needing a full toolkit.
Furthermore, I recommend investing in a quality wood glue and some clamps for those minor fixes that require stabilization—say, when joints loosen or support brackets need reinforcement. Regularly inspecting and tightening hardware extends the lifespan of your built-ins and keeps everything looking sharp. For cleaning and dust removal, a microfiber cloth combined with a gentle vacuum attachment helps maintain a pristine look and prevents dust buildup, which can degrade materials over time. Remember, routine checks every six months can catch issues early before they escalate into costly repairs.
How do I maintain my storage solutions over time?
Consistent maintenance is key to ensuring your storage system remains functional and beautiful. I suggest setting a calendar reminder every six months to inspect all hardware, clean surfaces, and tighten loose screws. When inspecting, look for signs of wear, such as sagging supports or misaligned slides. Lubricate metal slides with a silicone-based spray, like WD-40 Specialist Silicone, to ensure smooth operation without attracting dust. These small steps make a significant difference in preventing early deterioration. Keep an eye on support brackets and reinforce them if you notice any shifting or sagging. Over time, implementing proactive fixes based on these regular checks can save you from more extensive repairs later. As storage trends evolve, tools like the Blumotion soft-close hardware continue to improve durability, making maintenance even easier. Looking ahead, integrating smart sensors to monitor drawer weight and support status could become commonplace, providing real-time insights and alerts for homeowners. Before you dive into ongoing maintenance, consider reviewing your current setup to identify potential weak points—if you need personalized guidance, feel free to contact us through our contact page for tailored advice.
The Hardest Lesson I Learned About storage solutions,installation,built-ins,vanities
Early in my journey, I underestimated the importance of sturdy support—assuming that standard hardware would suffice. That oversight led to sagging drawers and frustrated searches for jewelry, highlighting that investing in quality reinforcement is crucial. I learned the hard way that small details, like reinforcing support brackets, make all the difference in long-term durability.
3 Myths About storage solutions,installation,built-ins,vanities That Held Me Back
One myth was that cheap materials could save money without sacrifice. Another was relying solely on professional installation for perfection. The third was believing that regular hardware sufficed for heavy jewelry loads. Busting these myths taught me that quality components and a DIY cautious approach can yield superior, lasting results, especially when supported by thorough research and patience.
What Experts Won’t Tell You About storage solutions,installation,built-ins,vanities
Many professionals know that the devil is in the details—like precise leveling and reinforcement—that aren’t always shared openly. They also understand that routine maintenance, such as tightening supports or lubricating slides, preserves the lifespan of built-ins. Gaining this insider knowledge transformed my approach from reactive to proactive, ensuring my jewelry storage remains functional and beautiful over time.
My Essential Toolkit for jewelry storage improvements
A high-quality cordless drill with adjustable torque, a digital level like Bosch’s, and a set of steel brackets have been game-changers in my projects. These tools empower precision and confidence, enabling me to reinforce supports and install heavy-duty slides confidently. Trusting these tools comes from experience, knowing they save time and prevent costly mistakes, guiding me toward professional-level results.
Books That Changed How I View Built-ins and Custom Storage
“The Complete Guide to Small Space Living” offered innovative ideas on maximizing limited areas, while “The Art of Custom Home Storage” deepened my understanding of integrating functionality with design aesthetics. These books broadened my perspective, emphasizing that thoughtful planning and tailored solutions can turn any cluttered space into a showcase of efficiency and elegance.
Your Turn to Transform Your Jewelry Space
Taking action on hidden fixes and insider tips can elevate your jewelry storage from chaotic to curated. Remember, the key lies in understanding the nuanced details—reinforcing supports, upgrading slides, and customizing organizers—to create a system that endures. Do you feel ready to turn your storage frustrations into a newfound organization masterpiece? Share your thoughts or questions below—we’re in this journey together to make your space work smarter, not harder.
Related Posts

Stop the Snap: 7 Heavy-Duty Fixes for 2026 Closet Rods
I'll never forget the day I watched my closet rod…
7 Closet Built-in Fixes for Deep 2026 Bedroom Storage Corners
Have you ever stood in your bedroom, staring at that…
How to Mount 2026 Bedroom Built-ins over HVAC Vents
Ever fumbled with installing your bedroom built-ins only to realize…