I’ll never forget the moment I finally opened my bathroom vanity drawer after a renovation—only to be greeted by a tight, stubborn space that refused to close properly. The initial relief of a sleek design quickly turned into frustration as I realized plumbing pipes were cramping my storage dreams. Sound familiar? If you’ve faced similar battles with vanity clearance issues, you’re not alone. These small but stubborn obstructions can turn an otherwise simple update into a logistical puzzle.
Why Vanity Drawer Clearance Can’t Be Overlooked
Vanity storage isn’t just about aesthetics; it’s about functionality and convenience. When plumbing pipes encroach on drawer space, it not only hampers organization but can also lead to ongoing maintenance headaches. Early on, I made the mistake of ignoring the importance of proper plumbing relocation, which ended up causing more problems down the line. Trust me, a little planning now can save you a ton of trouble later.
According to industry experts, addressing plumbing interference during cabinet installation is a critical step that many overlook, often leading to costly adjustments afterward. By understanding the core principles of plumbing-relocation tactics, you can design a vanity that maximizes space without sacrificing accessibility or function. Ready to learn how to troubleshoot these issues effectively? Let’s dive into four proven strategies that helped me reclaim my bathroom’s storage potential.
Is Plumbing Relocation Actually Worth the Hype?
I remember jumping into my project eager to save a few bucks, only to find that I hadn’t considered the plumbing layout carefully. That oversight made me realize early on that moving pipes isn’t just for professionals; it’s a vital step that can make or break your vanity’s usability. If you’re worried about the complexity or expense, know that with the right guidance, these adjustments are more manageable than they seem. For additional insights, I recommend checking out expert design tips on maximizing space.
In the upcoming sections, I’ll share practical tactics that you can implement to free up that precious drawer space, make your vanity more functional, and avoid common pitfalls. So, if you’re tired of battling plumbing every time you open your drawers, stay tuned—these solutions could transform your bathroom experience.
Cut the Power and Water Supply Before Starting
First, turn off the main water supply and disconnect the electricity to ensure safety. I made this mistake when I first attempted plumbing adjustments—forgetting to shut everything down resulted in water spraying across my workspace. By doing this step thoroughly, you prevent accidental leaks or shocks, setting a safe foundation for the project.
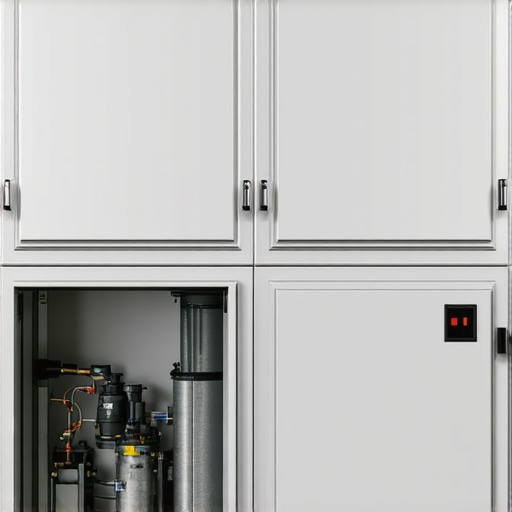
Assess and Map Your Plumbing Layout
Next, carefully examine the existing pipes. Use a marker and painter’s tape to outline their positions on the wall or floor. Think of this like charting a map before a road trip; knowing where the pipes run guides your decisions for relocation. I once skipped this step and ended up cutting into the wrong pipe, which caused days of delays and extra costs. Take your time here for precise planning.
Choose the Right Tools and Materials
Gather essential tools—pipe cutters, wrenches, PVC cement, and new fittings—and materials like flexible supply lines. For my project, I opted for flexible hoses instead of rigid pipes, which made maneuvering around existing structures much easier. This choice is like replacing stiff garden hoses with flexible ones to reach tricky spots easily.
Install Temporary Supports and Prepare Space
Before removing the old pipes, install temporary supports to hold the new ones during assembly. Clearing space around the vanity ensures access and reduces accidents. I used rubber clamps to secure the pipes temporarily, which kept everything stable while I worked. This micro-step saved me from a plumbing catastrophe when a pipe slipped mid-connection.
Relocate or Extend the Plumbing Lines
Begin cutting the existing pipes at their joints, then carefully move or extend them to the new position. Use a pipe cutter for clean cuts, and apply PVC cement or appropriate connectors. For my vanity, I extended the drain line with a flexible silicone connector, much like adding an elbow joint in a bicycle chain to navigate tight turns. Ensuring proper alignment prevents leaks and future clogs.
Secure the Pipes and Check for Leaks
Fit all connections tightly and turn the water back on gradually. Watch carefully for drips or puddles—like a pilot testing new wiring by flipping a breaker. I once noticed a slow drip that I tightened immediately, saving me from water damage down the line. Use a level to ensure pipes are properly aligned, preventing stress at joints.
Finish and Conceal the Plumbing
Finally, neatly conceal the pipes with cabinetry or decorative panels. This is where custom-built-in solutions shine; they hide plumbing while maintaining style. I added a custom wood panel that matched my vanity, which made the space look seamless. Just like framing a picture, good concealment enhances both aesthetics and function.
Relocating plumbing may seem daunting, but with careful planning and precise execution, you can create a vanity that maximizes storage without plumbing conflicts. If you’re ready to plan your installation, check out latest trends in vanity designs and explore innovative storage ideas.
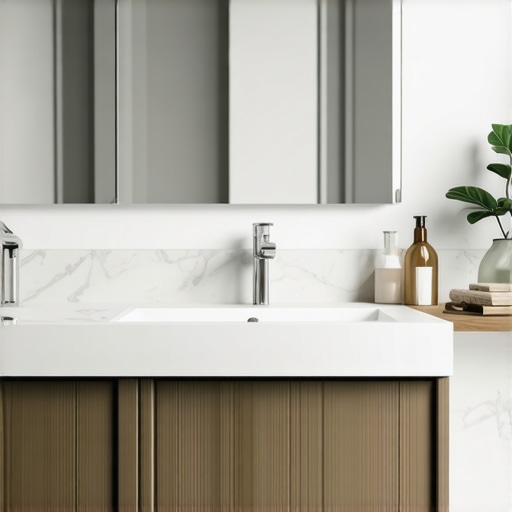
Many homeowners believe that choosing a vanity style or planning built-in storage is straightforward, but this oversimplification leads to costly mistakes and missed opportunities. One widespread myth is that standard measurements work universally—yet, in my experience, every space has unique quirks that demand tailored solutions. Relying solely on generic plans can result in ineffective storage, plumbing conflicts, or aesthetic compromises.
A critical nuance often overlooked is the importance of assessing long-term use versus initial design appeal. For instance, a sleek floating vanity might look modern and clean but can hide plumbing issues or limit easy access for maintenance. Advanced homeowners should consider the underlying infrastructure, such as pipe placements, load-bearing structures, and ventilation needs, which directly influence design feasibility.
Beware of the trap of underestimating how much space built-ins can actually save if properly planned. Many assume that adding more cabinets equates to better organization, but without strategic placement and smart compartmentalization, clutter accumulates faster. For example, incorporating vertical storage and utilizing hidden compartments can optimize small bathrooms—check out innovative storage ideas to unlock hidden potential.
For those contemplating complex built-ins, the misconception that they require extensive remodeling is false. In fact, modular systems and custom solutions can be installed efficiently, saving time and money. However, it’s essential to avoid the common mistake of neglecting structural support or misjudging spatial constraints. Consulting with experts or reviewing creative built-in hacks can help sidestep these pitfalls.
One sophisticated question that often puzzles homeowners is: How do I balance aesthetics and functionality when working with irregular or sloped walls? This is where nuanced design strategies come into play. Rather than forcing standard solutions, consider custom scribing and adjustable modules that adapt to unique architectural features. Experienced designers emphasize that this approach not only enhances the visual harmony but also maximizes utility—more info available in scribing custom built-ins.
Remember, the key lies in understanding the hidden complexities beneath visible surfaces. Home improvement experts warn against oversimplified plans that neglect underlying structural and infrastructural factors. Involving professionals early can prevent costly errors, especially with plumbing and electrical integrations. As a final tip, make sure to explore expert insights on designing your vanity.
Have you ever fallen into this trap? Let me know in the comments.
Invest in Precision Tools for Long-Lasting Results
Maintaining your bathroom vanities and built-ins requires a set of reliable, high-quality tools. I personally swear by a digital caliper for measuring pipe openings and clearance—precision is key when adjusting plumbing or fitting storage solutions. A laser level ensures your cabinetry and shelves are perfectly aligned, preventing sagging or uneven displays over time. Using these tools regularly during installation and maintenance prevents small issues from escalating into costly repairs.
Moreover, a corded rotary tool with a variety of attachments allows me to make precise adjustments or cutouts in cabinetry without damaging surrounding materials. Investing in good quality tools may seem pricey initially, but it significantly reduces the risk of mistakes and extends the lifespan of your built-ins.
Establish Routine Checks to Prolong Functionality
Routine inspections are often overlooked but vital. I set quarterly reminders to check for loose hinges, worn seals, or any water leaks behind cabinetry. Early detection of problems like a small drip can prevent water damage or mold growth, which can compromise the structural integrity of your built-ins. For my plumbing, I utilize a digital moisture meter to catch hidden leaks before they cause visible damage. Quick action can save you hundreds in repairs and keep your storage solutions functioning smoothly for years.
Tools I Recommend for Maintenance and Repairs
Beyond measurement and alignment devices, I rely heavily on a good set of screwdrivers, a versatile multi-tool, and a compact cordless drill. I prefer the drill with a variable speed setting—it’s perfect for making precise adjustments or tightening components without overtightening and damaging delicate materials. Additionally, a plumbing snake comes in handy for clearing minor clogs in drain lines without needing professional help.
For cleaning, I suggest an ultrasonic cleaner for small hardware components like hinges or drawer slides—this keeps moving parts lubricated and free of debris. Regularly lubricating hinges and sliding tracks with silicone spray prevents squeaks and ensures smooth operation. Maintenance isn’t glamorous, but these small steps preserve the longevity and appearance of your custom-built elements.
How do I maintain my vanities and built-ins over time?
Consistent upkeep involves inspecting hardware, tightening loose fasteners, and replacing worn gaskets or seals promptly. I also recommend applying a protective finish or sealant on wooden surfaces annually—especially in humid environments—to prevent warping or mold. When it comes to plumbing, using access panels simplifies future repairs, saving you from invasive demolition. With the right tools and routine care, your investment in custom storage solutions will continue to serve you beautifully for years. Looking ahead, I predict that integrating smart maintenance sensors into built-ins will become standard, alerting homeowners to issues before they escalate. For now, start with the basics and try implementing regular inspections—your future self will thank you.
What I Wish I Knew When I Started Bold Vanities and Clever Built-Ins
One of the hardest lessons I learned was that rushing into design choices without thoroughly assessing structural limitations can lead to costly setbacks. For instance, assuming standard measurements are universally applicable ignored the nuances of my space, making subsequent modifications more complex and expensive. This experience taught me to prioritize a detailed site evaluation before finalizing any plans.
Another insight was the importance of integrating long-term maintenance considerations into my initial design. A beautiful vanity or built-in can become a hassle if it complicates routine upkeep or repairs. Now, I focus on designing accessible panels and choosing durable materials that age gracefully, reducing future headaches.
Overconfidence in DIY plumbing adjustments often results in overlooked details, like proper support and secure fittings. I realized that collaborating with experienced professionals or thoroughly researching best practices, like those shared in creative built-in solutions, can save time and prevent leaks or structural damage.
Lastly, I’ve come to appreciate how small tweaks—such as installing steel reinforcement or using strategic supports—can dramatically improve the durability of heavy fixtures. These micro-investments ensure that your built-ins withstand daily use and the test of time, transforming your space into a lasting sanctuary.
My Go-To Resources for Elevating Vanities and Storage
For comprehensive design guidance, latest trends in vanity designs keeps me inspired with innovative ideas and current styles. It helps me stay ahead and adapt new solutions to my projects.
When it comes to practical tools, I rely on a digital caliper and laser level, both of which make measuring and aligning components effortless and precise. These tools empower me to execute complex installs confidently and accurately, leading to flawless results.
For maintenance tips and DIY fixes, effortless storage ideas provide quick, effective ways to keep my built-ins organized and in top shape. Regular checks inspired by these resources help me catch issues early, saving money and stress.
Lastly, engaging with community forums and expert blogs, like innovative bathroom storage solutions, allows me to exchange insights and troubleshoot unique challenges, fostering continuous learning and confidence.
Embrace Your Space and Make It Thrive
The journey of creating functional, stylish vanities and built-ins is deeply rewarding—each project a chance to express your personality while enhancing your home’s comfort. Don’t let fears or misconceptions hold you back; instead, take small, informed steps toward your vision. With patience, proper planning, and the right resources, you’ll design solutions that stand the test of time and truly reflect your lifestyle.
Are you ready to turn your vanity and built-in dreams into reality? Remember, every expert was once a beginner. Dive in, make mistakes, learn, and grow—your perfect space awaits. What’s been your biggest challenge with vanity storage? Share below—I’d love to hear your story and help you find solutions!
,
Related Posts
![Fixing 4 Costly Double Vanity Drain Alignment Fails [2026]](https://customcabinetrypro.com/wp-content/uploads/2026/02/Fixing-4-Costly-Double-Vanity-Drain-Alignment-Fails-2026.jpeg)
Fixing 4 Costly Double Vanity Drain Alignment Fails [2026]
I'll never forget that sinking feeling when I finally installed…
Avoid 2026 Cabinet Steam Damage: 4 Hidden Venting Rules
Imagine pouring your heart into designing a beautiful built-in cabinet…
Effective Vanities & Storage: Top Tips for Seamless Installation in 2025
It was a morning like any other, but as I…