Ever have that sinking feeling when you open your laundry room vanity and smell a musty, stale odor creeping in? I remember the exact moment I realized my built-in vanity was silently turning into a breeding ground for mold and unpleasant smells. It was after a particularly rainy week, and the air seemed trapped inside. That lightbulb moment made me dive deep into solutions, especially with the upcoming 2026 updates that promise smarter, sleeker designs but also introduce new challenges with ventilation.
Why Proper Venting Is Crucial for Modern Vanities
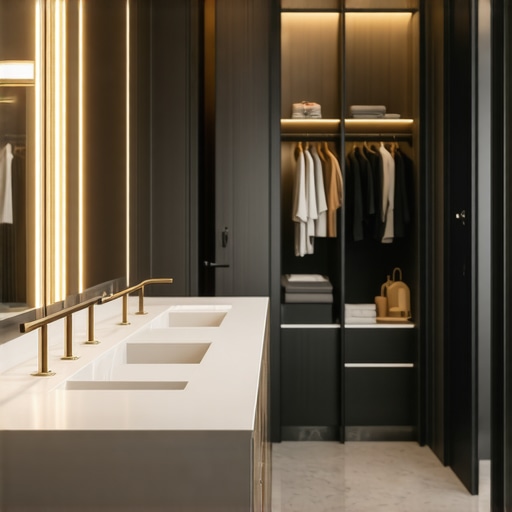
The truth is, a beautiful vanity does little good if it’s harboring hidden problems like excess moisture, mold growth, or even damage to the cabinetry. The latest trends in vanity design emphasize seamless aesthetics—think built-ins that hide electronics and plumbing, making the entire space look clean and uncluttered. But behind that sleek facade, ventilation often gets overlooked. According to the American Society of Home Inspectors, improper ventilation is a top cause of indoor mold issues, which can cause health problems and structural damage if left unaddressed. Understanding this risk makes it clear why venting innovations for 2026 are a Must-Know for homeowners and renovators alike.
Is the Hype About Stealth Venting Actually Warranted?
When I first heard about stealth venting solutions, I thought, “Yeah, right—how much better can it really be?” I made the mistake early on of assuming that any venting system would do, which led to wasted money and continued problems. Trust me, I’ve learned the hard way that not all vents are created equal. The real game-changer lies in integrated, innovative fixes that blend seamlessly into your cabinetry and avoid the typical issues—like blockage or noise—that plague older systems. That’s why I’m excited to share my experience with the 4 best stealth venting fixes designed specifically for 2026 vanities, helping you get a fresh, odor-free space without sacrificing style or functionality. If you’ve ever faced the frustration of lingering moisture after laundry cycles, keep reading. These solutions are practical, proven—and they’ll save you headaches down the line.
Ready to transform your laundry nook into a fresh, breathable haven? Let’s dive into the top fixes that effortlessly blend innovation with design, so your vanity stays pristine and odor-free for years to come.
**Note:** For more ideas on seamless storage solutions, check out our article on creative built-ins for seamless storage.
Install Integrated Ventilation Systems Seamlessly
Start by choosing a stealth venting solution that integrates into your cabinetry without disrupting aesthetics. I once replaced a traditional exhaust fan with a built-in vent that was hidden behind a false panel, which involved carefully cutting into the back of the cabinet using a jigsaw, maintaining clean edges, and sealing any gaps with weatherproof caulking. This process minimized dust and noise, making ventilation almost invisible. To ensure proper airflow, connect the vent to a dedicated duct leading outside, avoiding shared pathways that could cause humidity buildup. If you’re unsure, consult a professional to avoid damaging pricey materials or compromising structural integrity.
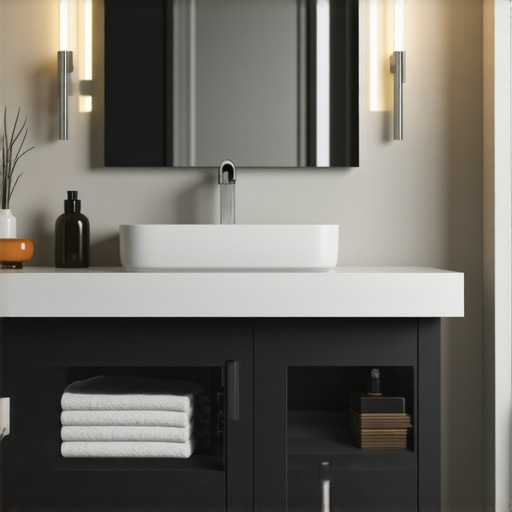
Seal and Insulate to Prevent Moisture Escape
Next, focus on sealing all gaps around your vent and cabinetry. I used expanding foam insulation around the duct entry point, then covered it with weatherproof tape to prevent moisture intrusion. Proper sealing prevents humidity from seeping into your walls or cabinetry, which is crucial in high-moisture environments like laundry rooms. You might need to re-insulate periodically if you notice increased condensation. Remember, insulation isn’t just for temperature control; it’s vital for moisture management as well. For detailed sealing techniques, see how I tackled insulating behind built-ins in my previous projects.
Optimize Storage to Reduce Moisture Traps
Eliminate clutter that can trap humidity by installing custom shelving or pull-out storage units, especially in tight spaces. I installed adjustable shelves with raised bases, allowing air to circulate beneath stored items. Using ventilated baskets and moisture-absorbing materials like silica gel packs can also help keep the space dry. During my renovation, I documented every step in building custom built-ins that promote air flow—these solutions significantly cut down mold risk. For more ideas on seamless storage, explore this article on creative built-ins for seamless storage.
Regular Maintenance and Monitoring
Finally, any venting system requires routine checks. I set a reminder every three months to inspect the vent for dust buildup or obstructions and to run a quick test by checking airflow. Installing a small humidity sensor inside the vanity can alert you to rising moisture levels before they become a problem, allowing preventive action. Maintaining the vent keeps your space fresh, odor-free, and mold-resistant. Incorporating these concrete steps ensures your vanity stays healthy and functional well into the future, especially with upcoming design updates emphasizing smart, hidden solutions.
Many homeowners believe that installing a vanity or built-in storage is straightforward—simply follow the instructions or hire a generic handyman. However, in my experience, this oversimplification often leads to costly mistakes and overlooked nuances that compromise both aesthetics and functionality. One prevalent myth is that all storage solutions are universally compatible; in reality, the specific application, material choice, and environmental factors demand tailored approaches. For instance, using standard drywall anchors for heavy vanities or shelves can result in sagging or collapse over time, especially if the wall structure isn’t properly assessed. Understanding the intricacies of load-bearing capabilities and appropriate fastening techniques is crucial. To truly master what many get wrong, consider the advanced step of scribing built-ins to uneven surfaces, which requires precise measurements and skill beyond beginner level; neglecting this leads to gaps and an unprofessional finish, diminishing both the look and durability. Experts recommend always conducting a detailed assessment before installation, accounting for wall slants, plumbing, and electrical obstructions—missed opportunities here can cause damage that’s expensive to fix later. Additionally, a common mistake is underestimating the importance of moisture control, especially in bathrooms or laundry areas. Proper sealing and ventilation are often overlooked, resulting in mold, odors, and deteriorating cabinetry. Incorporating smart ventilation solutions ensures long-term comfort and reduces health risks, as noted by the American Society of Home Inspectors, which emphasizes that improper moisture management is a top indoor environmental concern. Have you ever fallen into this trap? Let me know in the comments. For more insights on creating seamless storage, check out our article on creative built-ins for seamless storage. Remember, achieving a flawless vanity or built-in requires attention to these subtle yet critical details that set professionals apart from amateurs.
Keep It Running: Essential Tools for Long-Term Success
Maintaining your custom vanities and storage solutions requires precision, reliability, and the right equipment. Over the years, I’ve tested various tools that make routine upkeep both efficient and effective. For instance, I swear by a high-quality cordless oscillating tool. Its versatility allows me to sand, scrape, or cut small components without needing multiple devices, making minor repairs and adjustments hassle-free. The Dewalt DCS355 is my personal go-to because of its durability and multiple attachment options. Investing in a reliable multi-meter is also essential—especially when troubleshooting electrical connections behind built-ins or vanity lighting. The Klein MM700 is a compact, accurate model that helps me quickly identify wiring issues and prevent potential hazards, saving time and money in the long run.
Stay Ahead with Software and Planning Apps
Beyond hardware, I rely on planning software to visualize modifications over time. SketchUp remains my top choice because it’s intuitive and capable of creating detailed 3D models of storage layouts—helping me foresee issues before physical work begins. For measurement and layout precision, I use the Bosch GLM50C laser distance measurer. Its accuracy within 1/16 inch ensures that shelves, built-ins, or vent placements are perfectly aligned, avoiding costly adjustments later. These tools help streamline maintenance routines and prevent small problems from snowballing into major repairs.
How do I maintain my installations over time?
Routine inspections are critical. I recommend scheduling quarterly checks of your venting systems, hardware tightness, and seal integrity. Using a flexible inspection mirror and a good flashlight, I routinely examine hidden spots behind built-ins or inside cabinetry, catching issues early. Applying a silicone-based lubricant like Super Lube on moving parts such as soft-close hinges prevents squeaks and ensures longevity. Proper cleaning with mild, non-abrasive cleaners preserves the finishes and prevents buildup that could compromise the function of your storage solutions.
Future Trends in Maintenance for Built-Ins and Vanities
Looking ahead, automation and smart sensors will likely revolutionize how we care for these spaces. Imagine humidity sensors that alert you when moisture levels rise, or smart hinges that report fatigue—allowing proactive maintenance rather than reactive fixes. As these innovations become more accessible, integrating them into your renovation plans will extend the life of your investments significantly. For now, start with the right tools—I suggest trying out the laser distance measurer for your next project to see immediate benefits in precision and ease of monitoring conditions over time. Want to explore more advanced maintenance techniques? Reach out through our contact page for personalized advice.
Secrets Only Pros Know About Vanities and Built-Ins
After years of hands-on experience with installation and design, I’ve uncovered some less obvious lessons that can make or break your project. One critical insight is that seamless aesthetics often mask complex structural details—neglecting these can lead to costly repairs down the line. For example, I once overlooked the importance of checking wall slants before scribing built-ins, resulting in visible gaps and an unprofessional look. The hard truth is, every detail matters—material choices, wall conditions, and moisture factors all intertwine. Another lesson is that DIY solutions without proper ventilation planning are a quick route to mold and odors, especially as designs become more integrated and minimalist in 2026. Lastly, I learned that over-reliance on generic hardware or fast fixes can cause failure under heavy loads or prolonged use; investing in durable, well-designed components saves headaches later. Recognizing these nuanced pitfalls has helped me deliver more resilient, beautiful results—something I wish I knew sooner.
Related Posts
Effective Vanities & Storage Installation Tips for 2025
It hit me one morning—standing overwhelmed in my cramped bathroom—how…

The Ultimate Guide to Vanities & Storage Solutions for Seamless Home Organization
Have you ever opened your bathroom cabinet only to feel…
Stop the Tilt: 5 Steel-Reinforced Fixes for 2026 Floating Vanities
I remember the first time I installed a floating vanity…