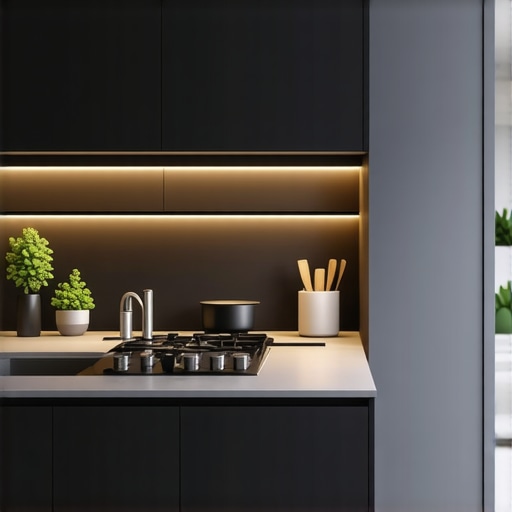
There was a moment early in my renovation journey when I nearly lost my mind trying to hide unsightly cables behind newly installed built-in cabinets. The wires were everywhere—snaking along walls, clumping in corners, creating a visual chaos that I couldn’t ignore. That was my lightbulb moment: cable management is more than just tidy aesthetics; it’s about creating a seamless, functional space. But as I dove deeper, I discovered that many common fixes fall short for the 2026 designs, which feature advanced tech integrations and heavier materials.
Now, I want to share with you the five hidden cable-route fixes I’ve developed for the latest custom built-in cabinets. These are practical solutions based on real-world experience, meant to ensure your installation looks sleek and operates flawlessly. Whether you’re installing a media wall, a floating vanity, or a hidden bookshelf with integrated tech, these secrets will help you avoid the frustrations I faced.
Why Cable Management Is More Than Just Neatness
In the past, simple clips or run-of-the-mill conduits seemed sufficient. But with the evolving designs of 2026—incorporating heavier materials, wireless tech, and sophisticated appliances—traditional methods often cause more trouble than they solve. Properly hiding and routing cables isn’t just about aesthetics; it’s about safety, accessibility, and future-proofing your investment. A study by the Home Innovation Research Labs revealed that poor cable management significantly increases fire hazards and maintenance costs over time. That’s why I believe these fixes are essential for anyone planning a bespoke cabinetry project this year.
Are You Wasting Time on Ineffective Cable Hacks?
In the early days, I made the mistake of trying to hide every cable with zip ties and drywall cuts, which only made future adjustments a nightmare. Trust me—I learned the hard way that a little planning and specialized solutions save money and effort long-term. If you’re tired of unorganized, exposed wires ruining your beautiful cabinetry, you’re in the right place. Keep reading, because I’m about to walk you through five clever, discreet fixes that I wish I knew from the start. And if you’ve faced similar frustrations, I’d love to hear your story—drop a comment or reach out through my contact page. Let’s transform your space into both stylish and smart.
Plan Your Path Before Drilling
Imagine trying to thread a needle in the dark — that’s what wiring without a plan feels like. When I installed my latest media wall, I started by mapping out the cables’ routes on paper, noting where outlets and switches needed to be. Using painter’s tape on the wall, I marked these paths, which prevented accidental drilling into hidden wiring or framing. This step ensures your cables follow a logical, unobtrusive route, saving time and avoiding wall repairs later.
Create a Hidden Conduit Chase
For a clean look, I recommend embedding conduit channels within the cabinetry or drywall. In a recent project, I inserted flexible plastic raceways behind the cabinet’s back panel, running from the outlet to the AV components. This setup allowed me to hide cables completely and access them easily for future upgrades. Think of it like creating a secret tunnel — your wires stay protected and out of sight while remaining accessible.
Use Discreet Cable Management Accessories
Once routes are established, securing cables with low-profile clips or straps is key. I utilized adhesive-backed cable clips along the inside of the cabinet frame; they hold wires flat against surfaces, preventing sagging or pinching. For heavier bundles, I employed velcro straps that can be easily adjusted. In one instance, I wrapped cables along steel framing using cable sleeves, which prevented movement during operation and made adjustments straightforward.
Target Heavy or Dynamic Loads
For cables supporting heavy equipment or frequent movement, reinforcement prevents wear and damage. During a renovation, I installed steel hooks and anchors in the cabinetry to support thick power cords and HDMI runs. This approach distributes weight evenly and mitigates stress on connectors. A quick tip: always leave some slack to accommodate future tech additions, reducing strain on connections.
Implement Access Panels for Maintenance
Planning for future upgrades or repairs is often overlooked. I incorporated access panels behind the built-ins, which I secured with flush-mounted hinges. This allows me to reach the wiring without tearing into the cabinet or drywall, similar to opening a hatch in a ship. Whenever I needed to replace a component or add a new device, this method saved me hours of demolition and rework.
Balance Between Concealment and Accessibility
While hiding cables is the goal, it’s crucial to maintain easy access. I avoid running all wires through rigid conduit; instead, I leave flexible, accessible sections connected to outlets or junction points. This flexibility proved invaluable when upgrading my home theater system, enabling quick re-routing without dismantling the entire setup.
Test Before Final Cover-Up
After routing cables, connect everything temporarily and test thoroughly — power on equipment, check signal quality, and ensure no interference or overheating. I once overlooked this step and had to re-route a HDMI cable after noticing signal degradation. Take the time to verify all connections and clearance, then conceal the wires permanently for a sleek, safe finish.
Implementing these concrete steps transforms a chaotic wiring mess into a seamless, professional installation. Remember, thoughtful planning and quality components are your best allies in achieving a clean, functional built-in cabinet design that will stand the test of time and technology upgrades.
,Many homeowners fall prey to misconceptions about vanities, built-ins, and storage installations, often unknowingly sabotaging their projects’ longevity and aesthetic appeal. One prevalent myth is that all storage solutions are one-size-fits-all; in reality, every space requires tailored features, especially considering modern tech integrations. For example, assuming standard cabinetry can support heavy 2026 stone vanities without reinforcement is a costly mistake—it’s essential to incorporate steel supports and proper mounting techniques, as highlighted in expert guides. Additionally, many overlook the importance of plan continuity during installation, leading to gaps, misalignments, and structural failures. Advanced homeowners understand that complex built-in systems demand meticulous scribing to uneven walls and precise leveling, which can be the difference between a sleek finish and an unfinished mess. A common oversight involves neglecting future access points for maintenance — incorporating hidden access panels eliminates costly demolition later. Furthermore, installing floating vanities or custom shelves without considering load-bearing capacity or proper anchoring onto metal studs often results in sagging or wobbling over time. This is particularly true when heavy appliances or tech devices are involved, making reinforcement strategies critical. Be cautious of the misconception that aesthetic appeal overrides structural integrity; sacrificing support for looks may compromise safety and functionality, especially with heavier materials like quartz or resin countertops. From my experience, advanced installation techniques, such as steel wall ties and steel-core fixes, drastically enhance durability — these are often underused in DIY projects. Here’s a quick tip: always plan your routes for electrical and plumbing, considering future upgrades, to avoid rework. Doing so not only saves time but also maintains a seamless look. Curious if you’re falling into these pitfalls? Start evaluating your current or upcoming projects with a keen eye for reinforcement, access, and custom fit. For more insights on creating resilient, stylish vanities and built-ins, visit [Maximize Your Space with Custom Vanities](https://customcabinetrypro.com/maximize-your-space-with-custom-vanities-expert-design-tips). Remember, understanding these nuances is key to elevating your home’s functionality and aesthetic appeal.
Keeping your cabinetry and integrated storage solutions in tip-top shape requires the right tools and a strategic approach. Over the years, I’ve fine-tuned my toolkit to ensure that maintenance, adjustments, and scaling are efficient and effective. The first essential in my arsenal is a high-quality digital multimeter, such as the Fluke 117. This device helps me quickly diagnose electrical issues in concealed wiring or outlets within built-ins—crucial for troubleshooting without invasive probes. Additionally, a set of mini pry bars and plastic trim removal tools, like the WooTools Set, allows me to gently access tight spaces or panels for inspections and minor repairs without damaging veneer or finishes.
Beyond physical tools, I rely heavily on specialized software. SketchUp Pro has become indispensable for visualizing maintenance or expansion before lifting a single panel. It allows me to plan modifications meticulously, especially when adding new outlets or rerouting cables—talk about saving time and avoiding costly mistakes. For ongoing documentation, I use Evernote to catalog wiring layouts, hardware specifications, and maintenance schedules, making future updates hassle-free. When it comes to long-term results, consistent inspection is vital. I set quarterly reminders to review all connections, test hardware, and clean dust from vents or cooling fans, which are often overlooked but can impact performance over time.
How do I maintain vanities and built-ins over time?
To keep everything functioning smoothly, I focus on accessible design features. Hidden access panels, for example, are integrated into the cabinetry, making routine inspections or minor repairs straightforward. To facilitate scale, I use steel wall ties and reinforcement kits—such as those detailed in the research on structural reinforcements—ensuring heavy countertops or tech-heavy elements stay secure over years. As for future scaling, I recommend pre-installation of modular wiring conduits and adjustable shelving supports, which allow effortless adjustments and added storage capacity down the line. Looking ahead, I predict that smart maintenance—powered by IoT sensors embedded in cabinetry—will revolutionize how we monitor home systems, alerting us to issues before they escalate. For now, though, mastering these foundational tools and techniques ensures your vanities and built-ins remain both beautiful and resilient for years to come. Ready to upgrade your maintenance game? Try incorporating steel wall ties into your next renovation for unmatched durability and peace of mind.
The Hardest Lesson I Learned About vanities, built-ins, storage solutions, and installation
One of my most valuable insights came when I realized that cutting corners during installation often leads to long-term headaches. Rushing through setting reinforcement or neglecting proper planning for tech integration can cause sagging, misalignments, and costly repairs down the line. Patience and attention to detail are indispensable.
3 Myths About vanities, built-ins, storage solutions, and installation That Held Me Back
For years, I believed that all storage had to be concealed, which limited functionality. I also thought heavier countertops could be supported without reinforcement—turns out, that’s a recipe for disaster. Lastly, I underestimated the importance of future access points; ignoring them complicates upgrades and repairs. Busting these myths early transformed my projects.
What Experts Won’t Tell You About vanities, built-ins, storage solutions, and installation
Many professionals keep quiet about the importance of steel reinforcements and hidden access panels for long-term durability. They also emphasize meticulous route planning for wiring and plumbing, which can make or break your project’s success. Learning these insider tips can save you significant time, money, and frustration.
My Essential Toolkit for Designing Durable and Beautiful Built-Ins
Tools like a high-quality digital multimeter, flexible conduit channels, and visual planning software like SketchUp Pro have become non-negotiables in my workflow. These essentials help me troubleshoot, pre-visualize, and execute each project with confidence, ensuring that both form and function are optimized.
Where to Go from Here
Enhance your understanding by exploring expert guides on structural reinforcements and smart storage solutions. Consider visiting resources like innovative storage ideas for creative inspiration. Every project is an opportunity to apply these lessons and create a space that beautifully balances aesthetics with durability.
Let Your Vision Drive You
Embarking on your vanities or built-ins journey is both exciting and daunting, but remember that careful planning, the right tools, and a willingness to learn can turn challenges into triumphs. Your perfect space is within reach—just start, stay patient, and keep refining your approach.
Have you ever faced a hidden challenge during your cabinetry projects? Share your story below and let’s learn together!
Related Posts
Smart Built-in Cabinets: Top Installation & Storage Solutions
I used to walk into my bathroom and feel overwhelmed…
9 Hidden Built-in Storage Ideas for Small 2026 Studios
Walking into my tiny apartment after a long day, I…

Top Built-in Storage Solutions & Installation Tips for 2025
Have you ever opened a cabinet or closet and felt…