

I still remember the sudden, sickening sound of tearing wood fibers. It was late on a Tuesday evening, and I was admiring my brand-new, gorgeous double-sink floating vanity topped with a massive, two-inch thick slab of Calacatta quartz. It looked like a modern masterpiece. Then, I leaned on it. Just a slight lean as I brushed my teeth, and there it was—a subtle but terrifying dip. Underneath, the cabinet screws were slowly pulling out of the drywall. I realized, with a sinking gut, that I had made a rookie mistake. I had trusted standard wooden cabinet frames and basic screws to hold up a piece of stone that weighed more than a grand piano.
The Hidden Weight of Luxury
We fall in love with the sleek, floating look of modern bathrooms without ever considering the sheer physics of stone. Quartz is incredibly dense, often weighing between 15 to 25 pounds per square foot depending on the thickness. When you opt for a massive double-sink setup, you are easily putting 300 to 400 pounds of dead weight on a structure suspended on your wall. Without a strategic skeleton, why your heavy quartz vanity is cracking the cabinet frame becomes a reality you cannot ignore. Today, I want to save you from the expensive, dusty nightmare of a collapsed vanity. We are going to look at the exact way to integrate hidden steel support into your bathroom remodel so your gorgeous stone countertop stays perfectly level forever.
Are hidden steel supports actually worth the extra hassle?
I get the skepticism. When you are already managing a budget, adding structural steel fabrication inside a bathroom wall feels like overkill. You might ask: “Can’t I just use more wall studs and heavy-duty drywall anchors?” The short answer is no. According to structural engineering principles outlined in the American Institute of Steel Construction guidelines, wood studs under continuous eccentric shear loads will inevitably creep and flex over time. This minor flexing is what hairline cracks your grout lines and breaks your silicone seals, eventually leading to water damage behind the wall. Relying on drywall or thin cabinet backing is a recipe for structural failure. By investing in concealed steel support, you eliminate the flex entirely.
Early in my DIY journey, I tried to bypass this step by simply doubling up on standard L-brackets. The result? A sagging vanity that forced me to tear out the tile work and start completely from scratch. If you want to avoid my mistake, you need to understand how to properly anchor these systems. For plaster or older walls, you might need to look at 6 heavy duty wall fixes for massive quartz top vanities to ensure a stable foundation. Have you ever noticed your floating vanity shifting slightly when you lean on it? Tell me about your bathroom installation struggles in the comments below!
The Anatomy of Invisible Vanity Support
To successfully hold up a massive stone countertop without unsightly legs, you need to think of your wall as a crane. The vanity is the load, and the wall studs are the tower. Simply screwing the back of a cabinet into the wood studs only creates a weak shear point. To solve this, we must transfer the downward rotational force of the heavy quartz deep into the wall framing using high-strength steel. This is where mastering how to support double-sink vanities without center legs becomes your ultimate weapon against gravity.
Strip the drywall and expose the studs
You cannot mount heavy-duty support brackets over drywall. Period. I once tried to shortcut this by cutting small access holes for the brackets, hoping to save some mudding time. It was a messy, misaligned disaster because I couldn’t see the electrical lines running through the studs. Cut out a clean horizontal section of drywall from hip height down to the baseboard. This gives you full, unobstructed access to your framing. Inspect the studs for any bowing or warping, as a perfectly flat mounting plane is critical for a flush installation later.
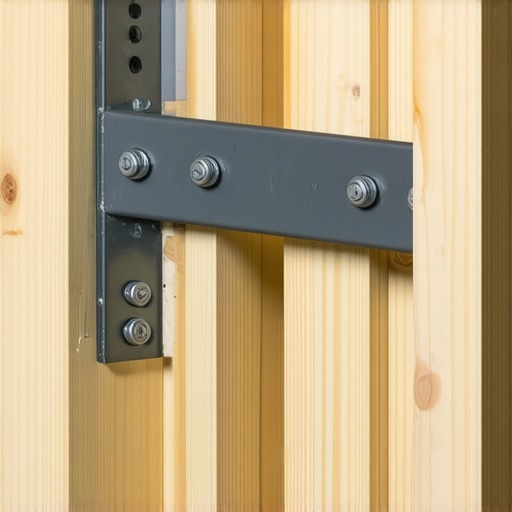
Install structural blocking between the studs
Before the steel even comes out of the box, you need solid wood backing. Cut chunks of 2×6 or 2×8 framing lumber to fit tightly between your wall studs. Screw these blocks flush with the front face of the studs using structural screws. This creates a solid wood network that prevents individual studs from twisting under the immense weight of the quartz. If you are working on a bathroom remodel in Michigan, this is exactly why your Farmington hills vanity installation needs extra wall blocking to meet local building standards and prevent wall flex.
Mount heavy-duty steel brackets directly to the framing
Now we bring in the real muscle. You will need heavy-duty, L-shaped structural steel brackets that are at least 1/4-inch thick. Bolt these brackets directly into the sides of your vertical studs using heavy-duty lag screws. The horizontal arm of the bracket must extend outward, sitting just beneath the cabinet’s top rail. In my workshop, I keep a variety of brackets on hand for different weight thresholds, similar to how we use specialized 6 heavy duty l-brackets for reinforcing custom built-in units to keep large, cantilevered shelving projects rock-solid. Make sure these brackets are perfectly level across the entire span, as even a 1/16-inch slope will cause your quartz countertop to rock or slide during installation.
Notch the cabinet back for a seamless fit
Your vanity cabinet needs to slide over these steel brackets smoothly. Instead of hacking up the entire cabinet back with a reciprocating saw, measure carefully and cut precise slot notches in the back panel. When you push the vanity cabinet against the wall, the steel brackets should slide through these notches, hiding inside the unused dead space behind your drawers or plumbing lines. If your cabinet carcass is particularly wide, look into using the anti-sag bracket for wide under-counter drawers to ensure that your drawer slides remain perfectly aligned and functional even with the steel supports occupying the interior cavity.
When you start researching how to hang these heavy, wall-mounted structures, you will often run into standard advice suggesting that robust fasteners and a few extra screws will do the trick. However, the design community often overlooks the devastating effect of rotational torque. Think of your floating vanity as a crowbar. Every time a child rests their weight on the front edge, or you lean in to examine the mirror, that weight is amplified dynamically. In my years of custom building, I have learned that traditional fastening methods fail not because the screw snaps, but because the wood fiber in the framing eventually crushes under the extreme localized stress.
Why traditional fastening methods fail under dynamic load
Everyone in the DIY space tells you to just grab some heavy-duty lag screws and drive them home. In my experience, relying solely on lag screws directly into wood studs without pre-drilled steel reinforcement is a recipe for silent, slow-motion disaster. According to structural guidelines from the American Institute of Steel Construction, point-loading wood without distributing the shear stress leads to localized wood crushing. Over time, the screw hole enlarges by a fraction of a millimeter. This microscopic wiggle room is all it takes for gravity to take over, causing your expensive stone surface to sag and crack your tile grout.
Another common trap is assuming that all wall studs are created equal. In many modern homes, studs can be slightly bowed or out of plumb. If you pull a heavy vanity tight against an uneven wall, you introduce massive internal tension to the cabinet box before you even set the stone on top. To bypass this, mastering the scribing hack for fitting vanities against out of plumb walls is essential to relieve that tension. Similarly, if your framing isn’t perfectly spaced, utilizing the stud bypassing plate for off center vanity installation allows you to transfer loads safely to the nearest structural studs without hacking up your drywall again.
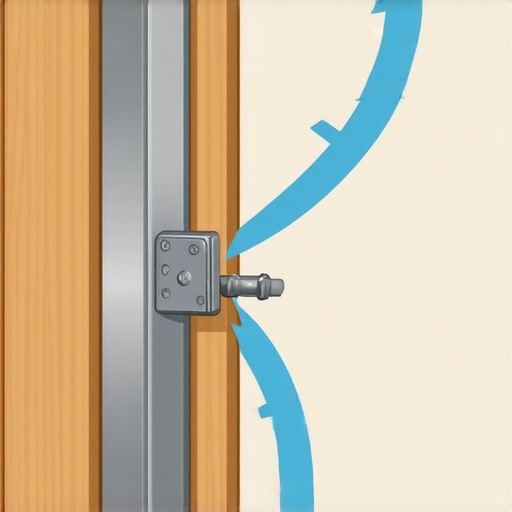
Beyond the studs, the interior mechanics of your vanity demand equal respect. Many people focus so heavily on the wall connection that they forget about how the cabinet itself handles the weight. If you plan to incorporate high-end internal organization, you must design for the dynamic forces of opening and closing heavy drawers. If your structural steel brackets interfere with your drawer glides, or if you build your drawers too wide without reinforcement, you will find that why deep storage drawers bind under heavy loads becomes your next major headache. Ensure you use low-profile steel supports that leave plenty of clearance for plumbing and modern drawer hardware.
Have you ever fallen into this trap and noticed your bathroom doors or vanity drawers starting to stick after a few months? Let me know in the comments below! If you are planning a complete overhaul of your space, check out these expert design tips for custom vanities to make sure your layout is both structurally sound and highly functional from day one.
Once you have successfully tamed the physics of hanging a 300-pound slab of stone on your wall, you cannot just walk away. The job is not truly finished when the last structural screw is driven. Wood framing, steel brackets, and heavy quartz countertops live together in a dynamic environment of high moisture, shifting temperatures, and daily use. To protect your structural investment, you must shift your focus toward long-term stability, moisture prevention, and precision maintenance.
How do I maintain structural vanity support over time?
Maintaining a heavy-duty vanity system is all about monitoring environmental changes before they impact your wood framing. Every year, changes in humidity cause the wood studs inside your wall to expand and contract. This subtle movement can put tension on your stone joints. I always recommend using a dedicated digital moisture meter—specifically the Delmhorst J-2000—to monitor the relative humidity inside your cabinet. Keeping tabs on wood moisture content is your first line of defense against structural shifting. If you notice localized humidity rising, applying 7 moisture barriers for vanities in high humidity bathrooms will prevent that ambient water vapor from softening the wood framing behind your steel brackets.
In my own custom projects, I also apply a small bead of high-performance elastomeric sealant (such as Dow Corning 795 structural silicone) along the seam where the steel brackets meet the cabinet body. Unlike standard kitchen caulking, elastomeric sealants remain highly flexible and allow for microscopic shifts without tearing. If you are dealing with a wet-room layout where water naturally pools on the floor, you will also want to read up on the waterproof shim move for vanities on wet room floors to isolate your lower framing from continuous water exposure.

As bathroom design pushes the limits of minimalist architecture, the future of these installations points toward ultra-thin, high-tensile carbon fiber support grids. These materials offer the strength of steel at a fraction of the weight, meaning we will soon be able to mount massive, double-sink layouts without even cutting into the drywall. For now, sticking to robust, heavy-duty steel brackets is your safest bet. If you want to take your vanity design to the next level while maximizing every square inch of your newly reinforced cabinet, check out these creative storage solutions for vanities to declutter in style.
My advice? Don’t wait for a hairline crack to appear in your silicone joints. Take a flashlight tonight, peek underneath your vanity, and check the connection point where the cabinet meets the wall. If you are currently planning a major master bath remodel, I highly encourage you to adopt the structural wall blocking method we discussed. Trust me, your quartz countertop will thank you for decades to come.
What No One Tells You About Hanging Heavy Stone
Over the years, I have seen dozens of floating vanities fail. The common thread in every single collapse is a fundamental misunderstanding of structural load distribution. Here are the core insights I have gained from repairing buckled cabinet frames and cracked tile walls:
- The weight is always dynamic, never static: A vanity topped with a 300-pound piece of Calacatta quartz does not just weigh 300 pounds. When you lean on the edge to clean the mirror, or when a child pulls themselves up to reach the faucet, that load can easily spike to over 500 pounds of rotational force.
- Drywall is a cushion, not a support: Never let your steel brackets compress against drywall. Under heavy weight, drywall slowly crushes like chalk, introducing microscopic movement that eventually snaps your silicone water seals.
- Cheap fasteners are a liability: Standard construction screws have high shear strength but poor withdrawal resistance under constant tension. Always opt for structural timber screws or heavy-duty lag bolts.
By understanding how gravity interacts with your wall framing, you can design a system that remains solid for decades. If you are still planning your layout, it helps to start with a solid foundation by checking out our step-by-step guide to vanity installation for beginners.
The Pro Installer’s Structural Toolkit
You cannot achieve professional, rock-solid results with basic household tools. When I am preparing a bathroom wall for a massive double-sink installation, these are the non-negotiable tools and materials I bring to the job site:
- Precision Digital Level: A standard bubble level is not accurate enough when dealing with cantilevered weight. I use a 24-inch digital level to ensure my steel brackets are perfectly plumb and flat.
- Structural Timber Screws (GRK Fasteners): These heavy-duty screws are heat-treated for maximum tensile strength, ensuring they will never snap or pull out of your wood studs.
- Anti-Sag Structural Steel Brackets: Specifically engineered L-shaped brackets made from 1/4-inch American steel. They transfer the weight deep into your framing without taking up valuable drawer space.
Using the right tools ensures that your structure can support both the stone and any custom storage elements you plan to add. For those looking to maximize their layout, combining these structural supports with creative storage solutions for vanities to declutter in style will help you get the absolute most out of your space.
Your Next Step Toward a Flawless Bathroom Remodel
Hanging a heavy, modern vanity can feel intimidating, but taking the time to build a hidden steel skeleton behind your drywall removes all the risk. When you invest in proper framing, you are not just hanging a cabinet; you are protecting your home from water damage, cracked stone, and costly structural repairs. Do not settle for standard, flimsy installation methods. Take your time, prep your walls correctly, and build something that is engineered to last.
If you are ready to transform your space with confidence, make sure to read our expert guide to flawless vanity installation tricks and tips to ensure every phase of your project goes smoothly. Have you ever run into issues with a sagging vanity or shifting wall studs during a remodel? Let me know in the comments below!