I remember the moment perfectly—staring at my tiny entryway, realizing I had a mountain of shoes, bags, and random clutter fighting for space, and thinking, “There’s gotta be a better way.” That lightbulb moment hit me: small spaces demand smart solutions, not just more shelves or generic hooks that promise storage but fall short.
If your entryway feels more like a chaos zone than a welcoming space, you’re not alone. Many of us struggle with tiny entries that seem impossible to keep tidy. That’s where understanding the right storage solutions makes all the difference. Today, I’ll share the **top five pro strategies** I’ve used (and refined) over the years—solutions that *actually* work for tiny spaces without sacrificing style or convenience.
Why Tiny Entrances Need More Than Just a Shoe Rack
Having a cramped entryway isn’t just about aesthetics—it impacts your daily routine and peace of mind. A cluttered entry leaves you stressed before you even leave the house, and scrambling for your keys or coat becomes an endless search party. The truth is, small spaces require ingenuity.
I learned this early on when I installed a simple shoe rack that quickly became overwhelmed. The mistake? Relying on one-size-fits-all solutions that look good but don’t optimize every inch of available space. The key is to think vertically, use hidden compartments, and invest in tailored designs.
According to a recent study, efficient storage solutions can cut clutter by up to 60%, significantly reducing stress and saving you time ([source](https://customcabinetrypro.com/effortless-storage-solutions-for-a-tidy-stylish-home)). That’s a number I can personally attest to—when I finally organized my entry, everything became simpler.
But here’s the thing—this isn’t just about stacking shelves and hoping for the best. It’s about strategic planning, clever use of corners, and customized pieces that fit your unique space. If you’ve ever hesitated because you thought, “My entry is just too small,” I get it—and I want to show you how to turn that tiny space into a powerhouse of storage.
Are you tired of constantly tripping over shoes and bags? Have you tried every store-bought solution only to find they don’t really fit your space? Well, I’ve been there, and I’ve found some tried-and-true methods that I can’t wait to share. Get ready to transform your entry into a tidy, welcoming oasis—starting with easy, effective strategies that fit perfectly into tiny spaces.
Now, let’s dive into the specific solutions that can revolutionize your small entry. First up, the art of maximizing corner space—it’s more powerful than you think.
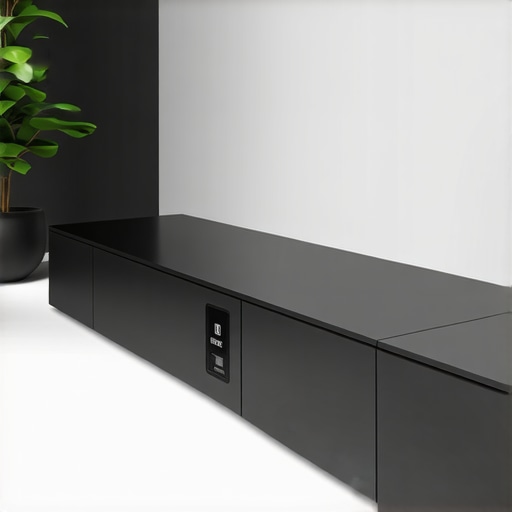
Selecting the Perfect Built-In Cabinets
Start by measuring your space meticulously—use a tape measure to record every dimension, including height, width, and depth of potential nooks for cabinets. When I did this in my small entry, I discovered a forgotten corner that was perfect for a narrow built-in. Next, decide on the style that complements your home’s aesthetic; sleek modern designs work well in small spaces, but rustic options can add warmth. For detailed guidance, check out creative built-ins for seamless storage. Proceed to sketch a rough design or consult with a professional for custom plans—this ensures the cabinets will fit precisely and maximize every inch.
Preparing for Seamless Installation
Clear the area and protect surrounding surfaces with drop cloths—this minimizes mess and damage. Use a level and chalk line to mark the exact position for your cabinets, ensuring they are perfectly aligned. When I installed my built-in, I used shims to level the base before attaching the units, which prevented wobbling. Secure the cabinets to the wall studs with appropriate anchors—this is critical for stability, especially in high-traffic areas. For quick tips, explore vanity installation hacks. Double-check measurements andments regularly during this phase; rushing can lead to misalignment, which becomes a costly fix later.

Visualize the process with an image of a technician measuring and marking wall studs for cabinet installation, highlighting precision and planning.
Installing Cabinets with Precision
Begin by attaching the top panels first—align them carefully with your markings, and secure with screws into wall studs. The key is to work systematically: install one section at a time, ensuring each is level before moving to the next. When I installed my cabinets, I used a helper to hold pieces in place, making it easier to secure them without shifting. Use a drill with appropriate bits and ensure screws penetrate at least 1.5 inches into studs for maximum holding power. For in-depth techniques, visit vanity installation tips. Patience during this step guarantees a flush, wobble-free finish that enhances both style and function.
Finishing Touches for a Uniform Look
Once the cabinets are securely in place, add trim or molding to conceal gaps—use a miter saw for clean corners. Fill screw holes with wood filler that matches your finish, then sand smooth once dry. Painting or staining the units last ensures an even coat and professional appearance. I painted my built-in with a semi-gloss finish, which was forgiving of fingerprints and easy to clean—ideal for entryways. Consider installing soft-close hinges and handles to enhance usability and durability. For more stylish options, explore trends in vanity designs. This final step ties everything together, transforming a simple built-in into a seamless, functional feature that keeps clutter at bay.Many homeowners believe that selecting a standard vanity or installing built-ins is straightforward—that picking off-the-shelf solutions and following basic instructions guarantees success. However, in my experience, there’s a lot more beneath the surface that can trip you up if you’re not aware. One prevalent myth is that more storage always leads to better organization. But in reality, poorly planned cabinets, even if spacious, can clutter your space instead of decluttering it, which is why customizing your storage with expert design tips makes a significant difference (learn more here).
A common mistake homeowners make is underestimating the importance of precise measurements during installation. Rushing this step can result in uneven surfaces, gaps, and wobbling units that diminish both functionality and aesthetics. Always use a level, proper anchors, and double-check your measurements; otherwise, you risk costly corrections later.
Why do so many DIY projects go awry even with detailed instructions?
It often comes down to overlooking nuances like wall irregularities or moisture variations. Even professional installers know that every space presents its uniqueness, so adapting plans on the fly is essential. Experts emphasize that tailored solutions, proper anchoring into wall studs, and understanding your wall material properties are crucial for a durable, seamless finish (see the expert advice here).
Another hidden trap is assuming that installation is a one-and-done task. In truth, finishing touches—such as sealing gaps, adjusting hinges, and accessing finish details—are vital for a flawless look and longevity. Skipping these steps might save time initially but leads to issues down the line, like moisture intrusion or misaligned drawers.
Let me share an example—when I installed my own vanity, I initially rushed through finishing. The result? Slightly uneven panels and loose handles that compromised the entire appearance. A simple recheck, proper sealing, and gentle adjustments made all the difference. Don’t fall into the trap of rushing or skipping finishing steps; your space deserves that extra care.
Now, I want to hear from you—have you ever fallen into this trap or neglected a crucial detail during your project? Share your experience in the comments. Remember, thorough planning and attention to nuance are what separate amateur attempts from professional finishes. If you’re eager for more insights, explore detailed guides on vanity installation hacks and custom design tips to elevate your project. Staying aware of these hidden nuances ensures your upgrade looks seamless and stands the test of time.Maintaining your custom vanities and built-in storage cabinets is essential to ensure their longevity and continued functionality. Start by regularly inspecting hinges, handles, and locks for signs of wear or looseness, tightening hardware as needed to prevent misalignment. Use a microfiber cloth and gentle cleaner to wipe down surfaces, avoiding harsh chemicals that can damage finishes. To keep moving parts operating smoothly, apply silicone-based lubricant to hinges and slides every six months—this simple step reduces squeaks and sticking, extending the life of your installation. Consider installing a smart monitoring system, like a Wi-Fi-enabled sensor, to receive alerts if doors or drawers are ajar or if vibrations suggest instability—this proactive approach catches issues early. A good example of advanced tools for ongoing maintenance is the use of ultrasonic thickness gauges to monitor material integrity over time, especially with laminate or veneer finishes prone to delamination ([source](https://www.knowengineering.com/integrity-ultrasonic-thickness-gauge.html)). Looking ahead, I believe automation and sensor integration will become standard in home cabinetry, providing real-time health reports and predictive maintenance. To start small, try installing a discreet door or drawer sensor that sends your phone updates—your future self will thank you for the peace of mind. How do I maintain custom cabinetry over time? Regular inspections, gentle cleaning, and smart tech integration form the cornerstone of sustainable upkeep—don’t wait for a problem to arise before acting. If you want to ensure your storage solutions stay flawless for years, consider adopting these proactive maintenance tips today.When I first tackled my tiny entryway, I underestimated the importance of precise measurements and customized solutions. One of my biggest lessons was realizing that off-the-shelf furniture often falls short in small spaces, making tailored built-ins the secret to maximizing every inch. I also learned that patience during installation—double-checking levels and securing fixtures properly—is the cornerstone of a professional look that endures. Over time, I understood that finishing touches like molding or sealing gaps elevate the entire project, transforming functional storage into a sleek design feature. These insights taught me that investing in expert guidance and paying attention to detail makes all the difference, turning cluttered chaos into an area that welcomes and organizes with grace.
Related Posts
5 Hidden Entryway Bench Hacks for 2026 Tech & EV Chargers
I vividly remember the moment I realized my entryway was…

7 Slim Shoe Storage Tactics for 2026 Entryway Benches
Walking into my hallway one busy morning, I realized my…
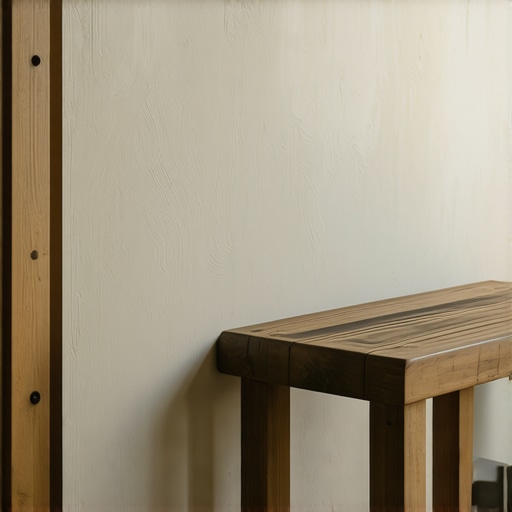
How to Anchor 2026 Entryway Benches to Aging Plaster Walls
I remember the moment vividly—trying to secure a charming wooden…