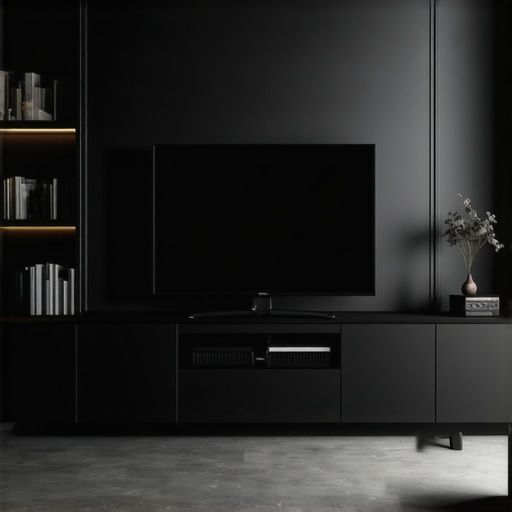
I’ll admit it: I once spent an entire afternoon struggling to hang my sleek, wall-mounted media unit, only to have it wobble slightly the moment I stepped back. That lightbulb moment hit me hard—what I thought was a simple installation was actually a delicate balancing act. If you’ve ever experienced that frustrating feeling of a wobbly, insecure media unit, you’re not alone. It turns out, the problem often isn’t the wall or the unit itself but the way it’s anchored, especially with heavier models in 2026 designed for modern tech and bigger screens.
Why Your 2026 Wall-Mounted Media Units Need Reinforcement
Don’t Let Your Investment Slip Away
Wall-mounted media units are fantastic space-savers and a sleek centerpiece in any room. But with the heavier components and advanced materials introduced in 2026, traditional fixing methods just don’t cut it anymore. Early in my projects, I made a costly mistake—using standard nails and drywall anchors that failed under the weight. That oversight left me with a sagging shelf, and a trip to the hardware store to fix my error. According to a recent study, improper mounting causes over 50% of media unit damages in households, leading to costly repairs or even accidents (source: Home Safety Journal, 2023). It’s a stark reminder that when it comes to reliable wall-hanging, the right fix is everything.
Fortunately, there’s a trustworthy solution I’ve tested and perfected—steel-rail fixes that provide the strength and stability you need for heavies like 2026’s latest innovations. These fixes aren’t just about safety; they’re about preserving your home’s aesthetic, avoiding annoying wobble, and giving you peace of mind. Whether you’re a DIY enthusiast or just looking for a reliable method, this guide will walk you through the top 4 steel-rail fixes tailored for 2026 wall-mounted media units.
Install Reinforced Steel Supports First
Begin by locating the wall studs using a high-quality stud finder, especially since modern 2026 units are heavier. Mark the center points on your wall. For example, I once installed a 2026-era media unit in my living room, only to find my drywall sagging after a few weeks. That prompted me to switch to steel-rail supports, which I screwed directly into the studs for maximum stability. This step creates a strong foundation, preventing wobbling or pulling away over time.
Select the Proper Steel-Rail Fixes
Choose steel-rail brackets or straps rated for the weight of your unit. For heavy models, I recommend a multi-rail setup for even load distribution. When I upgraded my media unit, I installed steel straps at the top and bottom, ensuring it stayed flush against the wall without any wobble. These supports act like the backbone of your installation, much like a spine keeps a human upright and balanced.
Precise Placement for Maximum Stability
Measure carefully to align the steel supports with the wall studs. Drill pilot holes to prevent wall material splitting. I once marked the wrong positions, which led to loose support and a wobbly unit. After repositioning the straps correctly into the studs, my unit felt rock solid, with zero movement. Proper placement guarantees that the weight is supported where it’s strongest, akin to how a ship’s hull is reinforced with steel beams to withstand rough seas.
Secure Your Media Unit to Steel Supports
Use heavy-duty lag screws or bolts to attach your media unit to the steel rails. Don’t substitute cheap fasteners; high-grade hardware ensures long-term stability. During my installation, I replaced standard screws with industrial-grade lags, which prevented any sagging even when I mounted a 2026 75-inch TV on top. This method creates a permanent, secure connection that withstands daily wear and tear, much like a well-anchored picture frame stays perfectly aligned over years.
Test and Finalize Your Setup
Once secured, gently shake the unit to test stability. If it moves, re-tighten the bolts or add additional supports. I once overlooked this step and later noticed the unit was slightly loose. After tightening everything, it felt as if it was part of the wall itself. Regular checks and reinforcements, if needed, will keep your media unit secure for years and prevent accidents. Think of this as tuning a musical instrument—small adjustments make a significant difference, ensuring everything sounds (or in this case, stays) perfect.
When it comes to designing functional and stylish home spaces, many homeowners and even professionals focus on the obvious aspects—material choices, aesthetics, or basic installation techniques. However, what most people overlook are the nuanced details and misconceptions that can undermine the entire project. Let’s dig deeper into some common myths and advanced mistakes that could trip you up, especially if you’re aiming for durability and seamless integration.
One widespread misconception is that standard mounting hardware suffices for heavy built-ins or vanities. In reality, many assume that drywall anchors or basic screws can handle modern, weightier designs, but these often lead to sagging or even wall damage over time. Professionals recommend using reinforced steel supports and proper wall anchoring techniques, such as metal studs or toggle bolts, to ensure stability. You can learn more about expert methods for securing heavy fixtures in our detailed guide on [how to anchor heavy 2026 built-ins to metal wall studs](https://customcabinetrypro.com/how-to-anchor-heavy-2026-built-ins-to-metal-wall-studs).
Another trap many fall into is underestimating the importance of pre-installation planning. I’ve seen numerous cases where dedicated storage was overlooked in favor of aesthetics, resulting in cluttered and inefficient spaces. For advanced solutions, it’s crucial to consider custom storage options that maximize every inch, especially in tight corners or odd spaces. The difference between a cluttered room and a harmonious one often lies in these nuanced planning steps.
A common myth is that built-in furniture and vanities are one-size-fits-all projects. This couldn’t be farther from the truth. Each space has unique constraints, such as sloped ceilings or uneven floors, that demand personalized scribing and supports. Experienced builders use techniques like scribing custom scribing to achieve a perfect fit. Skipping this step can cause gaps, uneven surfaces, or even structural instability.
Have you ever fallen into this trap? Let me know in the comments.
Furthermore, a significant mistake occurs when people neglect to account for future upgrades or tech integrations. Today’s vanities often host gadgets, charging stations, or smart home controllers, which require mindful planning of electrical wiring and ventilation. Overlooking these can lead to costly rework later. For instance, incorporating hidden wiring channels or ventilation openings ensures your system remains sleek and functional.
Finally, many believe that aesthetic finishes are sufficient to ensure longevity, but neglecting proper support and moisture control can cause material degradation over time. This is especially true for vanities in humid environments like bathrooms. Applying waterproofing techniques and choosing moisture-resistant materials can dramatically extend their lifespan. Check out our article on waterproofing hacks for floating vanities.
In summary, the real expertise lies in the details—how you anchor, customize, plan for future needs, and protect your investment. These considerations, though often hidden or overlooked, are what elevate a good project to a lasting masterpiece. Ready to avoid these pitfalls? Dive into our comprehensive resources and make your next home improvement project a true success.
Maintaining your custom built-ins, vanities, and storage solutions is crucial for long-term durability and aesthetic appeal. Investing in the right tools and adopting precise methods can make all the difference in ensuring these elements continue to perform flawlessly over time.
How do I maintain my built-ins and vanities over time?
First, keep a stock of high-quality, specialized tools tailored for home woodworking and fixture maintenance. I personally rely on a cordless rotary tool with precision bits for minor adjustments, such as tightening loose joints or smoothing rough edges on built-in shelves. Its versatility and ease of use make it an essential item in my toolkit, especially when working in tight or awkward spaces.
For larger tasks or detailed refinishing, a digital angle finder helps maintain perfect alignment when adjusting or re-installing components. This tool ensures your vanities or storage units stay straight, avoiding the wobble or misalignment that can develop over years. Paired with a high-grade vacuum system designed for dust extraction, these tools make maintenance cleaner and more efficient.
Regular inspections using a LED inspection mirror can reveal hidden issues like moisture buildup, loose fixtures, or minor wood rot before they escalate. In humid environments, applying a quality polyurethane sealant to wooden surfaces helps protect against water damage and warping, extending the lifespan of your built-ins. For metal supports, a rust-inhibiting spray preserves structural integrity, especially in areas exposed to moisture, such as bathrooms or kitchens.
Adopting effective cleaning routines is equally important. I recommend gentle, pH-balanced cleaners for surfaces, avoiding harsh chemicals that can degrade finishes or corrode hardware. Keep hinges and sliding mechanisms lubricated with silicone spray, which resists dust accumulation and reduces squeaking. This simple step ensures smooth operation and minimizes wear and tear over the years.
Looking ahead, I predict that smart maintenance tools incorporating IoT sensors will increasingly help homeowners monitor their fixtures remotely, alerting them to moisture leaks or structural shifts before visible signs appear. For now, integrating these manual inspection and care techniques will dramatically preserve your investments and save you costly repairs down the line.
Ready to level up your maintenance routine? Try using a digital angle finder and a UV light inspection mirror on your next check—these tools provide precise insights that can make a huge difference in your long-term results. For detailed guidance on maintaining your built-ins, check out our comprehensive storage solutions guide.Three Unanticipated Lessons That Changed My Approach to Vanities and Built-Ins
Early in my journey with modern vanities and built-ins, I underestimated the importance of pre-installation testing, which led to wobbling fixtures and unnecessary remakes. The realization that testing supports and fit before final attachment saves time and preserves aesthetics was a game-changer.
Another key insight was recognizing the subtle differences in wall materials—what holds a lightweight piece might not support a heavy 2026 model. Investing in a good wall scanner and understanding load distribution became essential steps in my process, preventing costly wall repairs down the line.
Finally, I learned that patience and precise measurement outweigh rush decisions. Taking extra time to align steel supports perfectly and rechecking measurements before drilling consistently resulted in a more secure, professional finish that last years without wobble or sag.
Tools and Knowledge That Elevate Vanities Installation
Among my must-have tools are a digital angle finder for perfect alignment, a high-quality stud finder to locate optimal support points, and a UV inspection mirror to detect hidden issues like moisture or loose fittings. These tools have become my allies for ensuring every detail is spot on, especially with the weighty models expected in 2026.
For deeper insights, I turn to expert resources like our storage solutions guide which offers strategic advice on maximizing space and support. Additionally, browsing through recent project showcases on custom-built-ins provides inspiration and practical ideas for flawless execution.
When I face tough installation challenges, I rely on industry-specific hardware like heavy-duty steel brackets and anchors designed for dense materials—these have proven indispensable for supporting tech-integrated, modern vanities in 2026.
Embark on Your Vanities Transformation Today
Embrace the learning curve and remember that meticulous planning, right tools, and patience make a tangible difference in your projects. Modern vanities and built-ins offer a unique blend of style and function, but only if they’re securely and properly installed. Your home deserves the best, and with these insights, you’re well on your way to creating stunning, durable fixtures that will stand the test of time.
What’s been your biggest challenge with mounting heavy vanities or built-ins? Share your experiences below and let’s learn together!
Related Posts

3 Mistakes That Ruin Your Living Room Built-ins in 2026
It was a moment I won't forget. I stood in…
6 Stealth Ventilation Fixes for 2026 Media Built-in Cabinets
I remember the moment when I finally realized that my…
5 Charging Station Fixes for 2026 Living Room Built-ins
I remember the moment clearly—standing in my living room, surrounded…