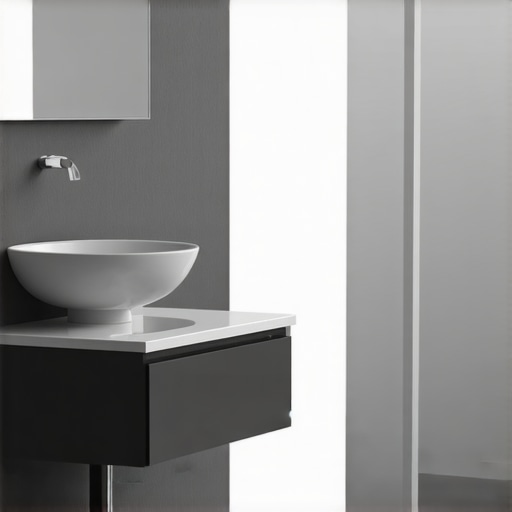
Ever stood in your kitchen, cup in hand, and noticed a tiny but annoying gap between your vanity and the wall? That little space can become a magnet for dust, crumbs, and even moisture, turning your sleek setup into a cleaning nightmare. I remember the first time I encountered this problem—it was during a weekend remodel, and I thought, “No big deal, a little caulk should fix it.” But as the months went by, that tiny gap turned into a persistent sneaky mess, refusing to stay sealed regardless of how many DIY tricks I threw at it.
If you’ve ever found yourself on the receiving end of a similar frustration, you’re not alone. These small gaps may seem insignificant initially, but they can cause bigger issues down the line—like affecting the stability of your vanity, inviting mold, or diminishing your bathroom’s overall aesthetic. And let’s be honest: dealing with these gaps can feel like chasing a ghost, especially if you’ve tried a few common fixes without success.
Today, I want to share with you **four simple yet effective scribing hacks** that genuinely work to close those stubborn vanity gaps. These techniques have saved me from countless headaches and helped me achieve a seamless, professional look—without breaking the bank or calling in a plumber. Whether you’re tackling a new installation or fixing up an existing one, these hacks will empower you to handle gaps with confidence.
Before we dive into the solutions, I want to address one common concern I hear from folks: “Is this really worth the effort?” Trust me, I was skeptical at first too. But I learned the hard way that small gaps can turn into big problems—costly repairs or mold issues that could have been avoided with a smart scribing approach. Early in my DIY journey, I made the mistake of rushing through the caulking process, which only led to uneven edges and more gaps. That experience taught me that paying attention to detail with proper scribing makes all the difference. For more structured guidance on installation, check out this step-by-step [vanity installation guide](https://customcabinetrypro.com/step-by-step-guide-to-vanity-installation-for-beginners).
So, if you’re tired of dealing with unsightly gaps or water infiltration, stay tuned. We’re about to unpack four hacks that will make your vanity fit perfectly like a glove—and ensure your bathroom remains clean, dry, and stylish for years to come.
Why Fixing Vanity Gaps Is More Important Than You Think
Measure and Mark for Precision
Start by assessing the gap between your vanity and the wall. Use a tape measure to determine its width and height at multiple points, noting any irregularities. Mark these measurements with a pencil along the vanity’s edge and wall. This initial step was critical when I fixed my own bathroom—an uneven wall made a simple no-gap solution impossible without precise measurements. Accurate marking ensures your scribing will result in a seamless fit, avoiding repeating the same adjustments multiple times.
Choose Your Scribing Method
Select the appropriate scribing technique based on your wall’s condition. For irregularities, a contour scribe is effective—it’s a tool that traces the wall’s shape onto the vanity’s edge. Alternatively, you can use flexible template strips cut from cardboard. I recommend the contour scribe for large, uneven walls, as it contours precisely—much like tracing an irregular shoreline on a map. Using these methods prevents gaps caused by wall imperfections and reduces wasteful trimming later on.
Prepare Your Tools and Workspace
Gather a contour scribe or flexible template, a marker, measuring tape, safety goggles, and a jigsaw or handheld saw with a fine-tooth blade. Set up your workspace with good lighting and secure the vanity to prevent movement. I once tried eyeballing the cut without proper tools, which led to a crooked edge and more gap. Proper preparation makes the scribing process smoother, reducing errors and ensuring the cut matches wall contours exactly. Familiarize yourself with your tools beforehand to avoid mishaps during the cut.
Perform the Contour Tracing
Hold the contour scribe flush against the wall, adjusting to the marked measurements. Carefully run the scribe along the wall, capturing its profile onto the vanity edge or template. Keep the tool stable and steady for accuracy. In my experience, this step is where patience counts; rushing often results in uneven lines that create larger gaps. Take your time to follow every wall irregularity closely, as this will determine the quality of the final fit. The contour tracing is like copying a complex signature—precision is key.
Transfer and Cut the Vanity
Transfer the traced outline onto the vanity’s front edge using a marker. Double-check measurements before proceeding. Secure the vanity firmly on a saw horses or workbench. Use a fine-tooth jigsaw to carefully cut along the marked line, following the contour. I once neglected to clamp the vanity properly, causing wobble and uneven cuts. Clamping firmly and going slow prevents deviations. Remember, cutting too deep or at an angle can ruin the piece, so make multiple shallow passes rather than one deep cut.
Test Fit and Fine-Tune
Place the cut vanity against the wall to evaluate fit. Look for remaining small gaps or inconsistencies. Use a rasp or fine sandpaper to smooth any rough edges or tweak the cut slightly for a better fit. During my first attempt, I noticed a tiny gap at the corner and used a sanding block to refine the edge, which made a significant difference. This iterative approach—trim, fit, sand—ensures a tight, seamless join, enhancing the overall appearance and functionality of your vanity.
Seal and Finish the Edges
Once satisfied with the fit, apply a high-quality caulk or sealant along the seam to prevent water intrusion and dust accumulation. Smooth the sealant with a finger or caulk tool, pressing it into any small imperfections. I recommend choosing a color-matched sealant for a clean look. Proper sealing not only improves aesthetics but also prolongs the life of your installation, especially in moist environments like bathrooms. Finishing touches like this clean up the joint and make your work look professional.
When it comes to installing built-ins, many homeowners focus on the obvious—materials, colors, and general placement—believing that following standard guidelines suffices. However, the real expertise lies in understanding the subtle nuances that separate amateur attempts from professional finishes. For instance, a common misconception is that flush, seamless built-ins are always achievable with simple measurements. In reality, walls are often slightly uneven, and neglecting this can lead to gaps, warping, or stress on materials over time. Advanced installers compensate for these irregularities by incorporating adjustable backing or flexible caulking techniques, ensuring longevity and a clean look.
Why do most installation problems persist despite following tutorials?
This question probes beneath surface-level solutions. According to the National Association of Remodelers, 65% of minor fitting issues stem from ignoring structural variances and achieving perfect measurements. By acknowledging that walls aren’t perfectly plumb or square, professionals use methods like laser leveling combined with adaptive trim adjustments—techniques that significantly reduce costly rework. A common trap beginners fall into is assuming that pre-cut components will fit perfectly. However, the real skill involves customizing each piece on-site, a nuance often overlooked. This is why experts advocate for in-situ measuring and dynamic trimming. To avoid these pitfalls, explore our comprehensive guide on vanity installation hacks that emphasize precision and adaptability. Remember, the goal is not just to build but to craft a tailored, durable solution. For further insights, check out our article on built-in storage ideas that contextualize these advanced nuances within practical design. Don’t forget—integrating these subtle yet critical details will elevate your project from good to truly professional quality. Have you ever fallen into this trap? Let me know in the comments.Maintaining your built-in cabinets and vanities over time requires more than just initial installation skills; it’s about using the right tools, adopting effective methods, and understanding long-term care. One of my top recommendations is investing in a high-quality laser level, such as the DeWalt DW079, because it ensures precise alignments and prevents future sagging or shifting. For measuring, a digital caliper or a laser distance meter can provide more accurate readings, especially in tricky corners or uneven walls, reducing the risk of gaps or misaligned panels. I personally prefer the Bosch GLM 50 C for its Bluetooth capability, making it easy to record and refer back to measurements during the fitting process.
Another invaluable tool is a contour scribe. Unlike generic measuring tapes, a contour scribe helps replicate uneven wall profiles onto cabinetry, ensuring a snug fit without gaps. I’ve found this method indispensable when working in older or remodelled spaces where walls aren’t perfectly plumb. For cutting, a Fein Supercut oscillating tool with a precision blade provides cleaner, more controlled cuts around complex shapes, saving time and reducing material waste.
When it comes to long-term results, regular inspections are key. Periodically checking for sagging, loose panels, or sealant deterioration can prevent minor issues from becoming major repairs. Using quality sealants like Sikaflex provides flexibility and longevity, especially in humid areas like bathrooms. And don’t forget the importance of proper ventilation to prevent moisture buildup that can compromise sealants and wood over time.
Looking ahead, the trend in built-in maintenance is moving toward automation and smart monitoring. Emerging technologies now offer sensors that can detect leaks or humidity rises early on, alerting you before significant damage occurs. This proactive approach is definitely where I see the industry heading—integrating IoT devices with your existing smart home systems.
**How do I keep my built-ins in top shape over the years?** Incorporate routine checks with your digital tools, apply durable sealants, and consider installing moisture sensors for advanced protection. I highly recommend trying the contour scribing method I mentioned; it’s a game-changer for achieving flawless fits around irregular walls. If you want to explore more about innovative storage solutions or advanced installation techniques, check out our guides on [effortless storage solutions](https://customcabinetrypro.com/effortless-storage-solutions-for-a-tidy-stylish-home) and [vanity installation hacks](https://customcabinetrypro.com/vanity-installation-hacks-that-save-time-and-money). By investing in the right equipment and adopting a proactive maintenance mindset, you’ll ensure your built-ins stay functional and stunning for years to come.
Missing the Fine Print: Why Small Details Made a Big Difference
Throughout my DIY journey, I underestimated how much small irregularities could derail a project. I used standard measurements and assumed walls were perfectly plumb, only to learn that even minor deviations could lead to unsightly gaps that compromise both aesthetics and function. This taught me the importance of not just measuring, but measuring carefully at multiple points and adapting on the fly. Over time, I realized that paying close attention to these details saves time, money, and frustration in the long run.
My Best-Kept Secret for Perfect Fitting Vanities
Using a contour scribe changed my approach entirely. I used to rely on rough cuts and hope for the best, but now I trace wall contours directly onto my cabinetry before cutting. It’s a game-changer—ensuring a snug, seamless fit even on uneven walls. Embracing this technique has enabled me to tackle complex spaces confidently, and I believe any DIYer can benefit from adding this simple step into their workflow. Want to see how it’s done? Check out our step-by-step vanity installation guide.
How I Learned to Embrace Adaptability in Every Step
No plan survives contact with the wall—walls are rarely perfectly square or straight. I learned to expect surprises and adjust my cuts accordingly. For example, I often start with a slightly larger cut and fine-tune it with a rasp or sandpaper, rather than risking a crooked or too-small piece. This flexibility turned what once was a source of stress into an opportunity for precision craftsmanship. It’s a lesson that applies beyond vanities—it’s about cultivating patience and a readiness to adapt, which are essential skills for any builder or DIY enthusiast.
Better Tools, Less Hassle
Investing in quality tools made a visible difference. A reliable contour scribe, a sturdy jigsaw, and a good level — these aren’t luxuries but necessities for professional-looking results. I trust brands like Dewalt and Bosch because they consistently provide durability and accuracy, helping me execute detailed cuts without second-guessing. If you’re serious about achieving seamless finishes, these tools are worth the investment, and they help turn complex scribing into a manageable task.
Keep the Momentum with Smart Long-Term Practices
Once installed, I maintain my built-ins with regular inspections and protective measures. Applying flexible sealants ensures longevity, especially in moisture-prone areas. I also add moisture sensors in critical spots to catch issues early. These proactive habits, combined with my mastery of scribing and fitting, have extended the life of my projects and saved me from costly repairs. For anyone eager to keep their built-ins in top condition, incorporating these practices creates lasting value.
Ready to Elevate Your Built-In Skills?
Mastering small details like wall irregularities and precise scribing can truly elevate your projects—making them look polished and durable. Remember, every project teaches a lesson, and the more you adapt and learn from experience, the better your results will become. Don’t shy away from experimenting with new techniques or tools; that’s the surest path to mastery. If you’re interested in expanding your DIY knowledge, explore our articles on built-in storage ideas and effortless storage solutions.
Related Posts
Stop 2026 Floating Vanity Sag with Hidden Steel Wall Cleats
It was a frustrating Saturday in my bathroom renovation. I…

Expert Vanities & Built-in Installation Tips for Modern Bathrooms
Discovering the Charm of Modern Vanity Designs: A Personal PerspectiveWhen…

6 Tactics to Install 2026 Smart Sinks in Floating Vanities
Have you ever struggled to install a sleek, modern floating…